Considering its power and low cost, XnView is a must-have
XnView is a photo browsing/editing/metadata tool. It operates in a files and folders environment, like Photo Mechanic, and unlike Adobe Lightroom. It’s available at a price that suggests that there’s no reason not to have a good tool for working with metadata. You might consider it a poor man’s Photo Mechanic. For companies, XnView costs € 26. For individuals, it’s FREE! XnView is available for Mac, Windows, and Linux systems.

Photo Mechanic notwithstanding, I have long recommended that every photographer and photo editor have XnView in their toolkit because it can open so many file types – over 500, according to the XnView website. It’s pretty good at opening corrupted files or files that have the wrong filename extension. And for anyone who prepares photos for use on the web but doesn’t need to edit thousand-frame takes, and, let’s face it, just isn’t going to shell out a hundred and fifty bucks for Photo Mechanic and hundreds more for Photoshop, it’s a top choice.
If you work on Linux, XnView is the runaway best choice (darn near the only choice) for pro level photo selection and metadata operations.
It’s not all wine and roses
All that said, in XnView, you won’t find the stability or the finely-honed user interface of Photo Mechanic or the Adobe Creative Cloud products. There are some rough edges. Some options are a bit technical (which is sometimes a good thing and sometimes not) and you’ll find some unimplemented features or inconsistencies. When thoughts of that sort sneak up on you, pause and remember that you just got a powerful and complex tool for 30.83 US bucks. Or nada. Bupkis. Zilch. As the case may be.
This How-To will only cover working with metadata in XnView. We come back to talk about using XnView (and our other software options) for optimizing photos for the web later. As far as the basic operation of the program is concerned, I leave you to the XnView website and YouTube.
I’ll try here to help you navigate the confusing or nerdy patches.
Video How-To: Work with metadata in XnView
Video Part 2: Customizations and more functionality
Working with XnView in the thumbnail browser
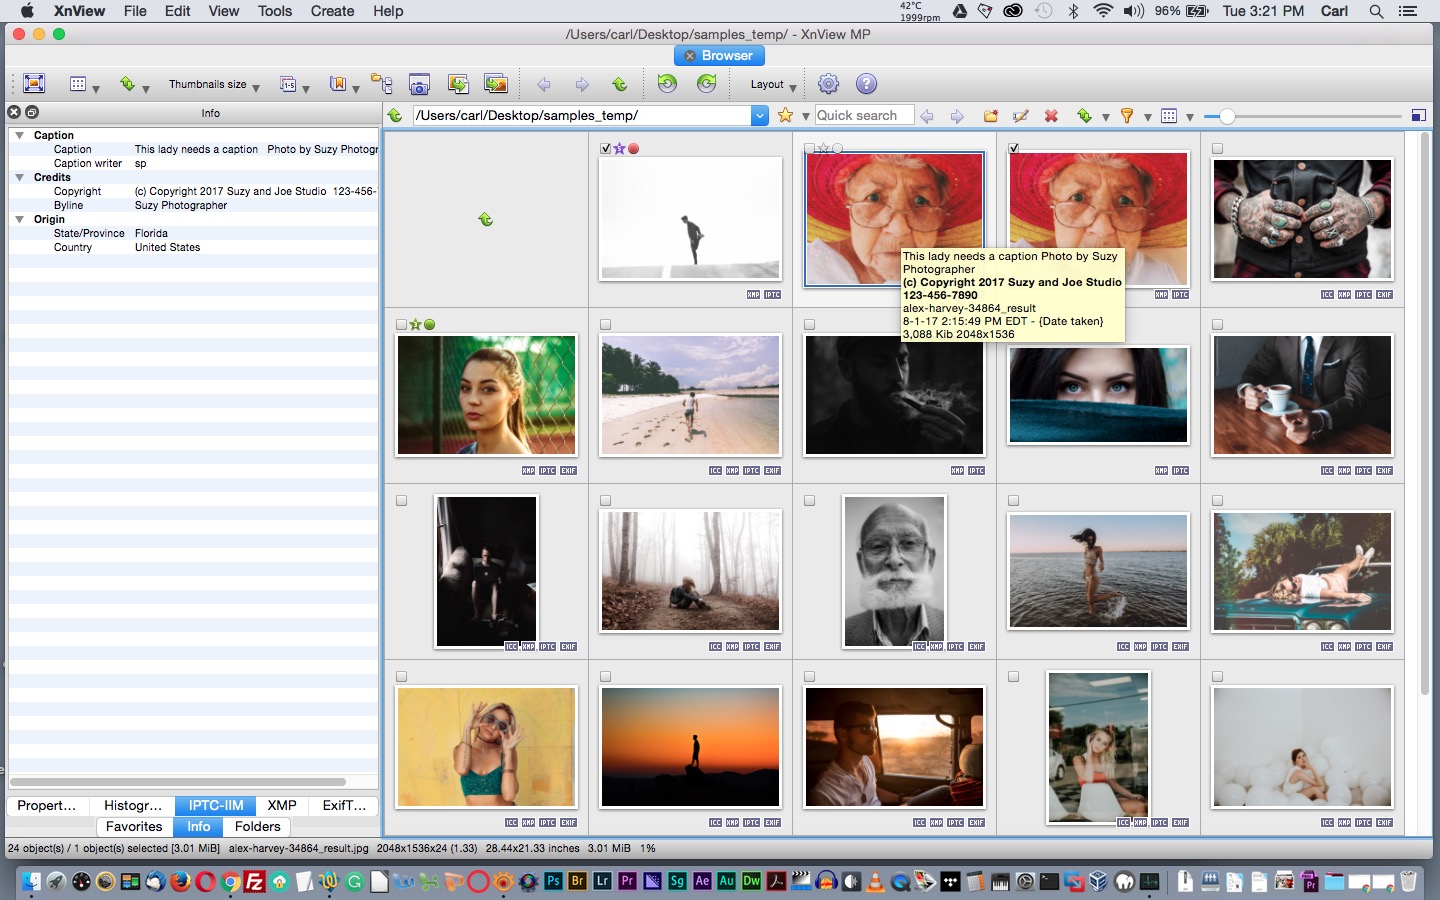
XnView has a dockable, tabbed info pane. I keep it on the left, but there are many interface options.
-
- Open a folder by single-clicking on it in the folder navigation tree.
- Now select the info pane or tab and choose a metadata category, such as IPTC-IIM. If you select

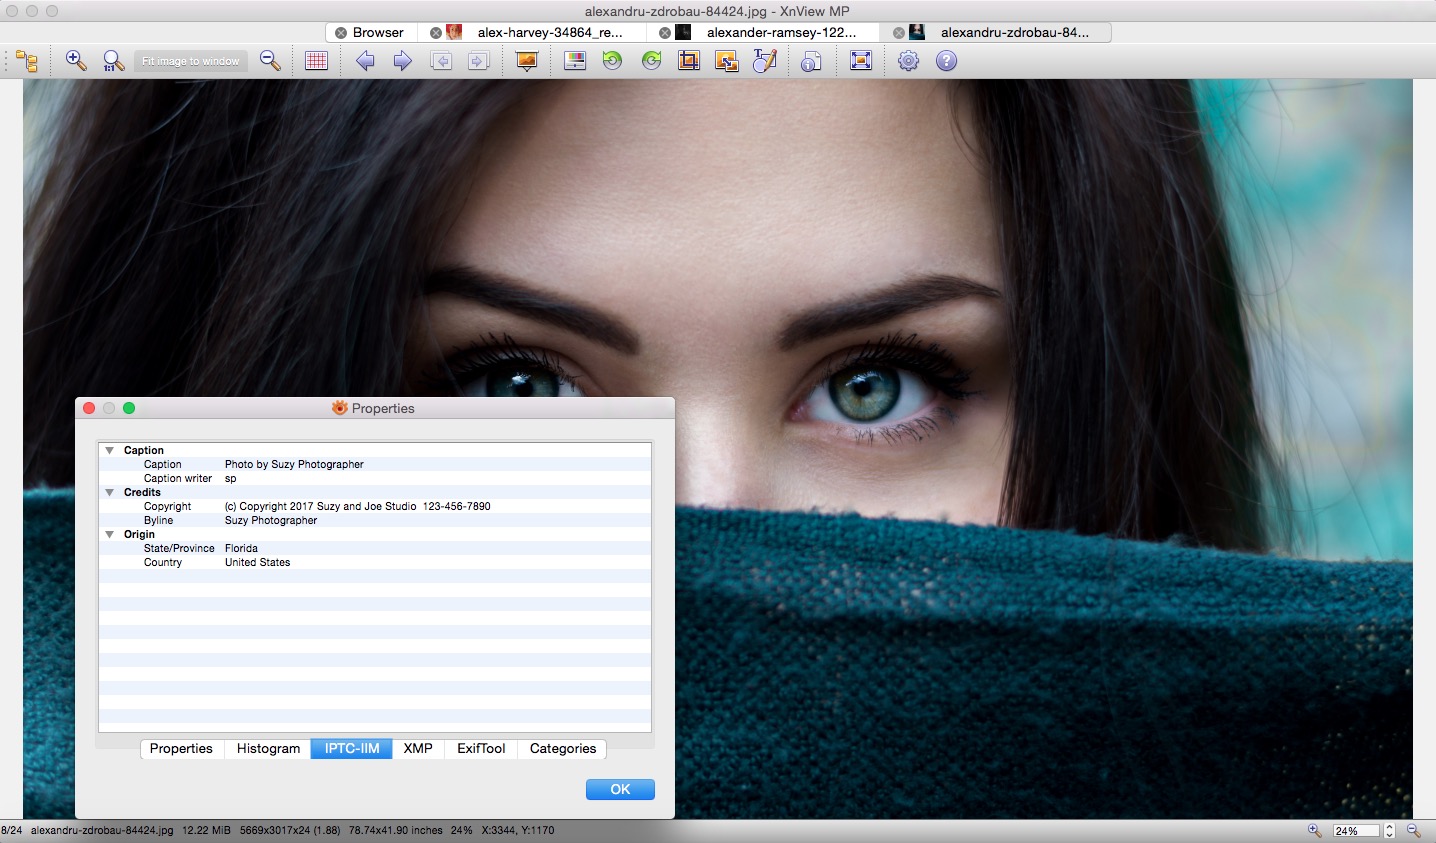
Metadata can be viewed in the Info Pane at left, or, optionally, in a tooltip in browser mode. The slide mount labels can also be configured to display metadata. a photo in the thumbnail browser, you will see a read-only view of metadata for that picture.
The pane will show only fields that are populated. You can select various tabs in the pane. ‘IPTC-IIM’ will show you all of the populated IPTC fields you can edit in XnView. “XMP” shows you the populated XMP fields, including the ones that are in common with IIM fields. “Exiftool” shows a combined view of all the fields returned by ExifTool for that photo.
There is a customizable tooltip that will show selected metadata when hovered over a thumbnail. I chose to show the Caption, Copyright, Filename, Create date, File Size, and Dimensions in my tooltip. More on customizing a tooltip later.
If you customize it properly and elect to display it, the thumbnail browser’s slide mount label can present chosen metadata. I’ll talk about customizing that later, as well.
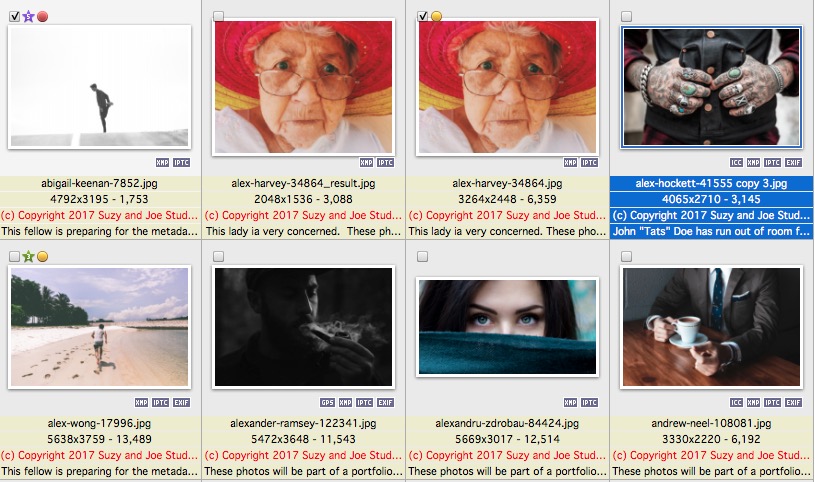
Icons appear on the slidemounts in the browser to indicate what categories of metadata exist for that photo as well as rating, color marker, and tagging (persistent selection) icons.
Preview/Edit tab
If you double-click on a thumbnail, a large preview will open in its own tab.
From this preview, you can crop and make adjustments to the image. There is a properties button
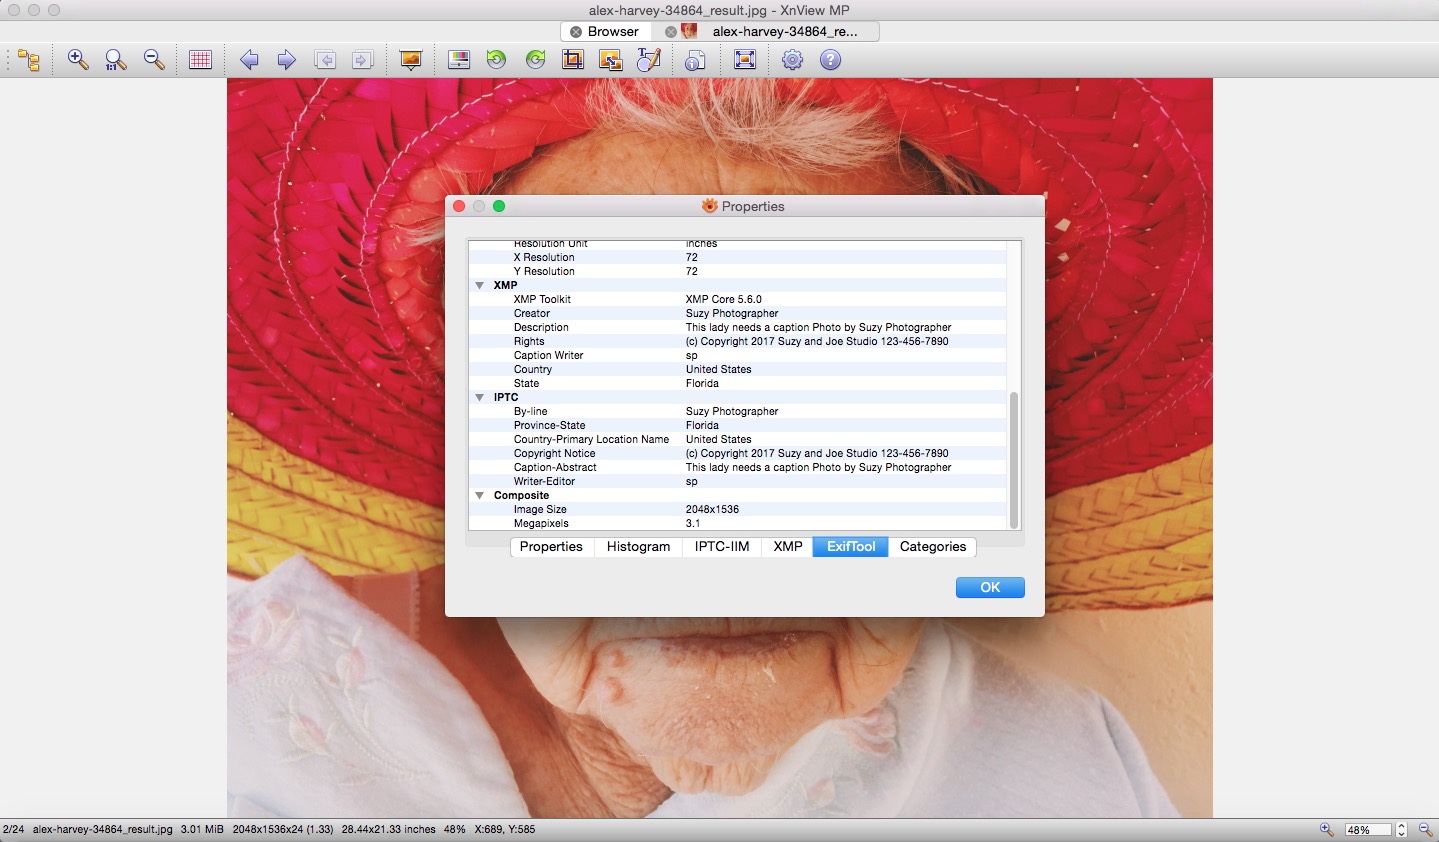
in the toolbar that will open a tabbed floating metadata window with the same information that’s available in the Info Pane of the thumbnail browser. The Properties window can also be called from the right-click context menu.
Using the metadata editor
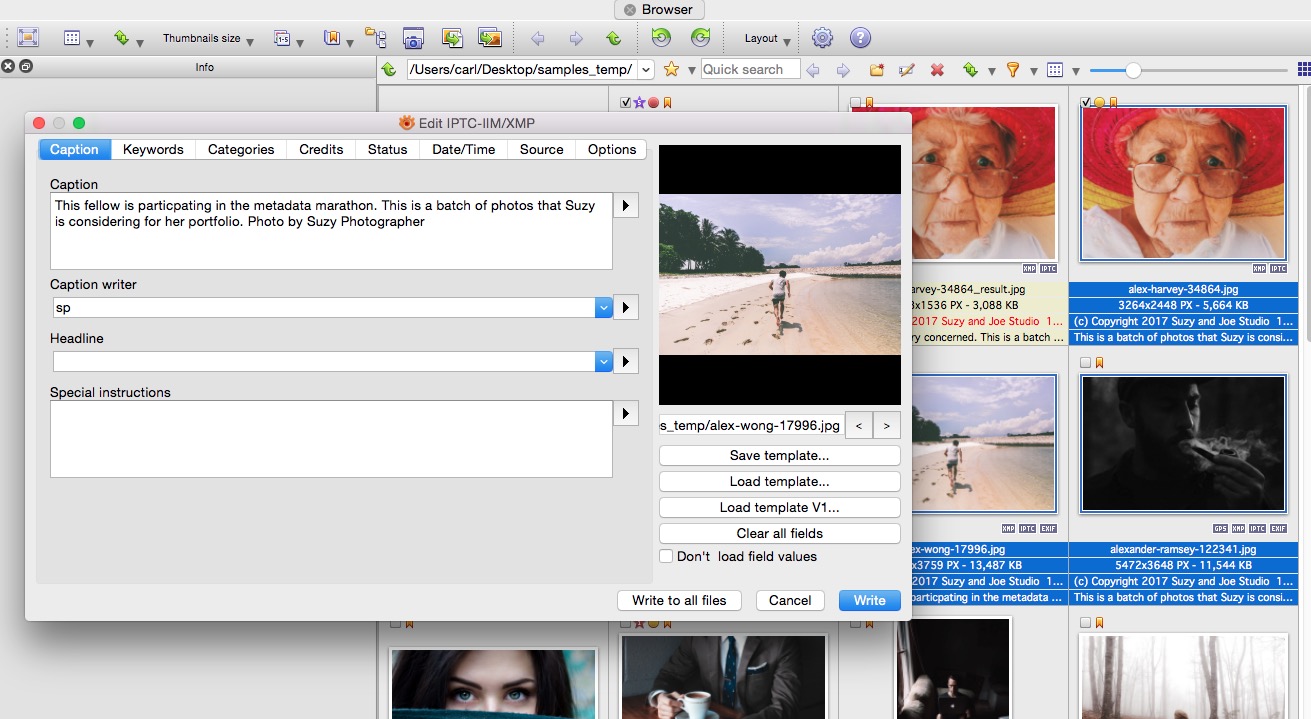
To add metadata to a photo or photos, select photo(s) and press ‘CMD/CTL + I’ to open the IPTC-IIM/XMP editor dialog. This dialog can also be called from the main menu with ‘Tools > Metadata > Edit IPTC/XMP.’
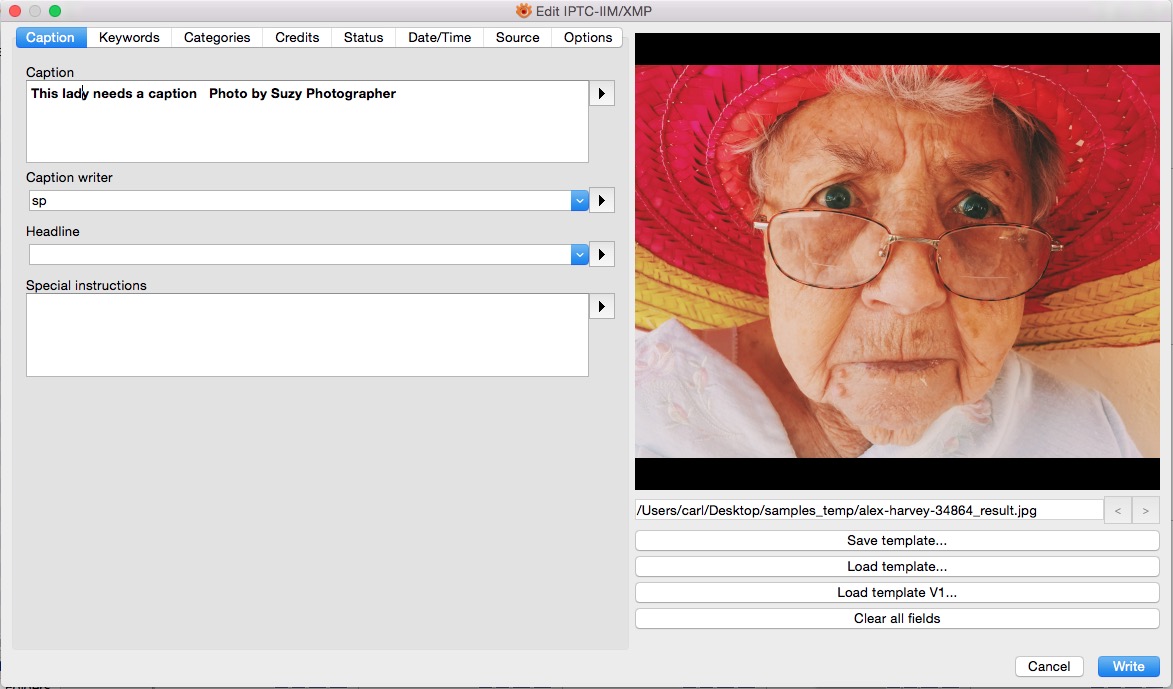
The IPTC-IIM/XMP editor is tabbed for different categories of fields and has a preview of the selected image. If more than one image is selected, there are navigation arrows allow you to move between them.
The big caveat
When you look at this dialog, you’ll immediately notice XnView’s greatest limitation as a metadata editor: XnView can only write to the core IPTC fields. It can write to those core fields in both the IIM and XMP formats. But you can’t write to the extended IPTC fields (The ones that only live in the XMP data.)
Faithful readers know that I always tell people to never assume that a given user out the world will have the capability to see more than the most basic of IPTC fields. And often, they can only see the caption. You should plan your metadata with that in mind. Nevertheless, I really do like some of the extended fields. Rights Usage Terms, is a particular favorite. I miss it here.
You can read all the fields in XnView, but you’re limited to writing the basic ones. (Remember what you are getting for the price you did or didn’t pay. Glass half full.)
Using templates
‘Save Template’ and ‘Load Template’ buttons appear at the lower right of the dialog. They work pretty much as you would expect, with one twist. (You can safely ignore the ‘Load V1 template…’ button. It’s about backward compatibility with old versions.) Templates are discussed in more detail in this post.
Download a starter template here
In XnView, you can overwrite a template by simply selecting it in the ‘Choose Template’ popup that appears when you click ‘Save Template’. That means you can use one or more templates as a clipboard of sorts. If you want to copy all IPTC metadata from a photo and paste it on one or more photos, it only takes two clicks to save the information to a reusable template. You can then paste the information by loading the reusable template and clicking ‘Write” on the target picture. It’s not as slick as IPTC Snapshot in Photo Mechanic or Metadata Sync in Lightroom, but it gets the job done.
There are flyout arrows next to most fields. These allow you to insert metadata, like Exif data, into the field. If you choose data in the flyout, the actual data, rather than a variable representing the data, is inserted into the field immediately. So you can’t use this feature to put variables in a template, in the way that you can in Photo Mechanic. (There are other places in XnView where variables do work in the customary way, but not here.)
Drop-down lists under most fields allow you to choose recently-used values for each field.
Captioning photos
To apply metadata to a batch of photos:
-
- Select them
-
- Open the IPTC-IIM/XMP editor and load a template.

Captioning multiple photos in XnView. Note the information displayed on the slide mount labels.
- Open the IPTC-IIM/XMP editor and load a template.
-
- Add any caption and keyword data that is the same for all the pictures.
-
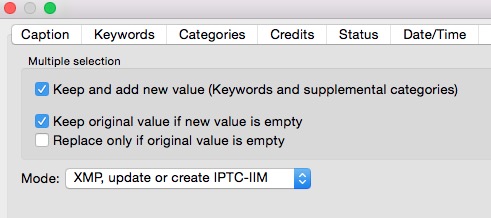
- Look on the options tab to be sure you’re OK with the overwrite options. “Keep and add new value” only affects Keywords and Supp Cats (The latter are deprecated. Ignore them unless your client says otherwise.) “Keep original value if new value is empty” is a usually a good idea. And, “Replace only if original value is empty” isn’t usually what I want, but it seems like it could be handy if, say, you don’t want to accidentally overwrite a copyright field.
-
- Finally, there’s an option for writing only to IIM, only to XMP, or synchronizing the two in your choice of directions. I keep mine set in the XMP-to-IIM direction. Barring rather odd circumstances, you want your IPTC data synchronized between the two formats. Which direction normally doesn’t matter.
-
- The options are sticky. You don’t have to look at this tab every time. But it never hurts.
-
- Click ‘Write to all files’ to save the metadata in the dialog to your photos. (Like Photo Mechanic, XnView writes metadata losslessly. So, no worries about damaging your images.)
Check the options before applying metadata to multiple images.
- Click ‘Write to all files’ to save the metadata in the dialog to your photos. (Like Photo Mechanic, XnView writes metadata losslessly. So, no worries about damaging your images.)
-
- Next, you’ll go back and open the editor and add per-picture caption and keyword data. Note that when you edit a field, you’ll be overwriting the whole field with new data. So, say, in the Caption, you would simply insert your caption ahead of the already-existing information. You can’t prepend or append in the way you can in Photo Mechanic.
Metadata considerations when you save photos
There are at least three ways to save files in XnView, and each contains metadata options.
Export
First, there is ‘Export’, available in the Thumbnail browser (One file at a time). From the main menu, choose ‘Tools > Export’, or press ‘CMD+OPTION+S’ on Mac, or ‘CTL+ALT+S’ on Windows or Linux
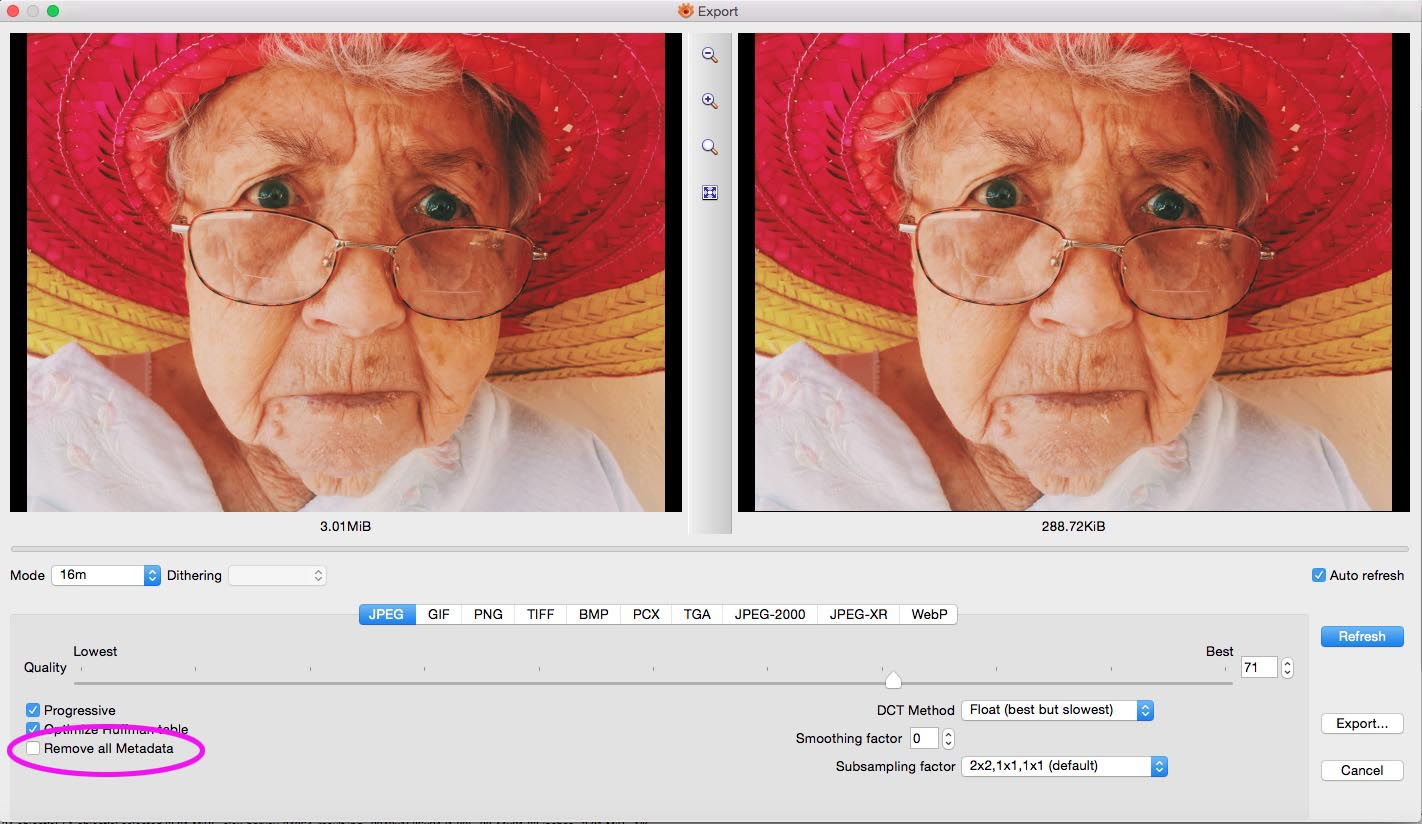
‘Export’ opens an interactive Save-as dialog. In it, in addition to very granular JPEG options, you have a tickbox that allows you to strip away all metadata as you save the photo. Obviously, barring strange circumstances, you need to make sure that’s not ticked.
Save-As
From the large preview/editor tab, you have an ordinary-looking Save-As function at ‘File > Save-As’. There are no options for this one. Default file saving options for each writable file type are set in the Preferences. (Preferences > Formats > Write > and choose your file type) You can also access

these settings from the main menu at ‘File > Format Settings’. This time, there are individual tickboxes that preserve, rather than delete, various categories of metadata.
Remember that your IPTC metadata lives in both IIM and XMP formats. So, you don’t want to delete either. Also remember that ‘File > Format Settings’ opens the global format preferences pane, just as if you navigated from ‘Preferences’. Whatever you set here is sticky. It will become the default.
‘CMD/CTL+OPTION/ALT+S’ will open the Export dialog from the large preview. (Oddly, Export isn’t available from the Tools menu in this view.) I’d use this method of saving with non-default settings, instead of changing my defaults with ‘File > Format Settings’. But that’s just me.
Batch convert
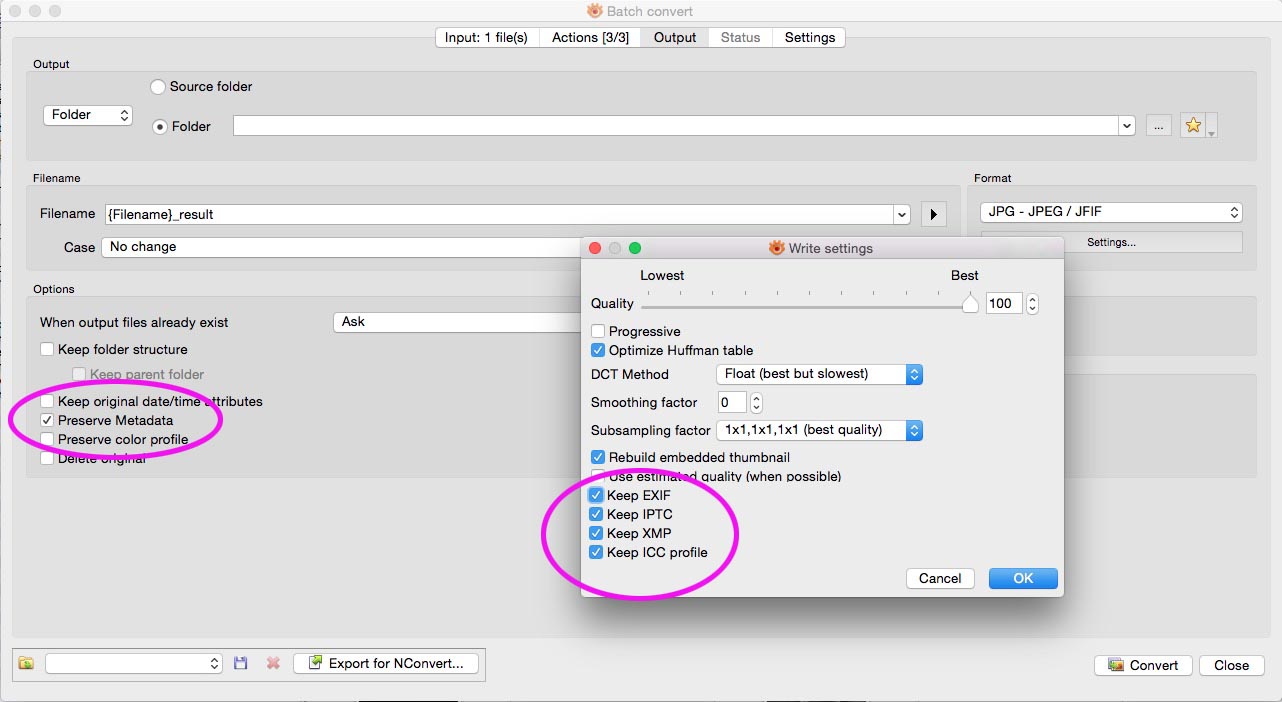
Then there’s the powerful Batch Convert command (Tools > Batch Convert). In Batch Convert, there are at least two options that affect metadata.
On the Output tab, there’s a tickbox for ‘Preserve Metadata’. And, for each output file format, there’s a button for ‘Settings…’ There, you’ll find the keep-categories-of-metadata tickboxes in a dialog similar to the ‘Format Settings’ one. Frankly, I don’t know which of the tickboxes in Batch Converter takes precedence over the other.
And, in Batch Convert, you can enable batch actions that write or clean metadata, or both. Note that the batch convert action to write metadata overwrites existing values. There
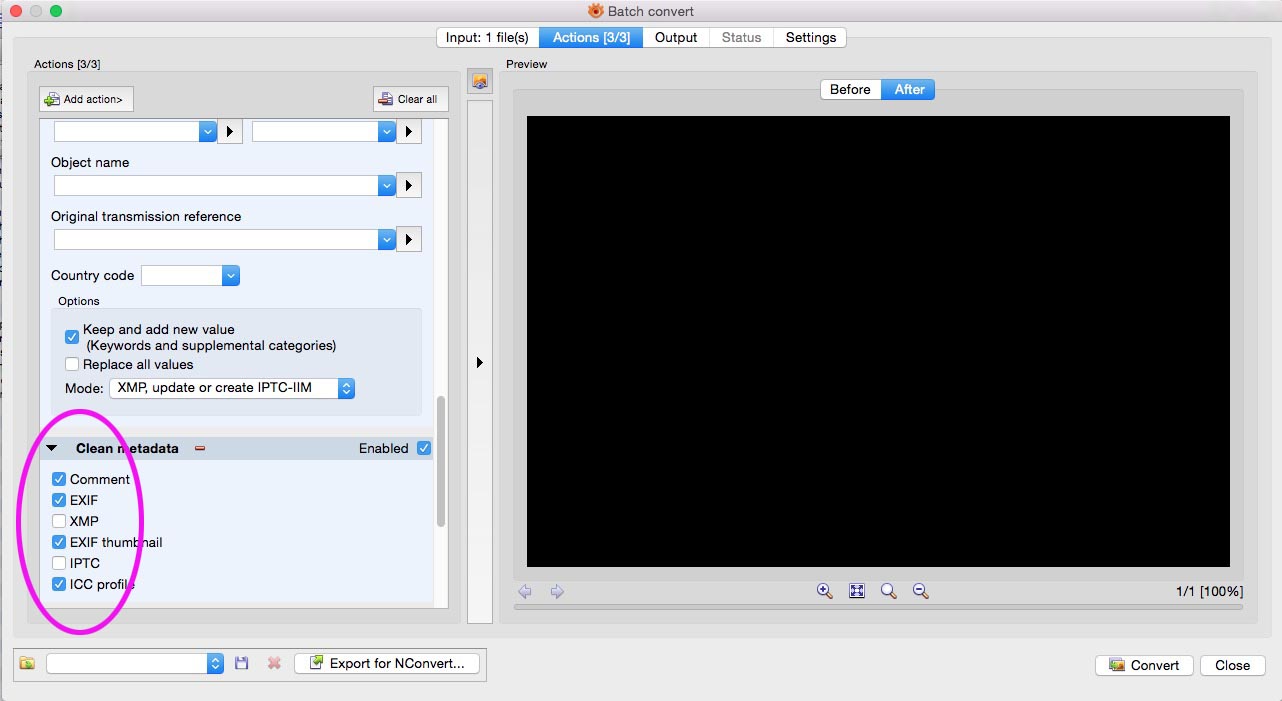
is no append function. The flyouts by each field here insert into the field variables which will be replaced with the specified value on a per-picture basis.
There will be more about Batch Convert in a future post, when we talk about using XnView to prepare images for the web.
Other metadata functions
Tooltip
You can choose what the tooltip displays in the thumbnail browser in XnView, making the tooltip a very useful gadget.
Go to ‘Preferences > Browser’ to find the tooltip’s settings. There’s an ‘Insert >>’ button at the bottom of the (huge) input field. Use it to insert variables. You can type in words that will always stay the same, like “Photo by: ”, if you’d like.
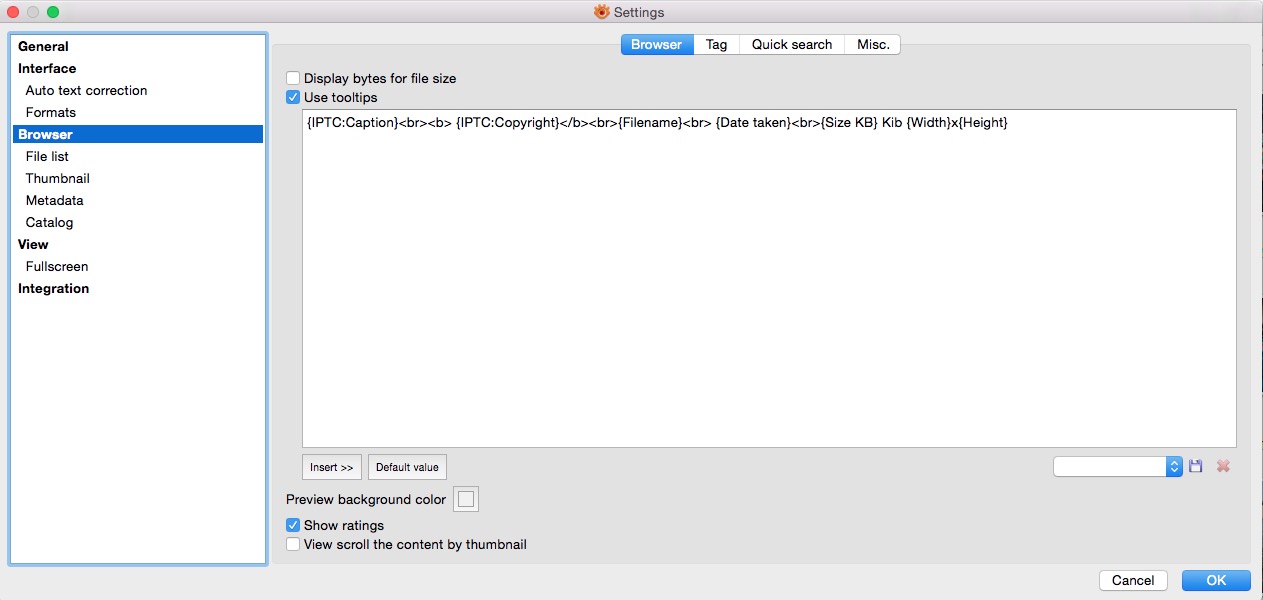
There are two more pieces of big news here. You can insert some HTML tags, like “<br>” to add a line break and “<b> and </b>” to bold text. And, you can save and load your tooltip templates. So, you can have several for different occasions. That’s very cool. You don’t have a keystroke to turn tooltips on and off – that has to be done from Preferences – but that’s not such a big deal. The tooltip is quite compact and unobtrusive. I just leave it on.
Slide mount labels
At ‘Preferences > Thumbnails > Labels’, you’ll find a tool for configuring the labels that appear on the slide mounts if you select ‘View > View As > Thumbnails + Labels’. You can insert any metadata field from the list on the left as a line in the label, and you can select up to six custom fields from the bottom of the list and populate them with variables. You can even set the color for each line in your label. I made mine with the copyright statement in red. This feature could be a time-and-lawsuit saver if, say, you were using XnView to check photos before you publish them on the web.
Note that there’s another “Labels” tab in the preferences, at ‘Preferences > Metadata > Labels’. This one is where you assign names to the color labels used for sorting images. Yeah. That’s confusing. (But consider how much you did or didn’t pay for the program before you complain about little deals in the UI!)
Clean (delete) metadata
Under ‘Tools > Metadata’, you’ll find ‘Clean…’ This opens XnView’s dialog for deleting metadata. The advice that appears in Photo Mechanic’s dialog for the same function does not appear, but perhaps it should: Do this on copies only, never on a photo that you are going to keep. In this dialog, you can select categories of metadata and remove them from a file. Interestingly, you can strip the Exif thumbnail or GPS data from the Exif while leaving the rest of it. But you can’t do it the other way around – strip all the Exif metadata, except the GPS. Remember once again that your IPTC data is in both the IPTC-IIM and XMP sections and you need both copies.
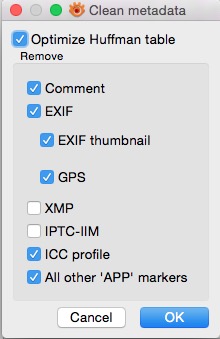
In the Clean Metadata dialog, you’ll also find a curious tickbox – for ‘Optimize Huffman Table’. Optimizing the Huffman table is a lossless operation that makes JPEG files a little smaller. It saves you a few percent of file size without penalty. XnView offers this as an option in its file saving settings. But from here, you can re-do the Huffman table in an existing file without inflicting the damage of re-saving the image itself. That’s a handy feature. I would never have looked for it in this particular dialog. But now you know. Knowledge is power.
GPS and Exif thumbnail
There’s an edit GPS information dialog in this submenu. It does exactly what it says. Nothing fancy.
There’s also an option for rebuilding the Exif thumbnail, for all those people who want unnecessary stuff in their files. This could be useful if, for some reason, you have a picture where the embedded thumbnail doesn’t match the photo itself. Assuming you actually want an embedded thumbnail. I guess.
File Listing
‘Create > File listing…’ opens a dialog for creating text files or spreadsheets presenting the metadata from multiple images. This could be handy if you need cheat sheets of captions, perhaps to post on file sharing services with folders full of photos. Experiment to find a configuration that
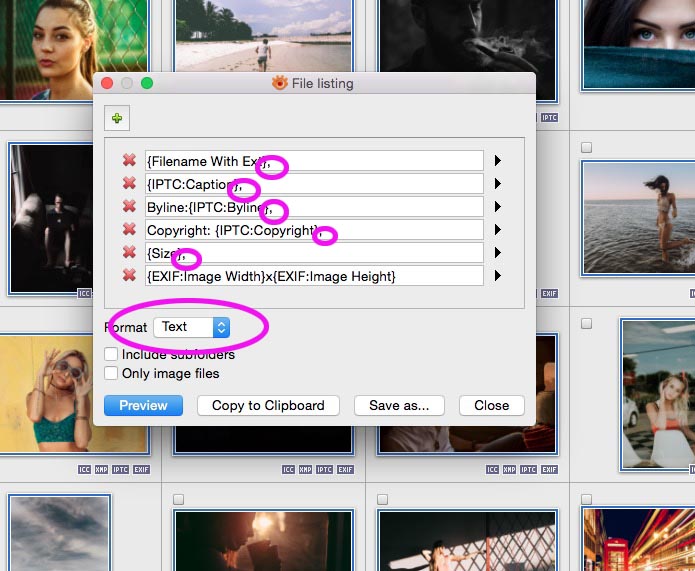
works for you. I found I got the best results if I placed commas after each item that I wanted, then saved the results as a text file. I then changed the file extension on the text file from “.txt” to”.csv” and opened the file as a spreadsheet. (See illustration). The equivalent feature in Photo Mechanic is a lot friendlier.
Printing
The print dialog allows you to create metadata-annotated prints and contact sheets. Its operation is pretty obvious. You can, of course, print to PDF if you need to send someone a contact sheet, or for posting with photos on a file sharing platform, like Dropbox, that doesn’t display captions.
So there you have it. It’s not Photo Mechanic. It isn’t as polished. It wasn’t designed to be used by people in extremely stressful situations, like war zones. But XnView gets the metadata job done. It does a few things that no other program can, and is on offer at a price that leaves no excuse for not paying proper attention to metadata, whether you’re a photographer or just someone who is responsible for a website.
In future posts, we’ll be back with How-To’s on using XnView and Photo Mechanic in a website production workflow, and specifically look at how each approaches optimizing images for the best possible page load times. Please speak up in the comments. And check out our other software How-To’s, including on working with metadata in Photo Mechanic and Adobe Lightroom.
Hi, i’m tring to replace Lightroom with XnviewMp, but i really don’t understand which field in Xnview i have to fill for the title.
In LR there is a Title field, but in xnview?
Thanks!!
Ale
Hi,
is there a way… or better… what is the best way to add a Title to a photo with xnviewmp? In the past i’ve used only Lightroom and in LR there is a “Title”..but i don’t find anything similar in xnview.
Thanks,
Ale
The Object Name field (Title – same field by a different name) is in the Source tab in XnView’s IPTC editor dialog.
Different software puts fields in different sections in the interface (Photo Mechanic puts this field under Status, for example.) And different programs refer to given fields using different names, sometimes names that are officially recognized in the standard and sometimes not. This one can be “Object Name”, or “Title”. (or “Title/Object Name”, for that matter) Either is okey-dokey according to the standard. The caption is officially “Description/Caption”. I can’t even count all the different names applied to the Byline/Author/Creator/Photographer field.
Sometimes the different names make sense for different user groups. Sometimes I think developers go around renaming stuff just for the sport of it 🙂
Hi Carl,
Thanks for the clear explanation ! Metadata is a very valuable crusade.
But is there a simple way to batch export my EXISTING db categories to the files’ metadata ?
I want to migrate a collection of pictures to Synology Photo Station, and still access there as keywords the DB categories I used to define in XnView. There are thousand of files, so editing manually IPTC for each picture is hardly an option.
I couldn’t find any option for that in the batch export tool as now.
Hi Jeremy,
I’m sorry I haven’t replied sooner. I somehow missed your comment in the queue.
I just went through the XnView changelogs back to 2014 and I didn’t find any mention of Pierre adding the feature that you (and several others) want to do that. That feature has been requested for years now.
-Carl
That tells me all that I need to know to reject using this software. “Requested for years”
Our comments function misbehaved for reader Bo De Lang, who has found a solution to Jeremy’s problem. I’ll paste in his findings here.
Without further ado, over to Bo:
I’m happy to report that I do have a way in which this can be achieved using XnViewMP.
1) set the categories for the image
2) in Preferences|Browser|Metadata|IPTC&XMP under Keywords tick Export DB category to XMP Subject and IPTC Keyword. Tick either one or both of the subheadings. Tick Write hierarchical keywords if appropriate.
3) with the images to be updated selected in the Browser, choose View|Update files from catalog
The image(s) now have the XnView categories written as XMP (hierarchical) Subjects and XMP keywords
– Bo De Lang
Edit Metadata allows you to select such things as filename to be inserted in a metadata field, e.g. Captiion.
This is fine on a one-at-a-time usage.
But if you select multiple photos and use the Insert Filename option for the caption, *all* photos get the filename of the *first* file as their caption.
I certainly expected this to occur *for each file*.
It seems that the Edit Metadata is just a batch write operation through the set of files.
In every case (metadata field) for which I can pick a ‘file value’ (filename, folder, date, etc), I’d like it done on a file-by-file basis!
Is there a way to do this that I am missing?
Win 10 XnView Version 0.96.4 64bits (Jun 30 2020)
Just select one file at a time and it should be fine.
I subsequently discovered that the Transfer function will do this.
I posted the details to the XnView group page (dont remember exactly just now – I am away from my normal computer).
PS – thanks so much for this write up and for your two vidios.
I “found” this again, and it was still useful the second time around.
Because I think it is good for people who need help in this area, and because I think (that you think) that XnView is a good program, I’d like to suggest that you re-visit the current metadata support and update this blog/page. The editor templates can get data from other fields automatically, and there is a batch (Metadata) Transfer feature which allows copying of data values from one field to another. Very useful! (and I have no relationship to XnView).
Yes, it’s been a while. A bit of an update might be in order. The Metadata > Transfer function is new. Variables have been in the program for quite a while. I think I mention variables in one of the videos. I’ll have to take a tour and see what sort of new stuff I find. I guess I’ve been waiting for the great and glorious day when Pierre finally supports the rest of the Core Schema fields. (Or the fields for Google Licenbsable) I don’t see any sign of that happening, so I should take a look at what is actually there now. Thanks for reading!
Hi Carl, in the latest version of XnView MP the CTRL+I command does not bring up the Edit IPTC-IM/XMP editor, it brings up an Edit IPTC-IM editor instead. In the Tools > Metadata menu there are now two options, Edit IPTC and Edit XMP but no Edit IPTC-IM/XMP option. Is there still a way to edit IPTC and XMP at the same time and if there is how do we enable it? If there isn’t what would you recommend? Should we use IPTC or XMP or should we use a different software program that allows editing both instead?
Hi David, This is strange. When I do command or control – i (Version 0.98.4, both Mac and Windows platforms), the dialog is indeed labeled “Edit IPTC – IIM”. But when I make an edit in the dialog, it’s written to both data blocks. As before. And as it’s supposed to be. So, OK, just an incorrect label.
When I go to the inexplicable “Edit XMP” dialog from Tools > Metadata, (I mean seriously, what the entire heck is this supposed to be for?) I can make an edit and nothing happens except that in the dialog it looks like I have made an edit. Nothing is actually written to the XMP data block. If I make an edit in Tools > Metadata > Edit IPTC, it brings up the normal IPTC editor, the same as Command – I. And an edit made here appears correctly in both data blocks.
In Preferences, I have ticked the boxes for writing both IIM and XMP, as well as the box for writing a .xmp file if one is needed. All of which is normal. I can’t remember if it’s the default, but it’s as it should be.
On my Windows machine, for some reason, the tickbox for writing to the IIM was not ticked. Same with the tickbox for writing the .xmp sidecar. The write IIM tickbox wasn’t active. I couldn’t tick it until I turned on the preference to write the .xmp sidecar. (What the heck does the .xmp sidecar have to do with writing to the IIM?) This isn’t really harmful because I can’t imagine not having all three tickboxes turned on. But it sure is weird.
So, yes, you can use XnView as normal, despite the mislabeled dialog. Tools > Metadata > Edit XMP doesn’t need to exist, IMHO. It’s buggy, and even if it was working correctly, I would be afraid that it might cause harm. Could you go over to the XnView forums and let Pierre know what you’ve found? – Carl
Carl, I know this is an old thread; I hope you see this.
Is there a way to get XnView to digest the latitude and longitude from the exif data, and come up with a place name, which it inserts into the caption, all automatically?
If not, do you know of any other software that does this, for Windows?
Thanks,
Mike Hodish
No, XnView won’t do reverse geotagging.
Photo Mechanic will. To put the geotag information in the caption will be a two step process. (Assuming your images already have GPS information.)
In Photo Mechanic – First, select the images you want to reverse geotag. Go to Tools> Reverse Geocode. Select the fields you want resolved. Then “OK” and your image(s) will have the fields you selected filled from the results of a GPS lookup.
Then, you can use the Template Editor to copy the fields you want to the caption. You’ll use variables. Clear the template. For the caption, choose to append, overwrite, or prepend. (Put the results of the operation in front of, behind, or overwrite whatever happens to be in the caption, in other words.) Add the variable for the field you want – in your case, I assume Location – and any text you want in the caption field, and apply to selected. So, in the Template Editor, you might end up with something that looks like “This happened at {location}, in {city}, {state}.” Which would add something like “this happened at City Hall in Los Angeles, California.” at the end of your caption, if that’s what the Location, City and State/Province fields for that particular picture contained.
Note that the Location field (and for that matter the City field) are a bit tricky, depending on the place in question. Location will often resolve to the name of a street, or sometimes to a well-known place, like a stadium, or city hall, or my favorite raw bar. Just depends what’s in the database. City will be filled in properly or not, depending on what country and state or region you might be in. Photo Mechanic uses Open Streetmaps. They’ve tried to be clever in their code to make the city come out right, but there’s a limit to what can be accomplished with some logic statements when you’re dealing with a whole world of different ways to express the concepts of “city”, or “village”, or “neighborhood”. Location is just down to what some volunteer did or didn’t add to the database.
If you need to add GPS data to your images, you can add it, either one image at a time, or by importing a .gpx track file to do a whole batch.
Lightroom Classic will also reverse geocode your pictures, but it lacks the variables functionality that you need if you want to copy the resulting information to another field.
I have some videos that explain the reverse geocoding process and using variables in Photo Mechanic. I am working on a set of videos about working with GPS data specifically. (If I ever get un-busy enough to get them finished.) metadatamatters.blog/youtube
I hope this helps.
Carl, Thanks for the thorough reply. Is there a way to set this up so it automatically happens for photos that are added in the future?
Yes, as it turns out. Just make a template that enables reverse geocoding and uses variables to copy whatever you want to the caption and apply it automatically at ingest or when you copy your files from the camera cards. Or, for that matter, just by applying the template by whatever means.
Usually, you can’t automatically fill a field and then copy it using variables in one go. I went back and checked this use case. Indeed, you can use reverse geocoding to fill the location fields and then copy the results with one template. So, woo hoo, you’re good to go. You probably will find that doing reverse geocoding on ingest will slow down your ingest. Photo Mechanic has to phone home to its servers, which in turn have to query the Open Streetmaps database. That can’t make things any quicker.
(Ingest is just a fancy way to copy files from one place to another and do stuff like applying templates, making backup copies, or incrementally copying only new files from a card. It is not importing images into a database like Lightroom. However, you can apply a template on most any file operation, like an ordinary copy.)
That’s great info. The speed is not essential for me. I do this as a hobby. If I have a massive pile of images from a trip, for example, I am perfectly happy if ingestion and reverse geotagging takes overnight. I am not on a deadline!
Thanks so much for your advice. I will trial Photomechanic now.
Mike