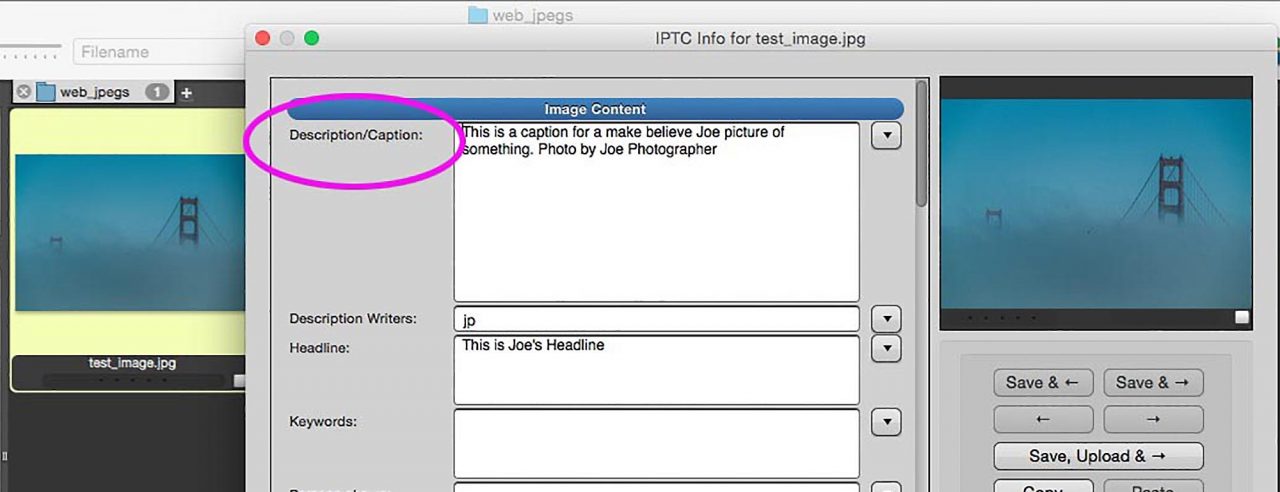
WordPress will read your IPTC Caption and put it on the page for you
If you have captions on your photos, WordPress will place them on your page (or post) along with the pictures. If the details in the caption were correct when the photographer – you or whomever – originally captioned the picture, they’ll be correct on your site. That means less chance to make an error. (And less room for excuses if you do.)
WordPress reads the IPTC caption from the metadata on your image and writes it into the WordPress database. The caption will be visible in the Media Library, and from there, it will make its way to the page, already formatted and ready to go. You don’t have to type, or copy and paste, or anything. You can edit the caption in the visual editor, or add links or whatever, just like any other text.

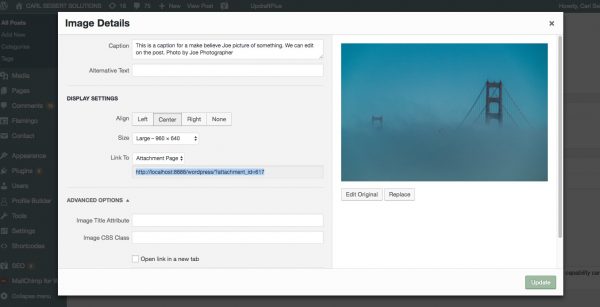
Or, you could also click on a picture, click on the pencil icon that appears when the picture is selected, and edit your caption in the ensuing pop-up editor dialog.
Watch the video version of this post
Captions go “downhill”, not up
It’s important to note the caption is inherited on only one direction: The metadata is read by WordPress and appears with the image in the Media Library. From there, it travels to the post or page with the picture. None of these steps are reversible. Edits made on the page won’t find their way back to the Media Library. Edits made in the Media Library are not written back to the metadata on the photo.
It comes down to – Metadata on photo > Media Library > Page. And not the other way around.
You can edit a caption in five places
That gets confusing in the interface sometimes, because the pop-up editors all look about the same. There are three pop-up editors and a “page-like” editor. Plus the ability to edit the caption right on the page itself.
On the page
One, called “Image Details”, you call from the page. Edits here stay on the page and don’t affect the Media Library.
In the Media Library
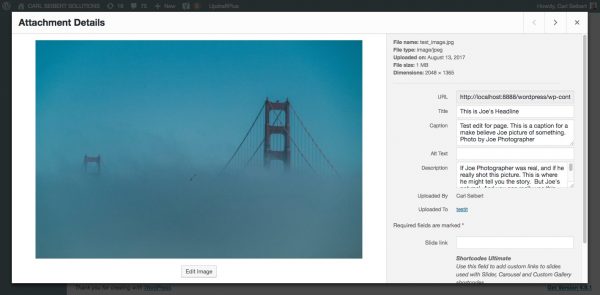
Then there’s the pop-up editor in the Media Library, called “Attachment Details”. This one appears when you click on an image in the Media Library’s grid view. Edits here will follow a picture anytime (in the future) that picture is placed on a page.
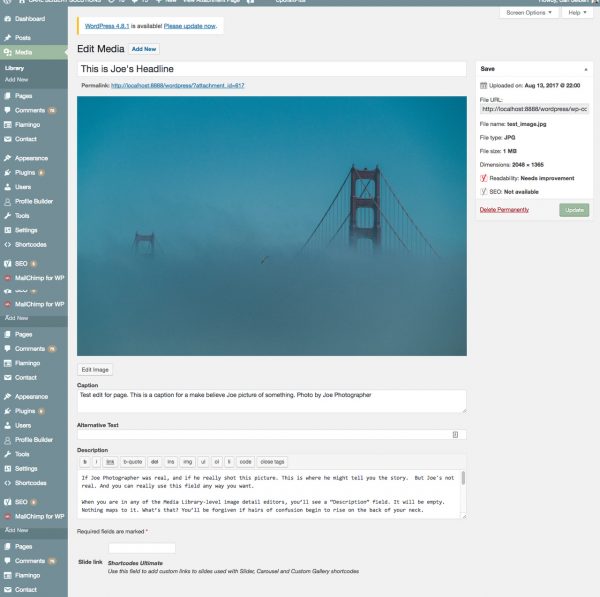
If you click on a picture from the Media Library’s list view, you’ll see an “Edit Media” page that looks like a page or post in the main visual editor. This one has the same functionality as the pop-up “Attachment Details” version you can call from the grid view.
And finally, when you click ‘Add Media’ from a page or post, you see the Media Library in grid view. Then, when you select an item, you see a right rail of “Attachment Details”, from which you choose some parameters and actually insert your image. You can edit captions and alt tags from here, too. Edits made in this dialog appear both on the page you’re about to add an image to, and in the Media Library.
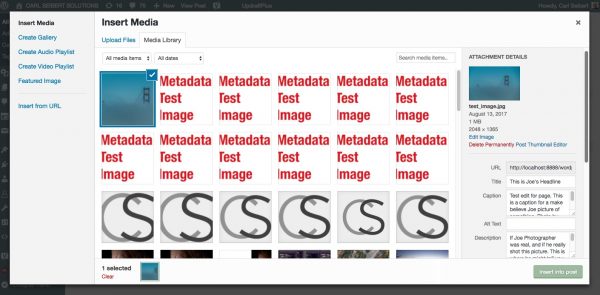
Yeah. It confuses me, too…
So, make edits in the Media Library that you want to appear on the page for all future uses of a particular asset. And make edits on the page as necessary for that particular usage. Usually, there’s more information on the picture than you’ll need on the page, so you’ll be just selecting and deleting some text from your caption.
Once you get used to the behavior, it really does save work and reduce errors. It’s pretty cool.
Does WordPress map any other metadata fields?
Yes. The contents of the IPTC Headline field are mapped to a field in the Media Library that WordPress calls “Title”. This WordPress title field is used as a headline of sorts for each listing in the list view of the Media Library. And it becomes an actual headline on the Attachment Page that WordPress makes for each piece of media in the Media Library. More on that in a minute.
It’s important to understand that this WordPress Title field is NOT the same as the “title” HTML attribute. The title attribute is the thing that appears as a tooltip when you hover over a picture on a web page. It, in turn, is not the same thing as the Alt Text. Title is optional. If it serves a purpose for you, go for it. Otherwise, ignore it.
- The title attribute can be edited in the page-level pop-up editor.
- Click on a picture on a page or post, and click the pencil icon to open the editor.
- If the ‘Advanced Options’ section isn’t open, click the triangular twiddle to open it.
- There you’ll find a text entry field for “Image Title Attribute”. In it, enter whatever you want in your tooltip.
- You can only edit the title attribute at the page or post level, not in the Media Library.
We should also note that the WordPress Title has nothing to do with the Object Name/Title IPTC field.
(There are plugins that allow you to set up custom mappings between photo metadata and WordPress. I’ll review some of them later.)
Alt Text is necessary. You really should use it. Alt Text appears when, for some reason, the image doesn’t. Screen readers for visually impaired visitors use it. Google reads it. Alt Text can be entered from any of the image editor dialogs in WordPress, and it follows the same rules of inheritance that captions do.
What is the WordPress Description field?
When you are in any of the Media Library-level image detail editors, you’ll see a “Description” field. It will be empty. Nothing maps to it. What’s that? You’ll be forgiven if hairs of confusion begin to rise on the back of your neck.

The IPTC standard allows developers to call the “Caption” field the “Description” field. Or both at the same time. Photo Mechanic calls it “Description/Caption”. In Photoshop and Bridge, it’s “Description”. In XnView, “Caption”. And in Lightroom, it can be either, depending on exactly what view of the Metadata Panel you have called.
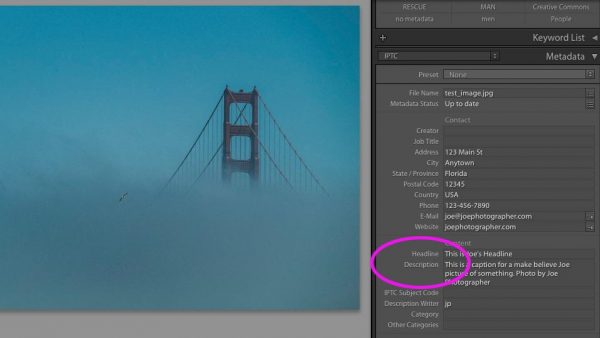
(What’s up with that?) That’s all inconsistent as all get out, but it’s fine with the IPTC.
The WordPress “Description” field is something completely different. It is a text block on an image’s Attachment Page. You may well have never heard of the Attachment Page. It turns out that WordPress makes a special page to display each item in the Media Library. There are links to the Attachment Page in the ‘Attachment Details’ pop-up and the ‘Edit Media’ page in the Media Library. If you follow one of them, you’ll be taken to a page that displays your image.
The Attachment Page displays your website’s header and footer, and thus, your branding. It has a large rendition of your image, with the caption as it appears in the Media Library. There is a headline, which comes from the WordPress Title field in the Media Library. That, in turn, is mapped from the IPTC Headline field on your picture, if indeed it is filled in. And there’s a text block that could be explanatory text about the image, or a short article, or whatever you want it to be. This is the mysterious “Description” field you saw in the Media Library.
How to use the Attachment Page
There is no editor for the Attachment Page. It can only be edited by filling in the various fields associated with an image in the Media Library. That means that if you edit a field, the caption, say, in the Media Library to make it appear the way you want on the Attachment Page, any future use of that image will feature the version of the caption you made to suit the Attachment Page use.
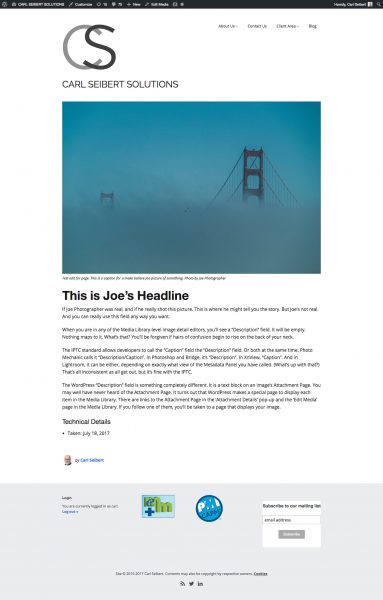
When you place a picture on a page or post, in the “Attachment Details” dialog, you have the option of linking the image to the Attachment Page instead of the media file. If you do this, visitors who click on the image will see the snazzy Attachment Page instead of the full-size image in a black surround. The Attachment Page has a permalink, too. So you can link to it from anywhere.
You changed metadata in the Media Library, what then?
If that happens and you need to retrieve the original metadata for your picture, remember that WordPress does not write metadata back to your image files. You can see the original metadata on your files by downloading them from your site and looking at the metadata in the application of your choice. If you have enabled ImageMagick (as you should!) or used the workaround in this post, right-clicking and saving any old picture will work. Otherwise, download the full-size version of the photo. If, when you placed the image on a page or post, you chose to link the image to its media file, simply clicking on the picture will open the full-size version. Right-click and save it and you’re good to go.
You might be wondering which instance of the IPTC metadata WordPress reads to populate the caption field. We’ll look into that in next week’s post. Stay tuned!

I have been reminded that I should point out that the appearance of the attachment page is set by your theme. The attachment page I used in this post was created by my theme (Make). Your theme and mileage may vary. WordPress’s own ‘2017’ theme, for example, puts the headline above the picture and omits the caption altogether.
-Carl