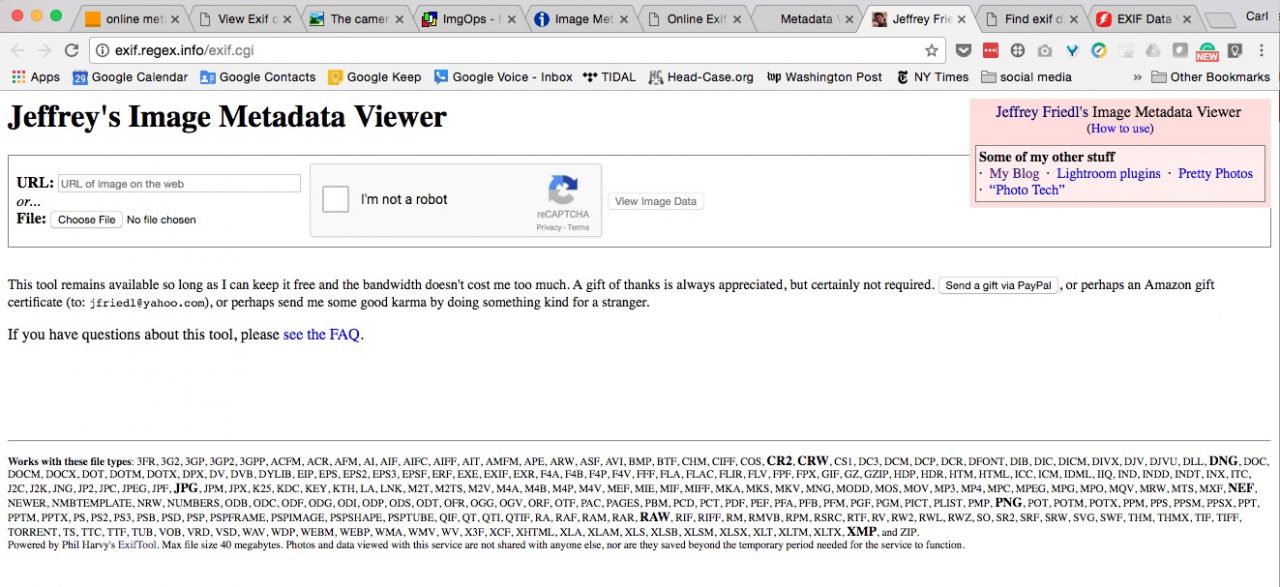
You can use web-based tools to view metadata on photos. While I doubt that’s earth-shattering news to any of you, a quick Google search on the subject returns breathless posts. “OMG! There’s metadata! Look! See!.” Granted, we have a lot of educating to do if we are to improve the environment in which photos must live online, but it’s a bit over the top. Let’s exhale and see what, if any useful resources we can find here.
I used to have an icon in my footer that linked to their manifesto, at http://www.embeddedmetadata.org/embedded-metatdata-manifesto.php (It’s not a link. Copy and paste it into a browser.)
I upgraded this site to secure all its traffic with SSL. The link to their still-non-SSL site was causing web browsers to issue security warnings to my visitors. I want you to be comfortable here, so that wasn’t good.
I should point out that neither their site nor mine (before the upgrade) is/was a danger. The old thinking was that SSL was only needed for sites that dealt with confidential information, like credit card data. Now, the feeling is that everybody should do SSL, and Google is making it a requirement for ranking in search results. Every website operator is somewhere in the process of switching over. The IPTC’s main site is already SSL-friendly, for example.
I’m a manifesto kind of guy, so for the time being, I’ll just quote the manifesto in its entirety for you right here.
Embedded Metadata Manifesto
How metadata should be embedded and preserved in digital media files
Photographers, film makers, videographers, illustrators, publishers, advertisers, designers, art directors, picture editors, librarians and curators all share the same problem: struggling to track rapidly expanding collections of digital media assets such as photos and video/film clips. With that in mind we propose five guiding principles as our “Embedded Metadata Manifesto”:
Metadata is essential to describe, identify and track digital media and should be applied to all media items which are exchanged as files or by other means such as data streams.
Media file formats should provide the means to embed metadata in ways that can be read and handled by different software systems.
Metadata fields, their semantics (including labels on the user interface) and values, should not be changed across metadata formats.
Copyright management information metadata must never be removed from the files.
Other metadata should only be removed from files by agreement with their copyright holders.
More details about these principles:
1: All people handling digital media need to recognize the crucial role of metadata for business. This involves more than just sticking labels on a media item. The knowledge which is required to describe the content comprehensively and concisely and the clear assertion of the intellectual ownership increase the value of the asset. Adding metadata to media items is an imperative for each and every professional workflow.
2: Exchanging media items is still done to a large extent by transmitting files containing the media content and in many cases this is the only (technical) way of communicating between the supplier and the consumer. To support the exchange of metadata with content it is a business requirement that file formats embed metadata within the digital file. Other methods like sidecar files are potentially exposed to metadata loss.
3: The type of content information carried in a metadata field, and the values assigned, should not depend on the technology used to embed metadata into a file. If multiple technologies are available for embedding the same field the software vendors must guarantee that the values are synchronized across the technologies without causing a loss of data or ambiguity.
4: Ownership metadata is the only way to save digital content from being considered orphaned work. Removal of such metadata impacts on the ability to assert ownership rights and is therefore forbidden by law in many countries.
5: Properly selected and applied metadata fields add value to media assets. For most collections of digital media content descriptive metadata is essential for retrieval and for understanding. Removing this valuable information devalues the asset.
Now we’ll have a short chorus of “amens!”, please.
There’s good content on the Embedded Metadata site. Mostly, it tells you the same stuff I’ve been telling you. Which means you’ve been getting the straight dope here. I take that as a good sign. I encourage you to take a look around.
Hopefully, it won’t be long and I’ll be able to link to their site again.
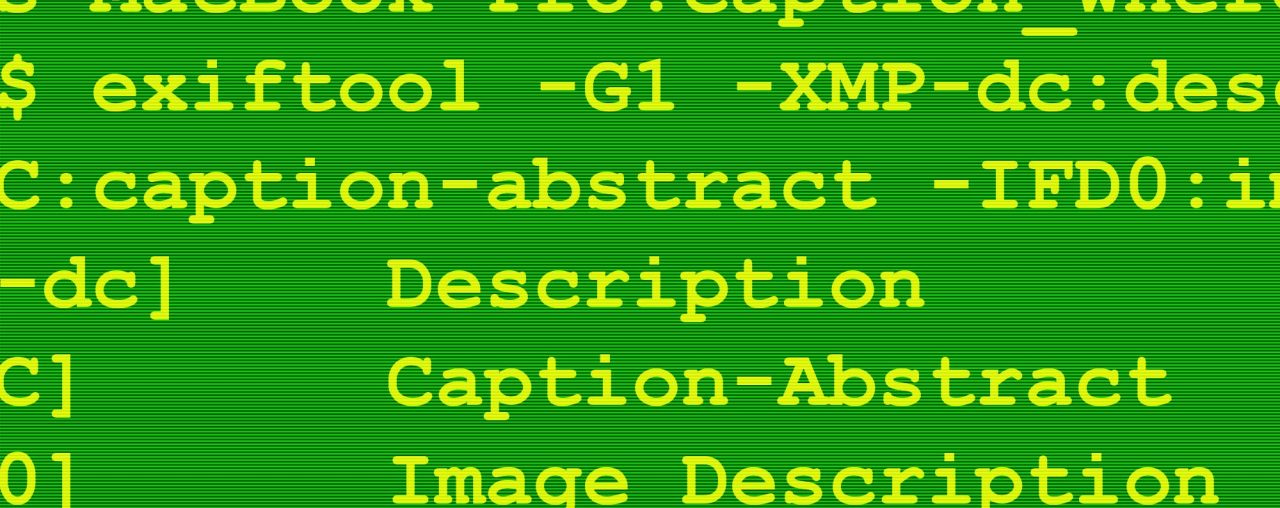
Which instance of the IPTC metadata does your favorite application prefer? Inquiring minds want to know.
Let’s step back for a moment for some background. Because all things that should be dead simple usually aren’t, the IPTC metadata - important information like the caption, your byline, and copyright notice - is stored in multiple places in your file.
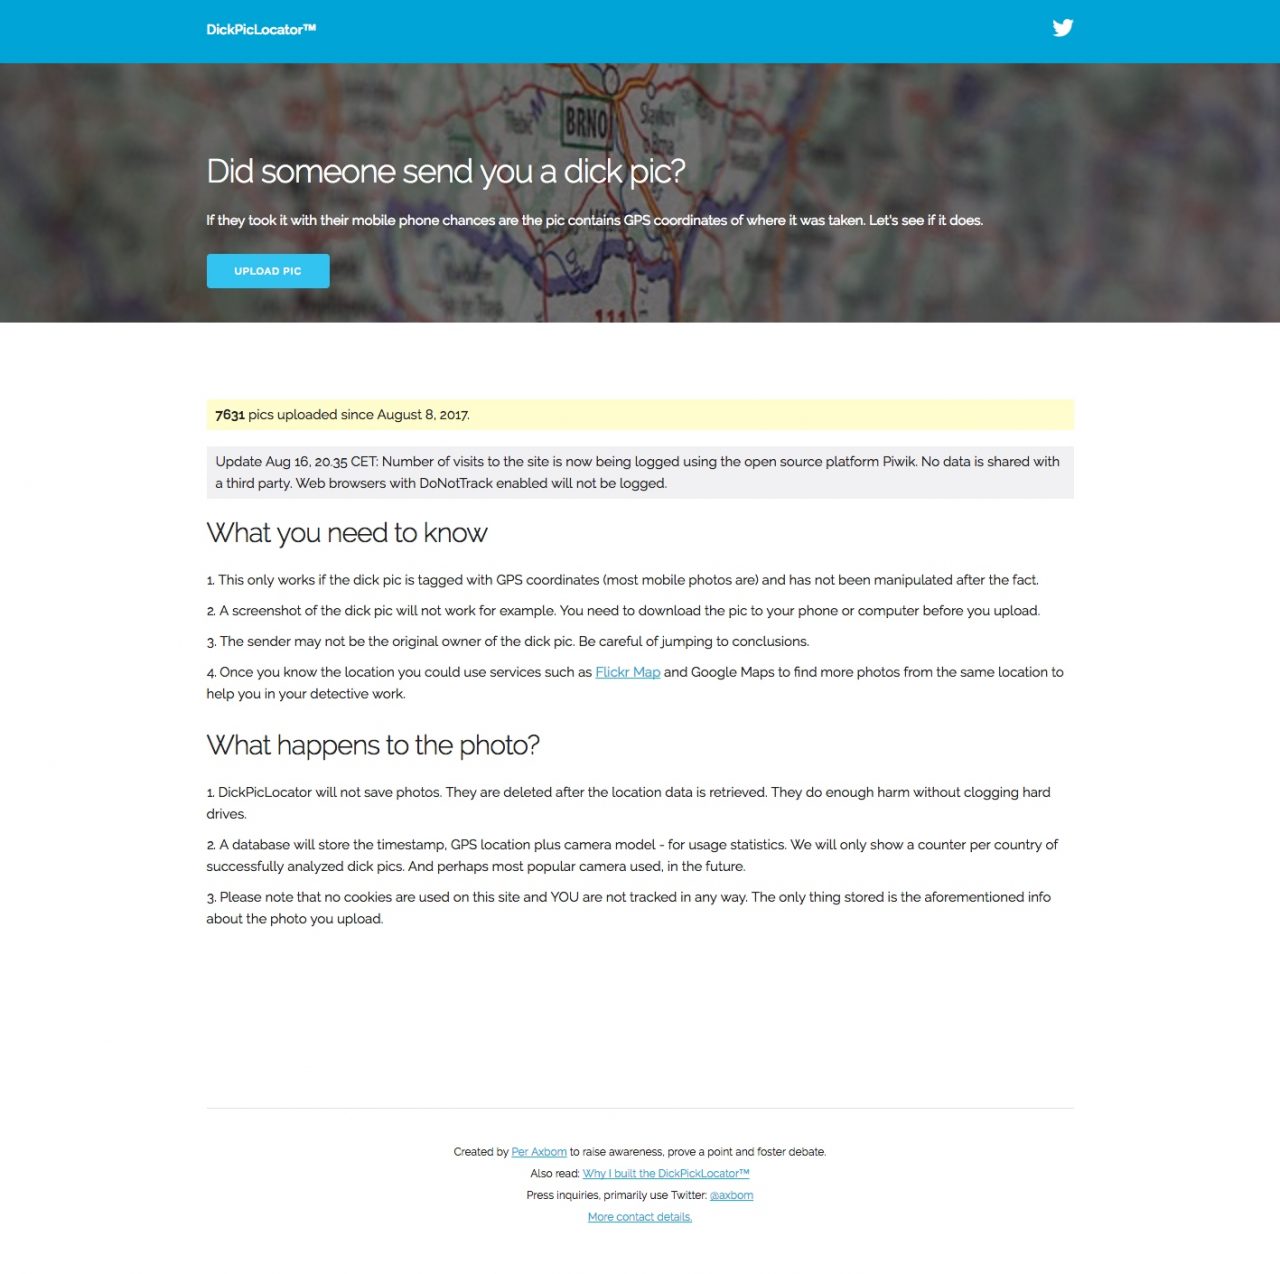
New website tells where dick pics come from; it's all about metadata
Dick pics. Film at eleven. This week’s internet’s social, er, upheaval has it all. Bad puns. Check. Click bait. Check. Moral outrage. Check. (I guess.) Metadata. Check. Wait. Metadata?
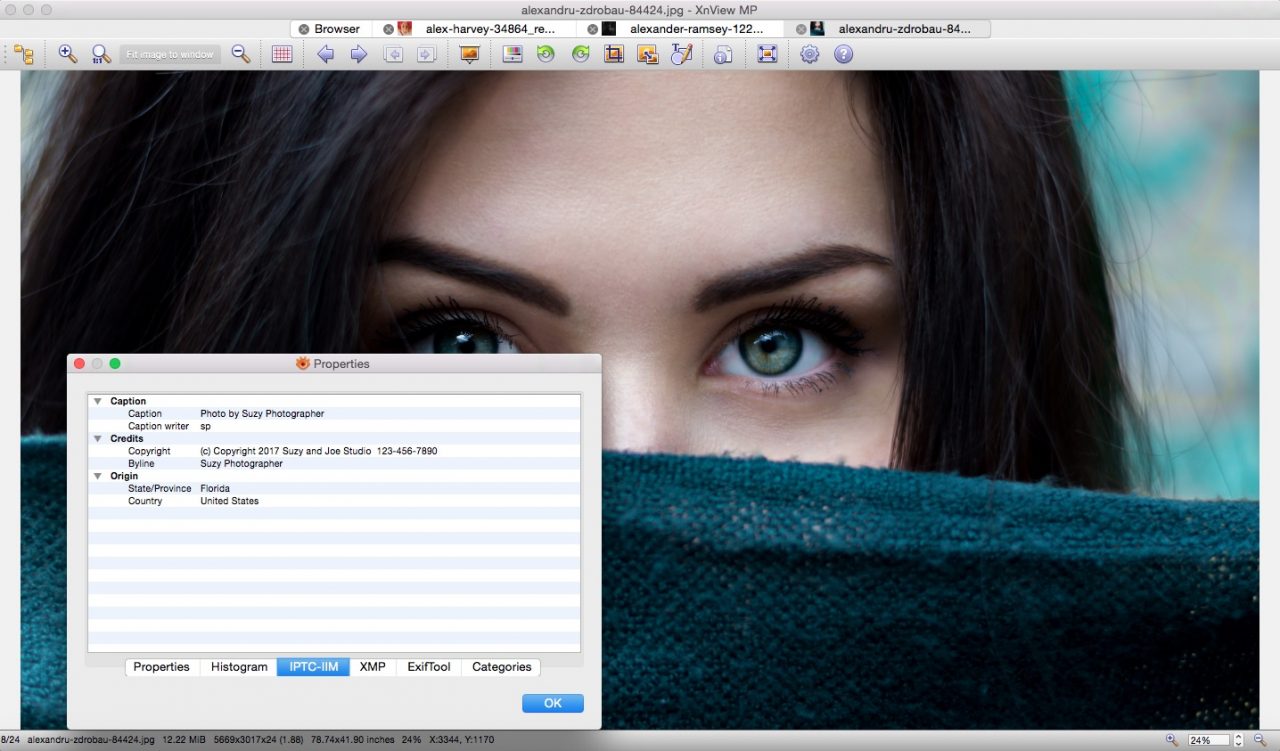
Considering its power and low cost, XnView is a must-have. XnView is a photo browsing/editing/metadata tool. It operates in a files and folders environment, like Photo Mechanic, and unlike Adobe Lightroom. It’s available at a price that suggests that there’s no reason not to have a good tool for working with metadata.
Captions connect pictures to the world. That connection between an image and its subjects, time and place (and its author, too) gives a photo the power to endure. Join your Aunt Louise as we explore the power of the caption.
WordPress uses an imaging library to make variously-sized versions of a photo to accommodate different view port sizes. But which imaging library is used determines whether metadata is preserved or destroyed.
Enable ImageMagick on your server and your WordPress site will be metadata-friendly
The good news: WordPress, by far the most popular content management system on the web, supports embedded metadata. The bad news: Well, not always. But we can fix that.
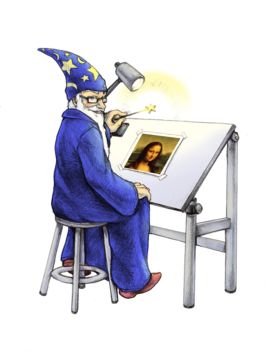
ImageMagick is, well, powerful. Illustration courtesy ImageMagick Studio LLC
If you import a photo into WordPress that has a caption, WordPress, by default, will read that caption from the photo and place it in the picture’s caption field in the Media Library. From there, when the photo is placed on a page or in a post, voila! the caption appears under the picture, formatted by your theme and ready to go. After a little touch-up editing, perhaps, but ready-to-go and I-didn’t-have-to-type-it have got to be pretty great. ¹
But what about the photo itself? Will it be served with its embedded metadata intact, or will be it be doomed to wandering the internet without its copyright information or caption? That’s where things get a little tricky.
ImageMagick
WordPress, by default, prefers an image-processing library called ImageMagick. If ImageMagick
Is available to WordPress, everything is awesome, and your picture will go forth into the world in possession of all the vital information it needs to be relevant for (hopefully) decades to come. Well, all the vital information that was in the metadata when you uploaded it, anyway.
(Also, by many accounts, ImageMagick produces better visual quality at smaller file sizes than its competitor.)
There are two sticking points.
ImageMagick, which has been an industry standard for many years and is the image processor for many, many, server-based systems, is either on your web host’s server, or it’s not. There’s no requirement that
Enable ImageMagick and your WordPress site is good to go. Karma will be on your side and you won’t have to worry about being sued for removing Copyright Management Information from images.
hosts provide it. Many –or even most – do. But some don’t.
And, if ImageMagick is available on your server, you will generally need to enable it in order for WordPress to be able to use it.
If ImageMagick isn’t available on your server, WordPress falls back to an imaging library called GD. GD is bundled with PHP, upon which WordPress depends in order to function at all. So GD is a sure thing. It’s guaranteed to be there.
Making resized images
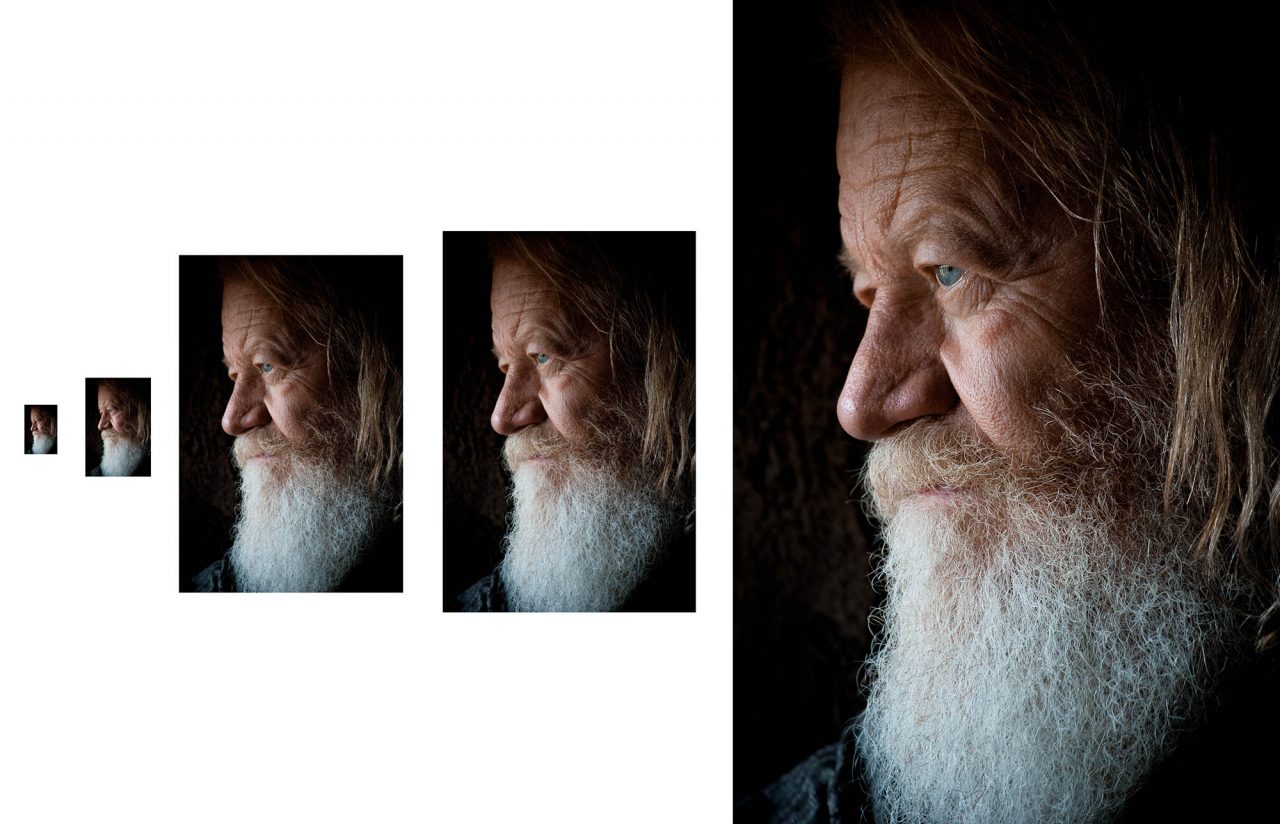
When you upload an image to WordPress’s Media Library, it makes copies of your image in various sizes, from Baby Bear little to Poppa Bear big. Four new files are created by default, plus the original, yielding five size choices to fit browser windows on devices ranging from itty bitty phones to great big desktop monitors. There may be more sizes created. You might add more sizes, or plugin software might require more sizes.
The biggest instance of your picture is the original file you uploaded. It’s untouched. If it’s the file that is served, say to a visitor with a really big monitor, you’ll serve exactly the same file that you uploaded. So, if you uploaded a file that has proper metadata, that’s what goes out on the internet. If you set clicking on your photos to open the media file (so that a large view of the photo is shown to the visitor – that’s usually expected behavior) then such a click will cause the original file to be served. If someone is, ahem, obtaining your picture, it’s likely that they will grab the largest version, and they’ll get a file with caption and copyright information. So that’s good-ish.
Here’s the rub
If ImageMagick made the smaller-sized versions of your picture, great. They’ll all have their metadata, too. That’s great.
But GD doesn’t do metadata. (It can, a little, but doesn’t by default) If your WordPress installation is relying on GD, you’ll strip metadata from all your images except the biggest, full-sized versions. Naked. Bereft. Raw statistical probability says that at least four out of five times you’ll serve a stripped image. That’s not good.
So, by now, the picture is clear. (sorry about the pun) ImageMagick = good. You want it. Now what?
Available? Make sure your host provides ImageMagick. If you’re shopping for a hosting provider, you may have to ask. Sometimes if you Google “your-would-be-host ImageMagick” you’ll get an answer in the form of
some sort of knowledge base article. Hosts rarely mention ImageMagick on their benefits page. (Are you listening out there, hosting providers?)
Obviously, if you are shopping for a new provider, you want your ImageMagick. If you’re staying with your current host, ask and cross your fingers.
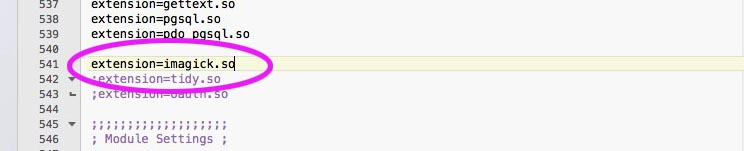
And enabled. Once you have confirmed that ImageMagick is available, enable it so WordPress to access it. Enabling ImageMagick usually involves un-commenting a line in a PHP configuration file (doing so enables a PHP extension, either IMagick or MagickWand, that talks to ImageMagick, ) and perhaps adding a path statement somewhere.
Enabling the IMagick extension in php.ini
Check with your host’s customer service department. The whole process only takes a minute or two. If your provider has good customer service, the rep will probably enable ImageMagick for you, while you’re still on the phone or chat. Or maybe they’ll provide you with instructions, or have documentation on their support site. Remember to backup any configuration files before you change them!
You don’t have to do anything on the WordPress side. WordPress will, all by itself, use ImageMagick henceforth.
I checked some hosting companies
I called some hosting providers while preparing this post. ImageMagick support wasn’t exactly on the tip of most providers’ tongues, but I got the impression that most good providers do provide the service. You might have to be a little bit persistent, though.
Liquid Web
At Liquid Web, Imagine Magick is installed and already enabled by default. “We make sure that ImageMgaick is already there,” says Managed WordPress Product Manager AJ Morris, “On the WordPress side, we take care of all that for you.”
There is a catch, though. Liquid Web is developing an in-house image optimization tool. Morris says that tool will be metadata-friendly. But in the interim, they have temporarily provided their customers with an image optimization plugin. That plugin eats metadata. So, for the moment, Liquid Web customers who want to preserve their metadata will need to work around that issue. They can either disable the plugin, and just make sure they’ve prepared their images properly before upload, or they can keep the plugin active and use a workaround for a little while. Or even possibly substitute their own plugin. (I’ve tested some optimization plugins that are metadata-friendly if the underlying server is using ImageMagick. I’ll post some reviews soon.) But remember, it will only be a short while until the proprietary tool is up and running.
Flywheel
A Flywheel rep told me that ImageMagick was enabled by default on their servers.
Bluehost
At Bluehost, a rep told me, “Our servers do supply MagickWand [a PHP extension that enables ImageMagick] 100%, but that would be something the customers would have to do themselves.” My call was the first time anyone had asked that particular rep about ImageMagick. But their ImageMagick knowledge base page says it has been viewed 68,000 times.
SiteGround
At SiteGround, enabling ImageMagick on my test site only required adding a configuration file to my web root and adding a path statement in my .htaccess file. SiteGround’s spokesman said, “We fully support the ImageMagick extension – with all of our packages. It is not enabled by default. However, our support teams can enable for you in a matter of a few minutes only.” Which is exactly what happened when they did it for me. It wasn’t done quite while I was still on chat, but they came pretty close.
(The server that hosts this site won’t be so simple, by the way. But we’ll get there.)
If your host doesn’t provide ImageMagick
But what if ImageMagick just plain isn’t available on your server and, for whatever reason, you don’t want to change hosts? There is a workaround that works OK in many cases. It’s a bit of effort, but it’s not too bad. I’ll explain in next week’s post.
That’s it. Enable ImageMagick and your WordPress site is good to go. Karma will be on your side and you won’t have to worry about being sued for removing Copyright Management Information from images.
How was your experience when you asked your hosting provider about enabling ImageMagick? Post in the comments and I’ll include your input in an upcoming post that will feature a list of hosts who support ImageMagick.
Footnotes
¹ You’ll notice in Media Library that there’s a field called “Description” underneath the Caption and Alt text fields. That’s confusing because the IPTC “Caption” field is also called the “Description” field. So what’s WordPress’s “Description”?
Well, every media object in WordPress has it’s own “Attachment page”. The attachment page displays your image with your header and footer, a headline, caption and a text block. That text block is the “Description” field you see in Media Library.
In Media Library, you can see the attachment page by clicking on an image’s permalink. You can link from an image to its attachment page instead of the media file when you place an image into a post or page, if you so desire. It’s kind of cool, but frankly, I’ve yet to find a use for this feature. It might be a nice way to display an infographic, I guess.
You can’t edit the attachment page in the editor. The headline is mapped from the Title field in Media Library. The caption is mapped to Caption, and Description becomes the text block. The only way you can edit any of that on the attachment page is in Media Library, which means that edits to the Caption field will then show up when you place that image on a post or page. That’s kind of inconvenient.²
And the footnote has a footnote:
² Note that editing a caption in Media Library or on a page does not affect metadata in a photo’s file. WordPress does not write edits into a file’s metadata. This conforms to normal conventions. Best practice assumes that where ever it may go, an image is expected to have the original metadata it was published with. You can probably live your whole life without ever having to worry about this, but it’s always better to know how things work. If something is outrageously wrong on a photo’s caption, correct it before you upload the photo to WordPress.
Photo Mechanic’s Copy Options dialog includes the option to add metadata as files are being copied.
Photo Mechanic is a powerful metadata editing tool
Photo Mechanic is the high-power tool of metadata editing and photo selection. If you’re a woodworker, it would be the Festool track saw. If you’re a photographer, the Nikon D5 or Canon EOS 1D would pop to mind. While it’s not expensive for what you get, it does cost some money. What you get for your money is a program that does what professionals need it to do, is stable, and gets its part of the job done with the minimum expenditure of sweat from your brow. This thing is the real deal.
Photo Mechanic makes quick work of dealing with metadata. It does a lot with metadata. And it does a whole lot of other stuff, too. I could write three-thousand-word posts every week for a month or two to cover everything this program can do.
In this post, we’ll look only at its metadata functionality and assume that you already know how to edit photos with the program. We’ll also leave customizing Photo Mechanic and using it for optimizing images for the web (and maybe more) for future posts.
We’re going to look at the basic metadata functions in Photo Mechanic first. Then we’ll use what we’ve learned to build an efficient workflow. Finally, we’ll tour some really advanced metadata functionality.
If you open a folder of photos in a “Contact Sheet”, which is Photo Mechanic-speak for a thumbnail browser, you’ll see an ‘i’ button at the lower left of each photo’s slide mount. Click it (or press the ‘I’ key) and the IPTC Info dialog opens. The IPTC Info dialog is Photo Mechanic’s one-at-a-time metadata editing tool. It’s what you would use to read metadata from a photo or add metadata to a single photo.
The IPTC Info dialog is Photo Mechanic’s one-at-a-time metadata editing interface.
At its most basic, this dialog has fields for metadata. You fill them in and click ‘OK’ to apply them to the selected photo. Metadata is applied losslessly. The image is not disturbed when metadata is edited.
But we don’t want to just fill out the fields by hand. Ever. We should always start with a template that contains all our standing information. We don’t want to type all that stuff in because, for one thing, we don’t want to type all that stuff in. The more important reason is that we need for standing metadata to be consistent across thousands or hundreds of thousands of files. If we type it by hand every time it won’t be. Trust me on this.
Working with templates
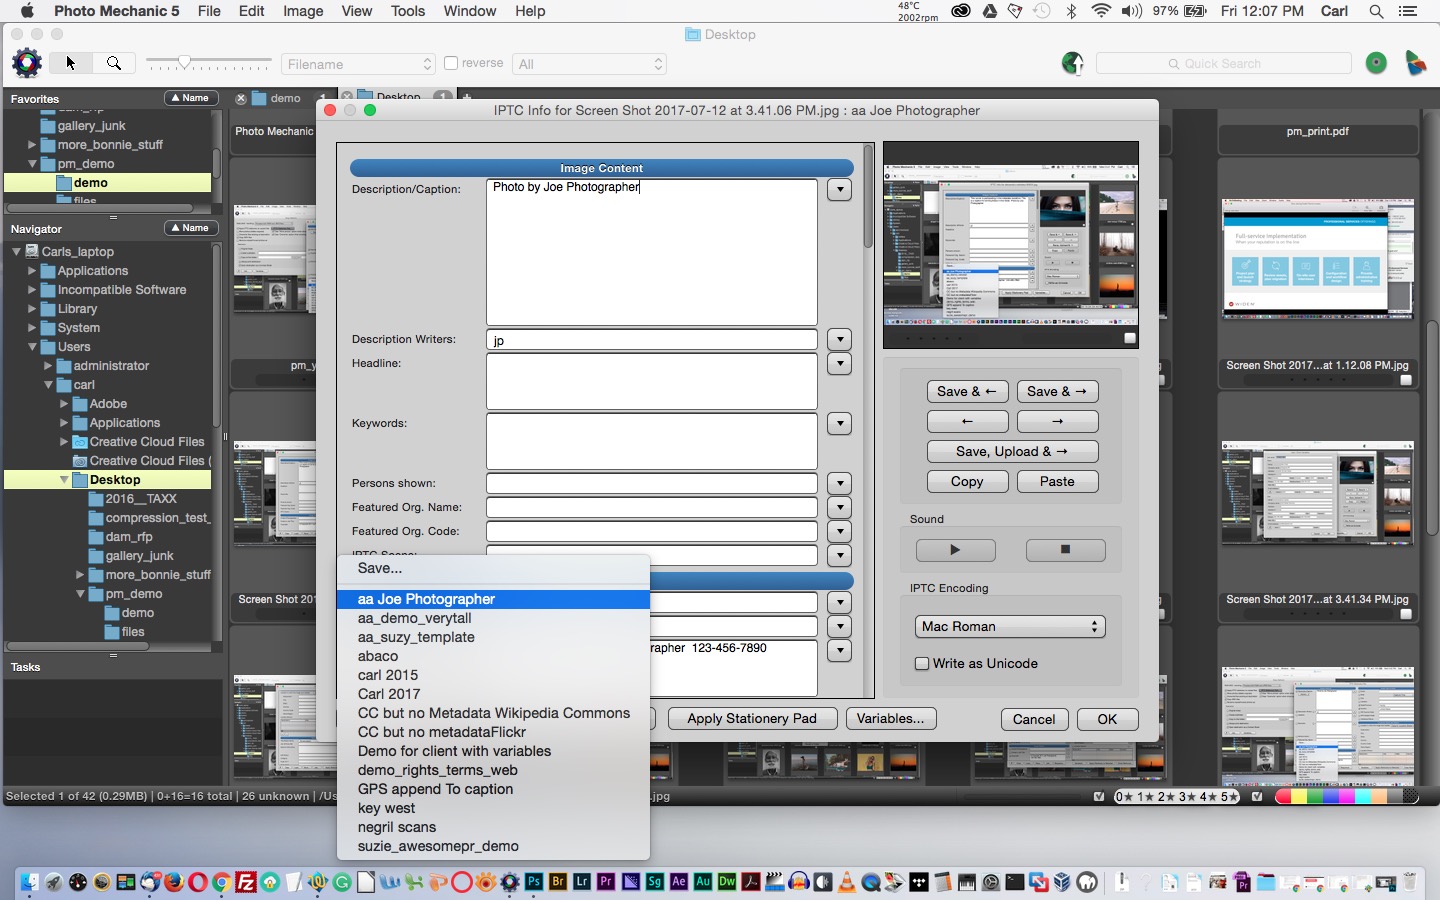
We need to use a template. To make a metadata template in Photo Mechanic, we can carefully fill in the relevant fields in the IPTC Info dialog and make what Photo Mechanic calls a Snapshot. There is a button with a lightning bolt icon at the lower left in most Photo Mechanic dialogs.
Use the Stationery Pad to apply baseline metadata to photos coming into our workflow. Then use the Stationery Pad again to apply information common to all photos in a batch. And finally, use the IPTC Info dialog to apply specific metadata to individual photos.
That’s the Snapshot button. Click it and a flyout appears. It lists available Snapshots (Templates, in this case). To save a new Snapshot, choose ‘Save’ and name your template. To call a template, choose one from the Snapshot flyout and the template loads into the dialog.
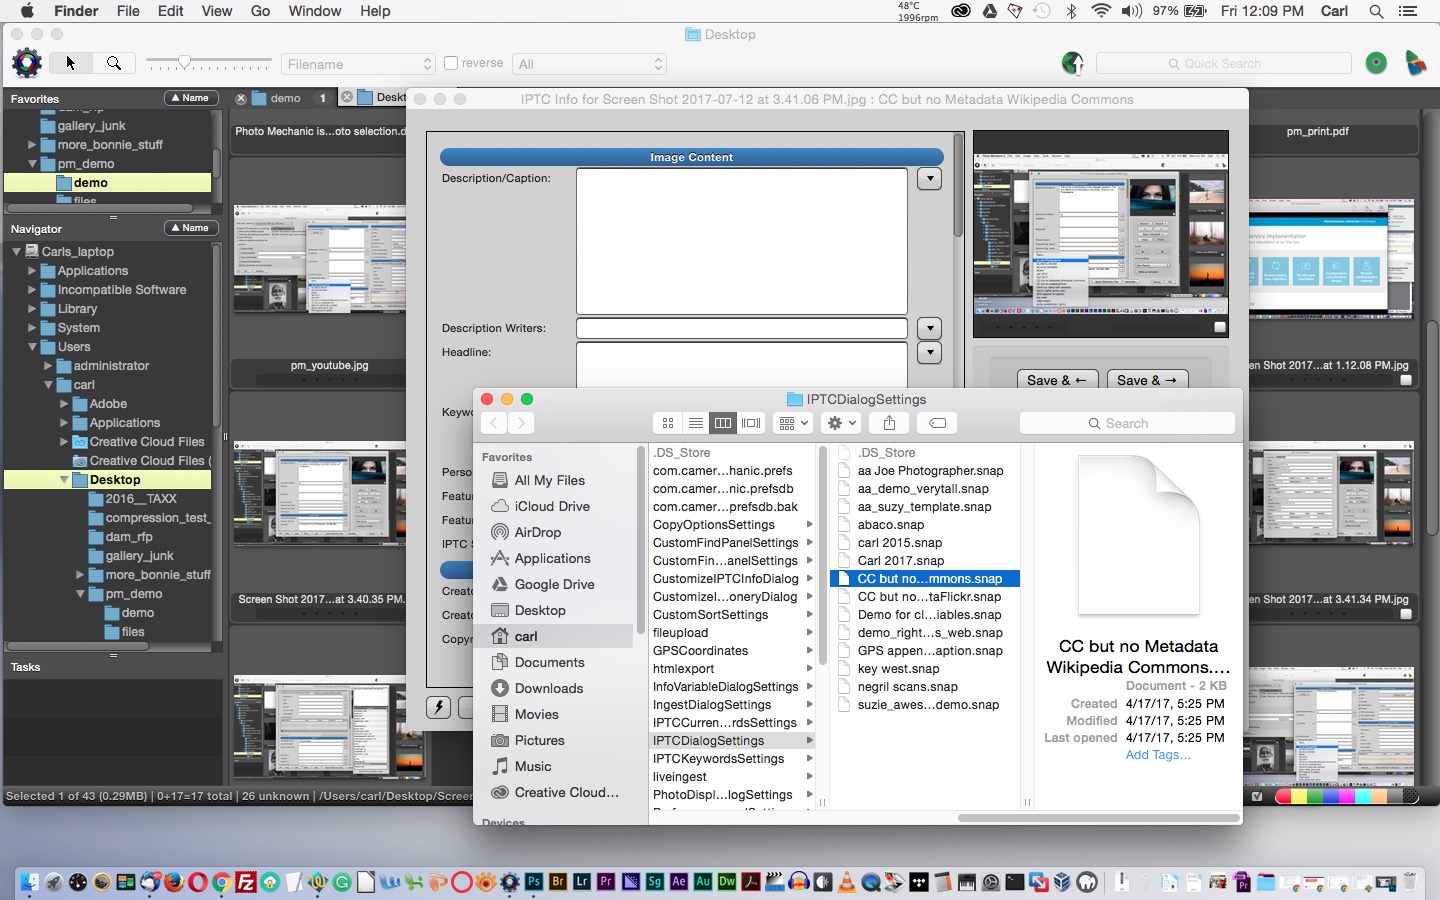
You can delete a Snapshot/template by holding down the Option key (on a Mac) or Shift key (On a PC) while clicking a Snapshot in the flyout, and an operating system file manager window opens. From there, you can delete a Snapshot, or copy it to share it with another Photo Mechanic user.
(Note: Photo Mechanic allows you to export and import complete sets of preferences so that you can synchronize installations across multiple computers. Snapshots can be exported with all the other prefs in one combined file. That’s a big feature for studios or companies with many users.)
Another way to make a template is to import the template as an XMP file. There are buttons on the IPTC Info dialog that allow you to load or save XMP template files, which can be exchanged with other programs that understand .XMP files, like Adobe Bridge and Photoshop. You can also exchange templates with programs that can’t understand .XMP files, like Adobe Lightroom and XnView, by exporting and importing metadata on JPEG files. See this post for detailed instructions.
Option-clicking on a Snapshot opens an operating system file manager window from which you can delete or copy Snapshot files.
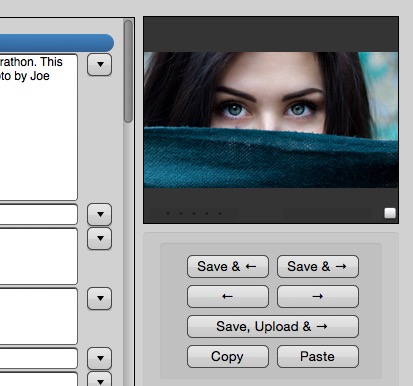
You can navigate from photo to photo in the IPTC Info dialog.
In the IPTC Info dialog, when you are ready to apply metadata to a photo, you could click ‘OK’ and close the dialog, or you could use the navigation buttons under the thumbnail at the upper right in the dialog. These allow you to save metadata to a picture and move forward or back to the next picture, or simply to move without saving. In this set of buttons, there are copy and paste buttons that allow you to copy metadata from one picture to another. You can save metadata to a picture and go straight to the File Uploader dialog from another button in this group.
The escape key closes the dialog. (And most others in Photo Mechanic.)
There are a few more buttons, but we’ll talk about them as we look at IPTC Info’s big brother, the IPTC Stationery Pad, because they’re common to both dialogs.
Some workflows are one photo at a time, but in most cases, the IPTC Info dialog would be used in a second or third pass through the pictures, to add final per-photo information to just a couple of fields.
IPTC Stationery Pad
From anywhere in Photo Mechanic you call the IPTC Stationery Pad with Cmd/CTL+I, or from the Image pulldown in the main menu.
IPTC Stationery Pad is Photo Mechanic’s tool for applying metadata, or changing metadata, in bulk. Like the IPTC Info dialog, the Stationery Pad has the various metadata fields, in which you can enter or edit
metadata. The StationeryPad broadcasts metadata to groups of photos. Fill in the fields and press the ‘Apply stationery to Selected’ button and your metadata will be applied to any selected photos. Or you could close the stationery pad and select photos, right-click on one of them, and choose ‘Apply IPTC stationery’ from the context menu to apply the stationery. The Stationery Pad doesn’t need to be open to work. As long as it’s loaded with metadata it’s active and ready to go.
You’ll notice that each field in the Stationery Pad has a tickbox next to it. The tickbox is checked automatically if there is a value in the corresponding field. Fields with a selected tickbox are active and will overwrite any metadata that might exist in those fields on a target photo. A ‘ticked’ but blank field will erase the contents of that field on a target photo.
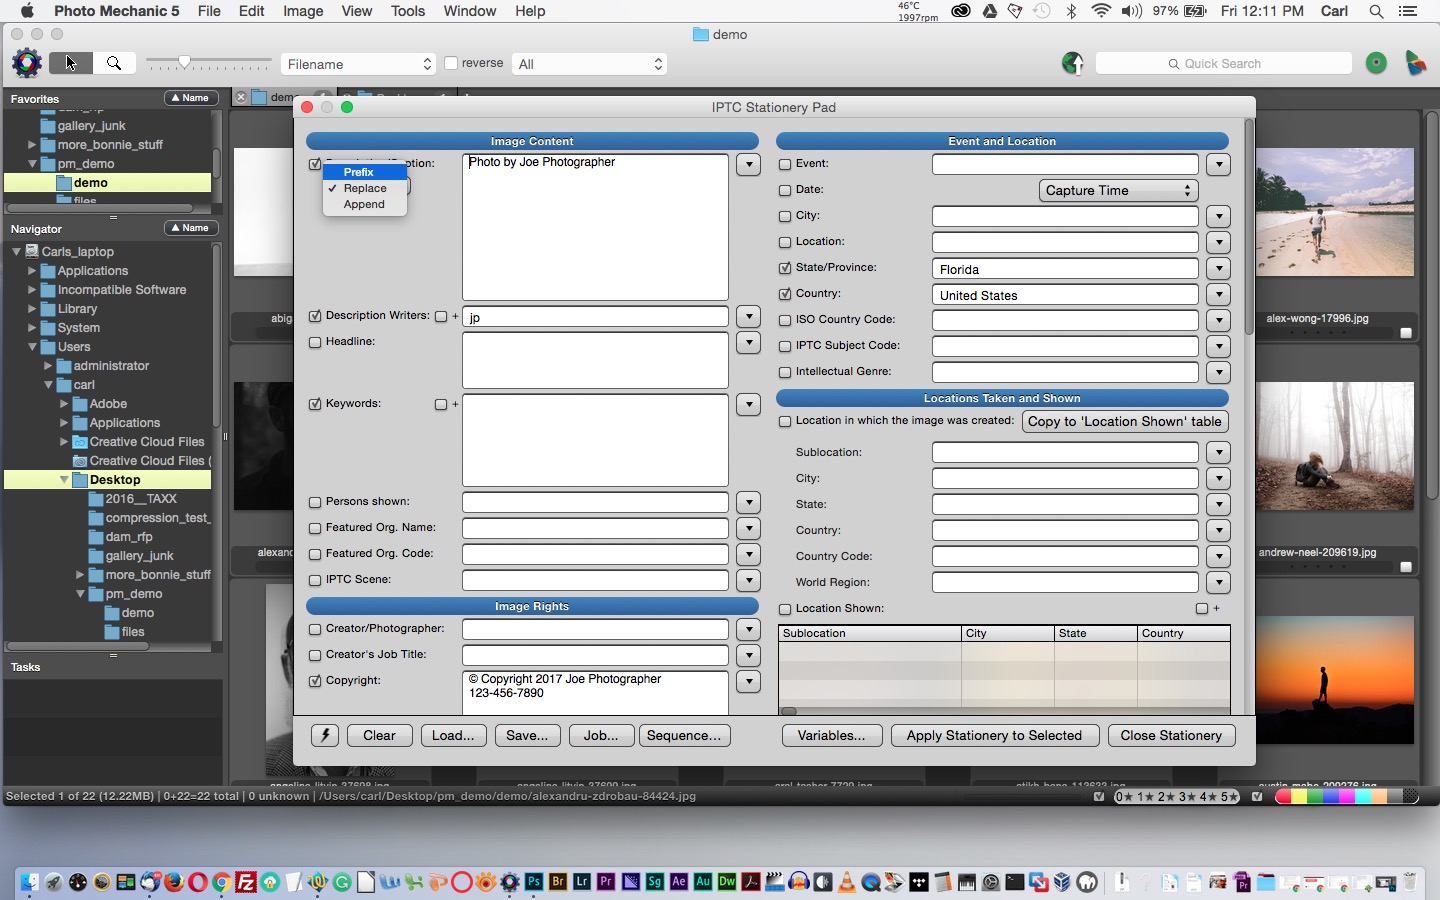
Add additional metadata to the caption
Now notice that the Caption field has a flyout menu with choices for ‘Replace’, ‘Prefix’ and ‘Append’. Depending on what you choose in this flyout, the Stationery Pad will prepend, overwrite, or append data in the Caption field of target photos. The Caption Writer and Keywords fields have ‘+’ tickboxes. Those allow the contents of those fields to be appended to corresponding fields on target photos.
In the IPTC Stationery Pad, you can add information to an existing caption.
Typically, we use appending or prepending on our second pass through our photos. First, we broadcast baseline metadata to all the photos in a given batch. Then, we add caption information and keywords that may be common to all the photos in the batch by clearing the Stationery Pad, adding the new information, choosing to prepend or append as appropriate, and applying the Stationery Pad.
The Stationery Pad has a Snapshot button and from it, we can choose and save templates. Templates are interchangeable between the stationery pad and the IPTC Info dialog, as are XMP template files.
Variables in Photo Mechanic
On the bottom of the Stationery Pad, there is a ‘Variables…’ button. Variables are codes that can be replaced with values that you define. If you put a variable for GPS Latitude in, say, a picture’s caption, Photo Mechanic will find the Latitude for that picture and write it where the variable was.
If you click the ‘Variables…’ button, a menu will appear with variables available in Photo Mechanic. Place your cursor where you want the variable to appear, go back to the menu and double-click a variable and that variable will be inserted. You can also simply type or copy and paste. Once you apply your metadata to a picture, any variables will be replaced with the appropriate values. You can build whole sentences peppered with variables. It’s like the mail merge feature in an office program.
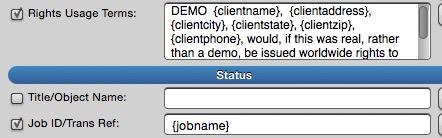
These variables in a template will be replaced when the metadata is applied.Variables in a template have been replaced by contact information in this Rights Usage Terms field.
Variables work the same way in IPTC Info and, indeed, several other dialogs in Photo Mechanic.
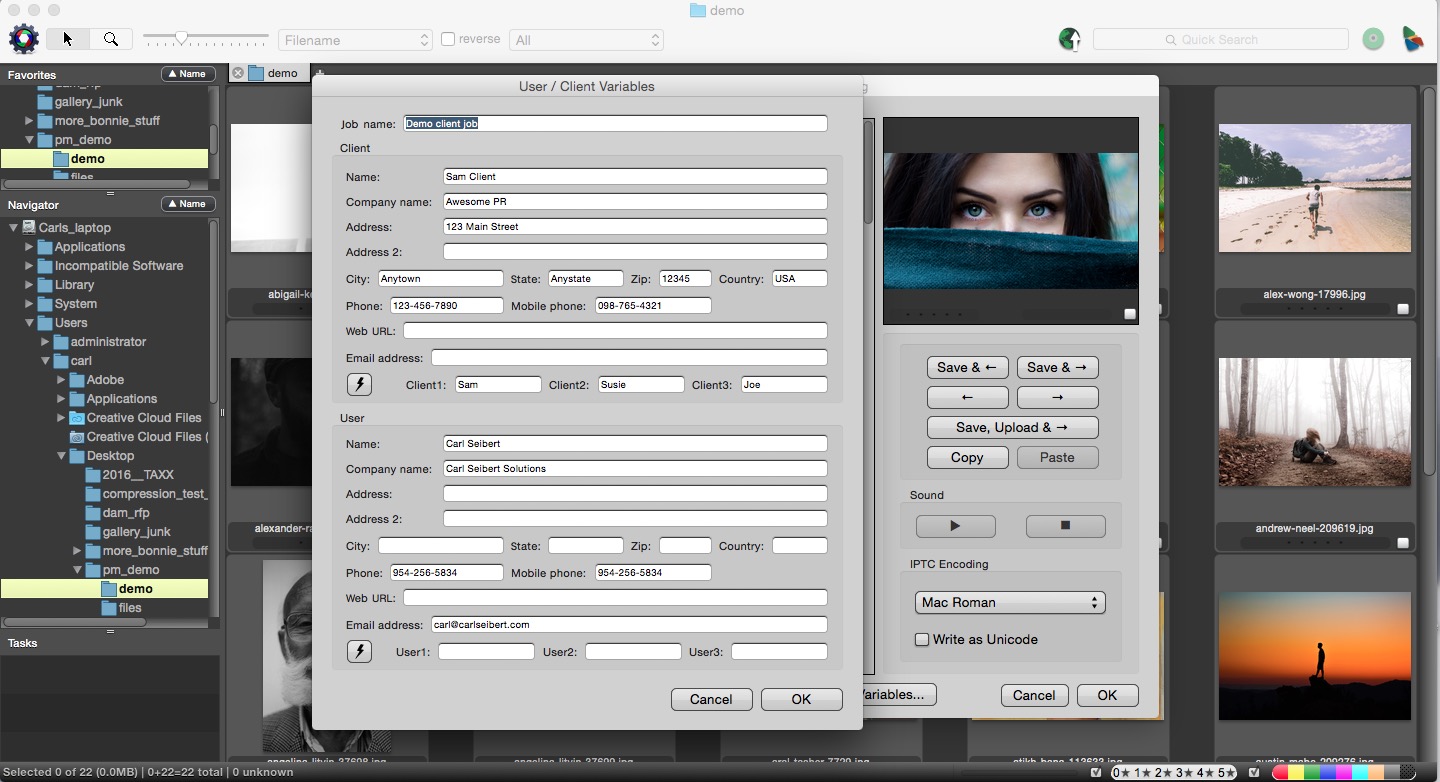
Another button found in both the IPTC Info dialog and the Stationery Pad is the ‘Job…’ button. ‘Job…’ Opens a dialog where you can enter contact information for clients and photographers (although you could enter this information for anybody.) Snapshots in this dialog allow you to build an address book. Each field in the ‘Job…’ the dialog is associated with a variable. If you load a certain client’s, or photographer’s info in the Job dialog, then the corresponding variables can be placed to apply that information anywhere you choose. You could easily build a template that would create, for example, a customized Rights Usage Terms statement granting a license to whatever client you select in Jobs.
In the Job dialog, you can enter information about people – clients, photographers and others – which can be used with variables to automatically insert names and contact information into metadata.
The ‘Sequence…’ button allows you set the starting number for the sequence variable. The sequence variable is often used to rename files with incrementing numbers in the file name, like “01wedding.jpg; 02wedding.jpg; 03wedddng.jpg”. But it can be used anywhere you want a number that increments from picture to picture, “…photo {sequence} of 17”, in the captions of a seventeen-picture gallery, for example.
How do we apply baseline metadata to many photos?
Most workflows start with photos on a camera memory card. The first order of business is to copy either all your photos or a select edit of photos from the card to your computer. In Photo Mechanic, you’ll either do that by copying or ingesting.
Copying
If you copy, you’ll start with thumbnails of the pictures on your card open in a Photo Mechanic Contact Sheet, or thumbnail browser tab. You’ll select the photos you want to copy to your computer and press ‘CMD/CTL+Y’ (or select ‘Copy To’ from the File menu) to open the copy dialog. Right near the top of the copy dialog, there
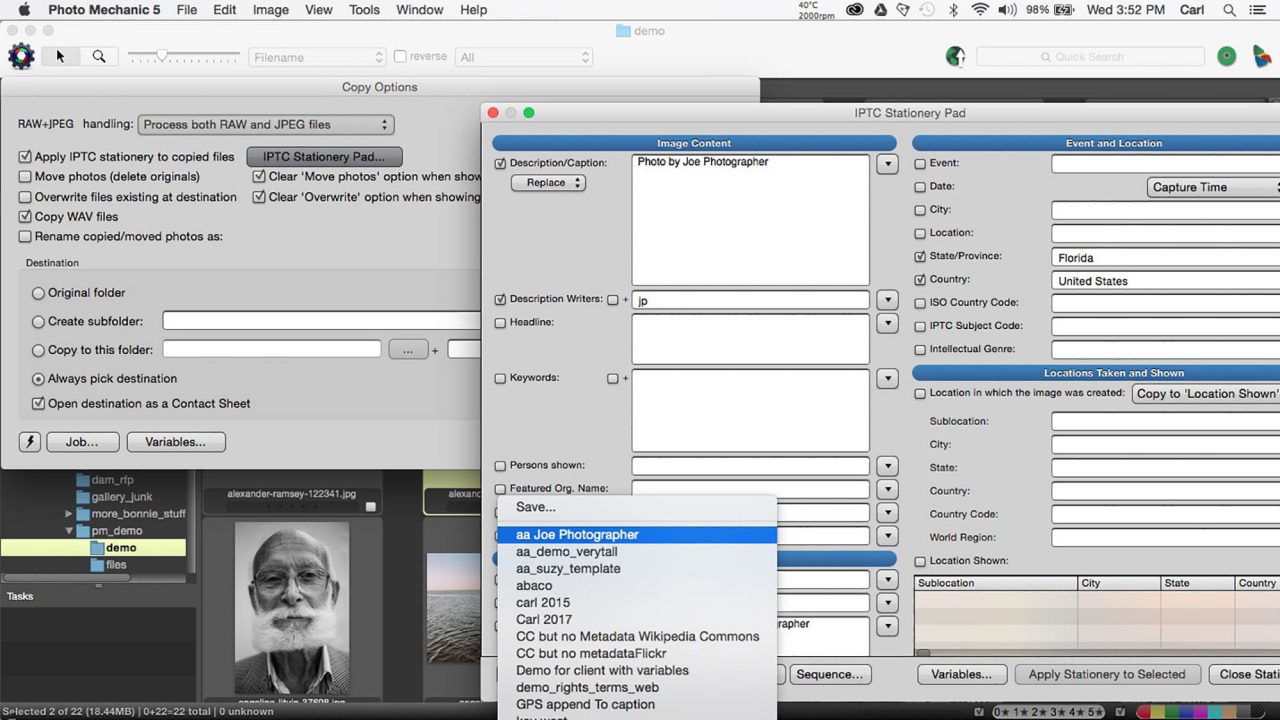
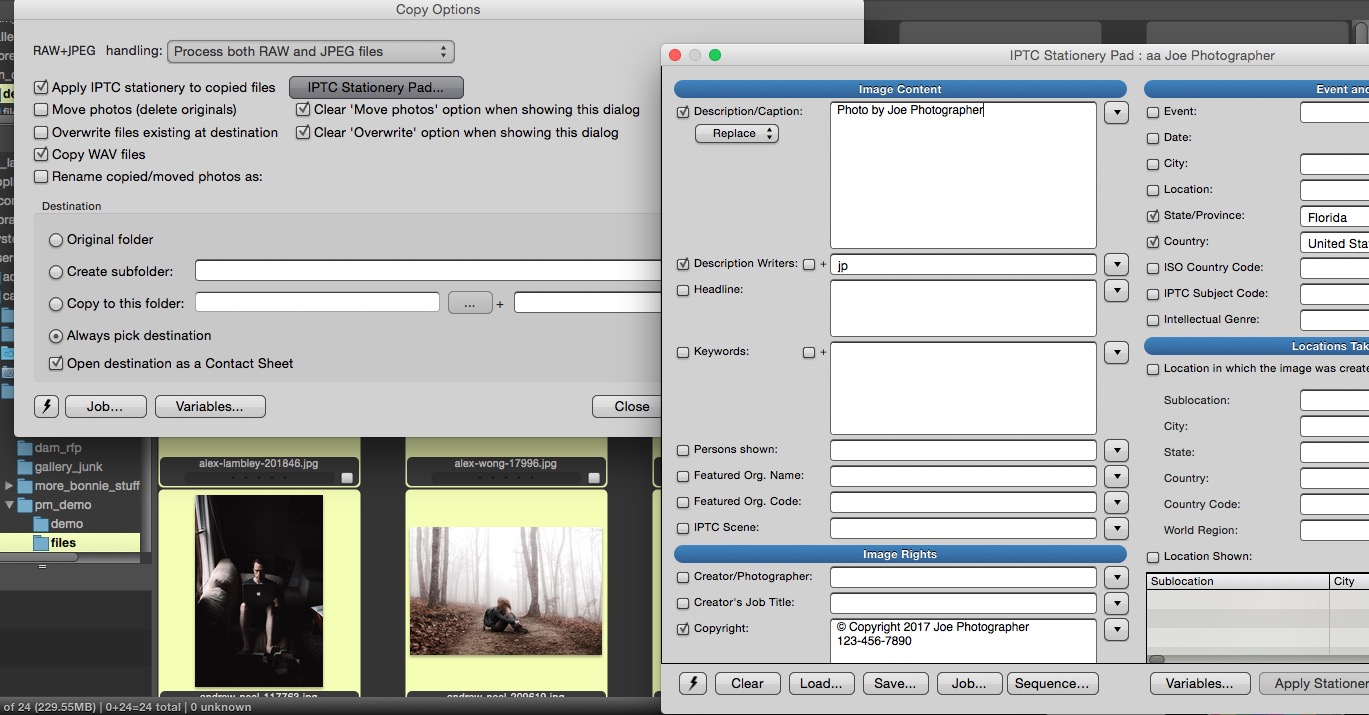
Adding template metadata while copying files.
is a tickbox that allows you to ‘Apply IPTC Stationery to copied photos’. Tick this and we can apply baseline metadata to photos even as we copy them to our computer. There is a button that opens the IPTC Stationery Pad.
From the Stationery Pad’s Snapshot flyout, choose a Snapshot (template) and it will load into the Stationery Pad. We can now close the Stationery Pad. It’s loaded with the metadata from the template we just chose. Now we choose our other copy options and click ‘Copy’. While our photos are being copied, our metadata template is being applied. Photo Mechanic will embed metadata in files that accept embedded metadata and it will make sidecar files for file formats that don’t work with embedded metadata. (Many RAW files, for example.)
Ingesting
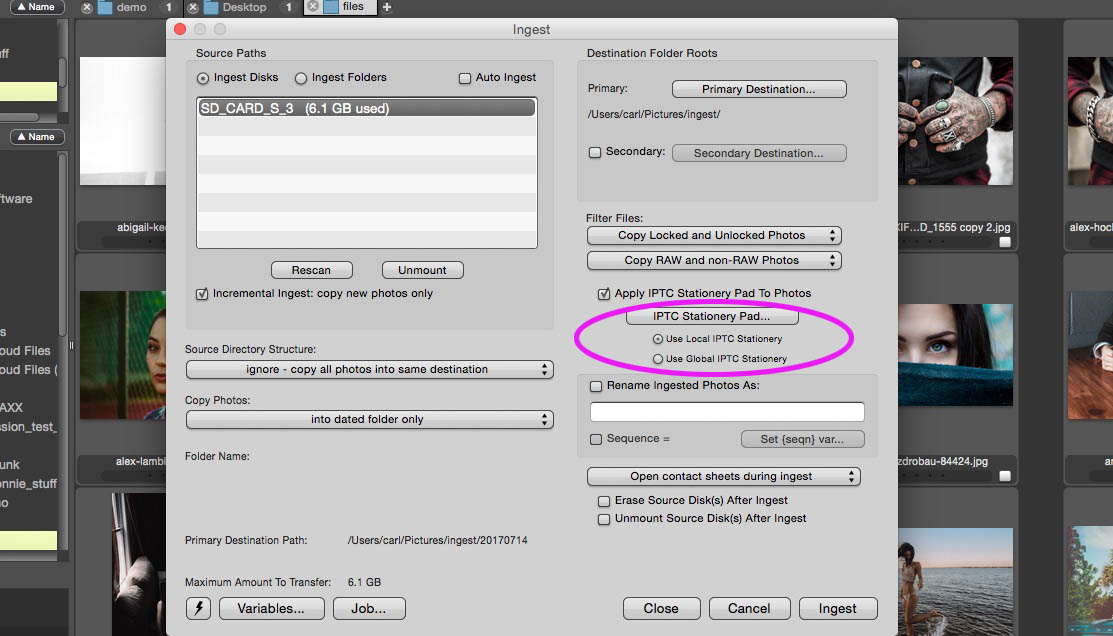
The other method for copying files from a camera card to your computer is called “Ingest”. Go to ‘File > Ingest’ to open the ingest dialog. Ingesting copies all the photos on a card, or newly added ones, from the card – or “disk”, if you’re old school by digital standards, and learned when camera cards were actually miniature spinning hard drives. In the Ingest dialog, we have another ‘Apply-IPTC-stationery’ tickbox.
In the Ingest dialog, specific sets of metadata can be saved and applied during ingest through use of the ‘Local Stationery Pad’ option.
This time, we have radio buttons that allow us to choose between “Local” and “Global” IPTC stationery. “Global” IPTC stationery means whatever metadata we have loaded into our Stationery Pad, just like when we copied pictures from the card to the computer.
“Local” IPTC stationery means IPTC stationery that was loaded on the pad when a Snapshot of the Ingest dialog was made. The Snapshot button in the lower left corner of the Ingest dialog will make such a Snapshot.
Snapshots are like presets. They record the condition of the entire dialog. Thus, by using this “Local” feature, we can make Ingest Snapshots that include specific metadata. We can assign different sets of metadata to different batches of photos in just one click, without having to even open the Stationery Pad. Use this feature for batches of photos from different photographers, or for different clients, for example.
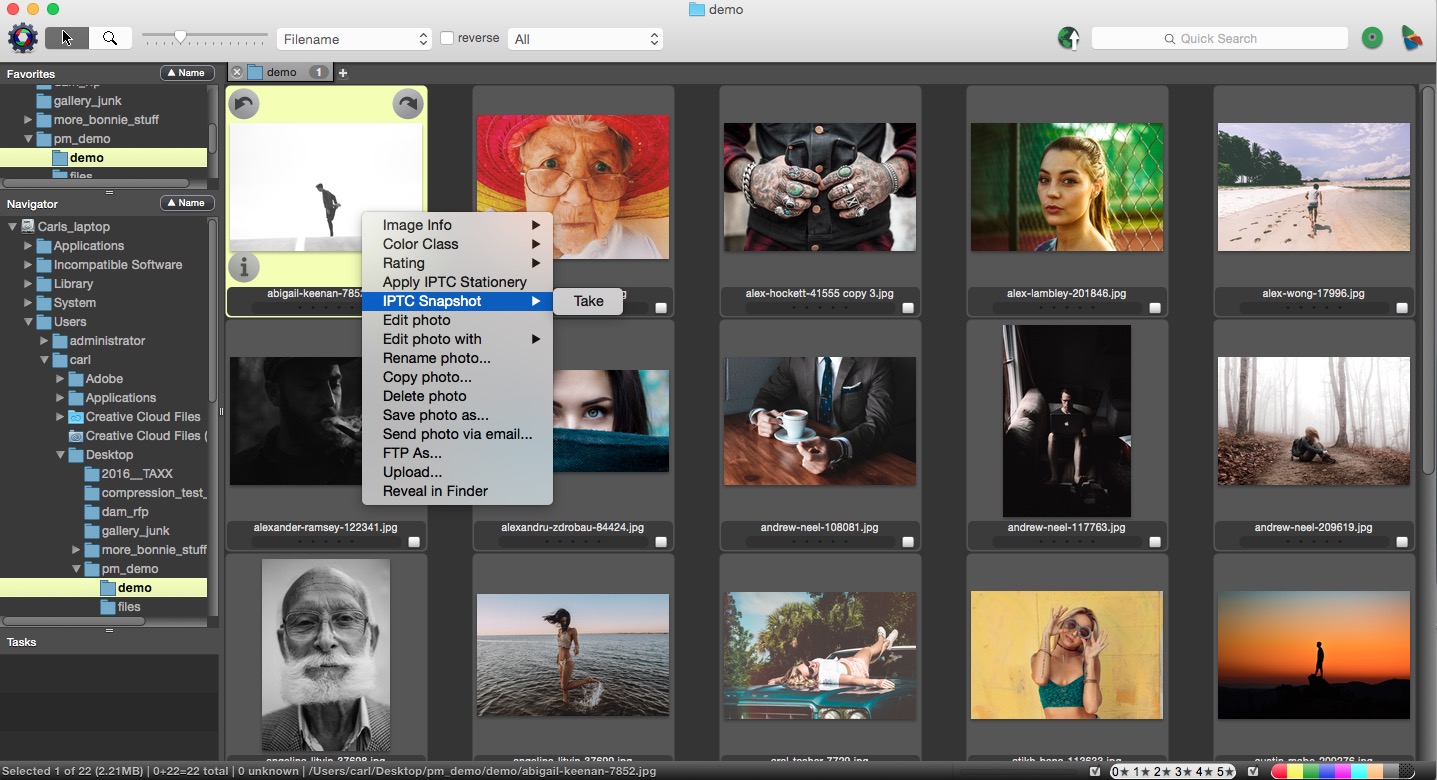
IPTC Snapshot
Another way to copy metadata to one or many photos is IPTC Snapshot. Right-click on a photo. You’ll see ‘IPTC Snapshot’, with a flyout arrow that allows you to ‘Take’ or ‘Paste’. IPTC Snapshot one photo and paste its metadata to as many selected pictures as you want.
Take an IPTC Snapshot from the context menu.
You might not want to add baseline metadata to every photo. There are perfectly logical reasons why this might be. In this case, simply copy photos to your computer, sans metadata, then select the ones you want to add metadata to, and use the Stationery Pad.
Generally, in the Copy and Ingest dialogs, we would use the Stationery Pad to apply baseline metadata to photos coming into our workflow. Then we would use the Stationery Pad again to apply information common to all photos in a batch. And finally, we would use the IPTC Info dialog to apply specific metadata to individual photos.
Save Photos As…
If you look in the right-click context menu from any photo in Photo Mechanic, you see ‘FTP as…’ and ‘Save Photos as…’ items.
‘The Save Photos As’ and ‘FTP As’ dialogs both feature the ability to apply metadata from the Stationery Pad.
‘Save Photos as…’ opens a dialog where we can save copies of our photos transformed in a variety of ways. They can be resized, have crops applied, be compressed, or renamed, among other things. This dialog also has an ‘Apply stationery’ feature, with a button to open the Stationery Pad. Like the copy dialog, in this one, we can only use the active data that’s currently loaded on the Stationery Pad.
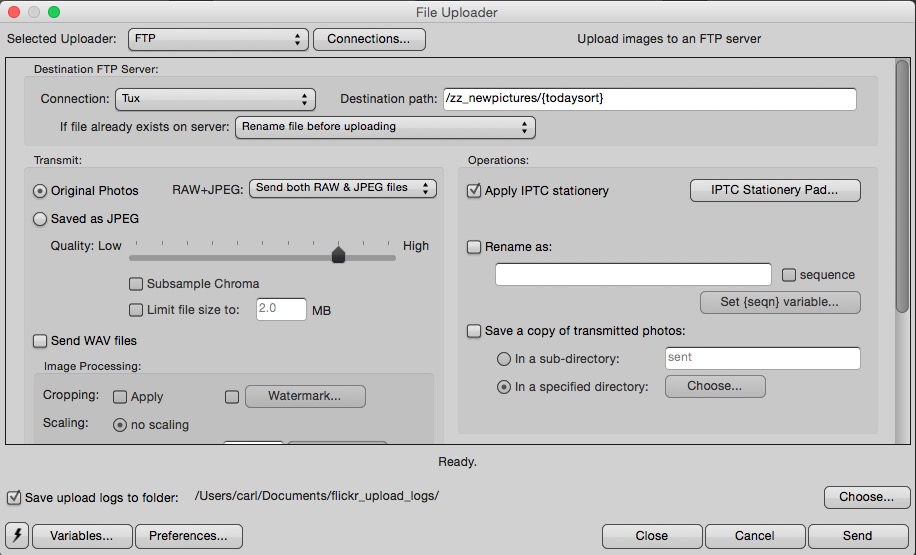
FTP As…
‘FTP as..’ is equipped the same way. (‘FTP as’ is a bit of a misnomer, by the way. From this dialog, you can send photos to a number of specialized destinations, like PhotoShelter and Zenfolio, that are not ordinary FTP servers.)
In these output dialogs, we would normally by using the Stationery Pad to apply tweaks, like licenses, or embargoes, to existing metadata.
More metadata functions in Photo Mechanic
The Tools main menu pulldown includes several metadata functions. From this pulldown, you can do housekeeping tasks to your metadata such as choosing its text encoding or synchronizing IPTC metadata in the IPTC IIM Area of your file and the XMP area of your file.
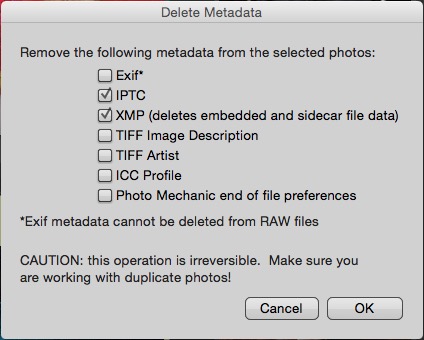
Delete metadata
From the Tools pulldown, you can choose ‘Delete Metadata’. You would use this dialog if you were working on copies of photos from which you need to redact metadata for one reason or another. See this post for a discussion on when stripping metadata from a photo might be appropriate.
Classes of metadata can be individually deleted in the Delete Metadata dialog.
In this dialogue, choose categories of metadata that will be removed from your photo. Often, you would leave untouched the IPTC and XMP metadata (where the most often used copy of the IPTC information lives) and remove everything else. Notice the warning that cautions that this operation is permanent and should be used only on duplicate photos, never on originals that you want to keep. Good advice. Heed it
Adjust Capture Dates and Times
Another powerful dialog that is available from the Tools menu is ‘Adjust Capture Dates and Times’. This dialogue allows you to adjust the capture time of a photo and write the new information to Exif metadata, IPTC metadata, or to files’ own modification dates and times.
This dialogue is usually used to synchronize time data between different cameras. Photos of a running clock such as the game clock at a sports event or even your watch can be used with this dialogue to precisely synchronize capture times of photos. Most often this is used to order the photos in chronological order in the contact sheet view. It can also be used to correct if the camera’s clock is just plain wrong.
The inline information button in this dialogue is extremely helpful. (Most of Photo Mechanic’s Help documentation is excellent, by the way.)
From the Settings flyout of the Edit menu, you can access the settings for several text and variable-related functions. Of particular interest to metadata users are the ‘Code Replacements’ item and the ‘Auto-Complete’ item.
Code Relacements
Code Replacements allow you to define codes what you can type in your metadata and then that code will be replaced with any text you desire.
When I type the closing “\”, a long and difficult to type string will instantly replace this Code Replacements character string.
If your workflow requires you to repeatedly use phrases that are difficult to type or difficult to spell this feature can be a significant timesaver. For example, if you often need to type “Governor Arnold Schwarzenegger (Republican), California,” you might quickly learn to love this feature. Program Photo Mechanic to replace “\guv\” with that phrase.
Code Replacements instantly substitutes this phrase when I type a five-character code.
The use of code replacements is explained in detail in the Camera Bits Wiki.
Auto Complete
‘Auto Complete’ is exactly that. Photo Mechanic allows you to set your own type-ahead auto-complete values. This could be helpful for example if your company’s CEO has a particularly difficult to spell or type name.
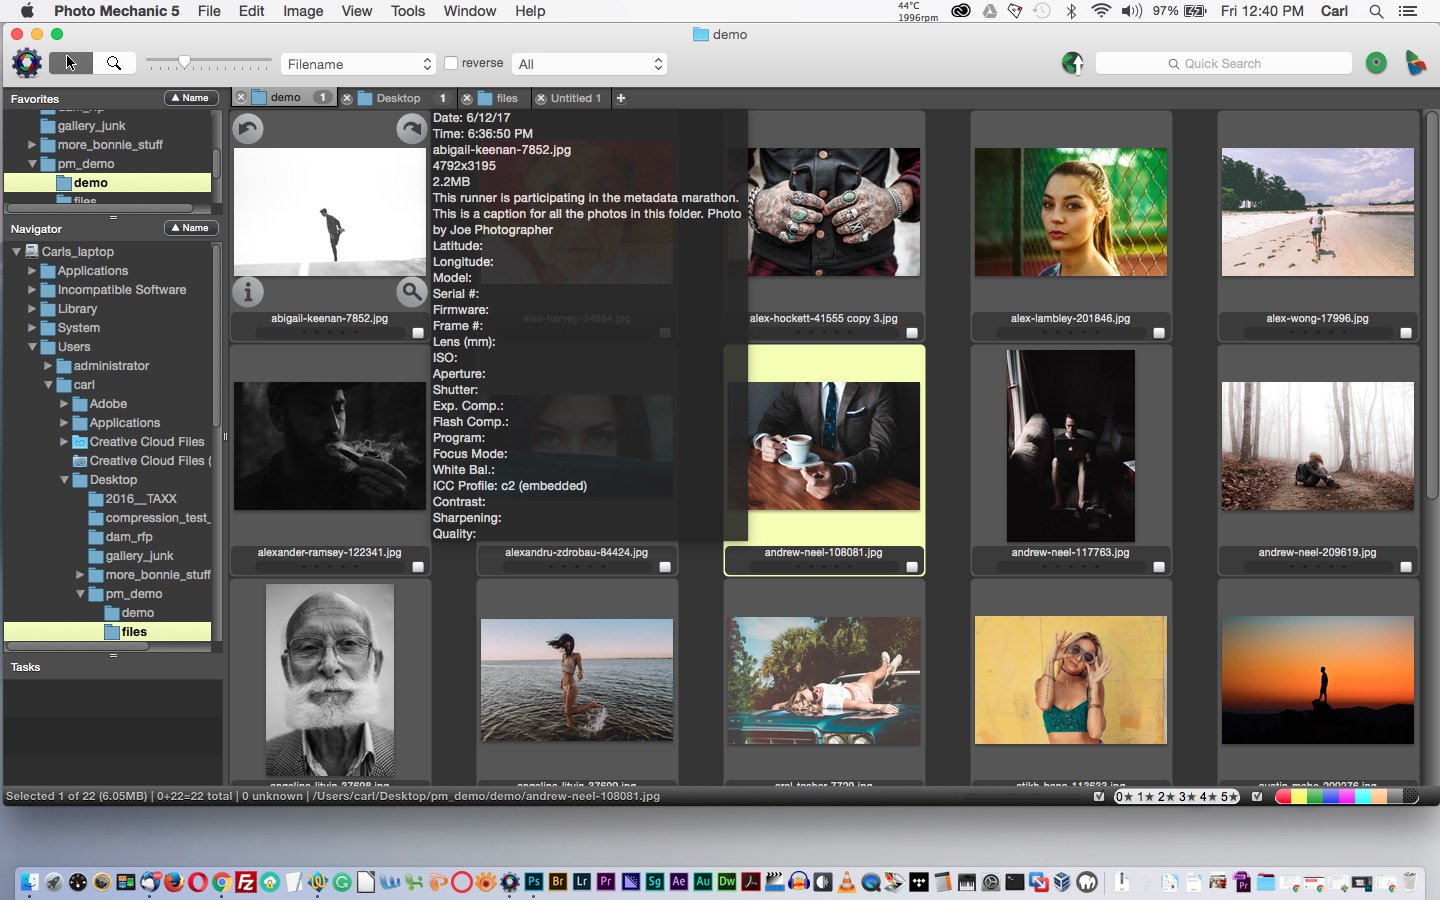
Set Info Text
The Properties tooltip can be configured in ‘Set Text Info’ to show the metadata of your choosing.
The ‘Set Info Text’ dialogue allows you to configure what information from the metadata is shown in the one-up preview in Photo Mechanic and in tooltips (View > ‘Show Info Tooltips’, or Shift+CMD/CTL+T, or from the right-click context menu) For example, you could add file dimensions to the display, as I did, or you could show the caption or other IPTC fields. By default, Exif data is shown, but you can choose variables to show any metadata.
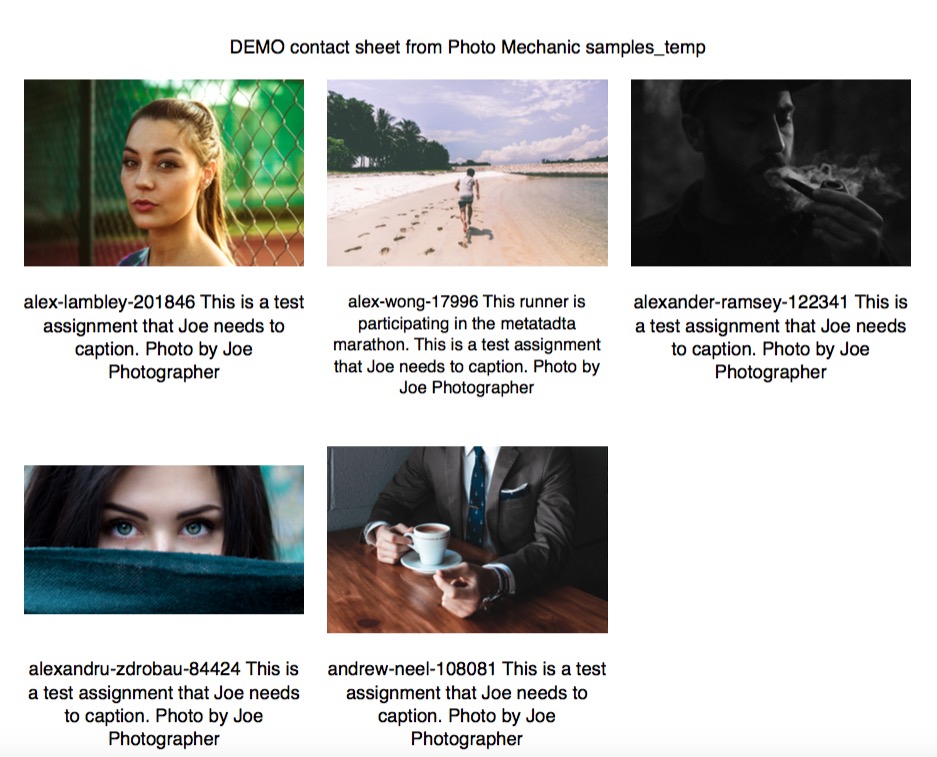
Printing metadata
Let’s say you need to reveal metadata to users who do not have a metadata reading
Photo Mechanic can produce printouts with legends containing metadata of your choice.
application installed on their computer. There are two functions in photo mechanic that allow you to do this elegantly.
Photo Mechanic’s print dialogue allows you to use variables to include metadata fields as legends under pictures printed either one up or as a contact sheet. You may, of course, print such a contact sheet either to paper or to a PDF.
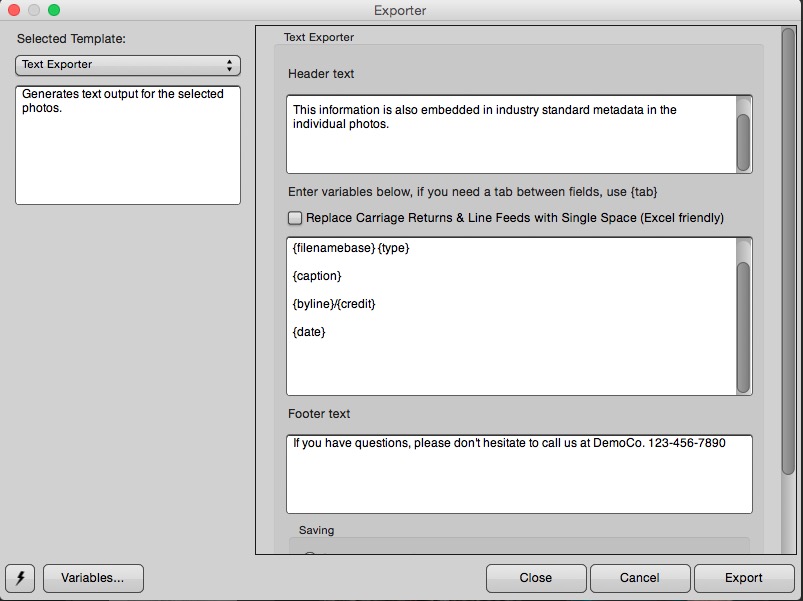
Export text files of metadata
From the File menu, choose ‘Export’ to open the Exporter dialog. Then from the flyout menu on the left side of the dialogue choose ‘Text Exporter’. This function allows you to export text from any metadata field into a text file. You can add header and footer text and simple ASCII formatting. You can even make tab delimited output for use in spreadsheets or print publishing programs.
The Text Exporter creates lists of metadata from selected images. Experimentation is the best way to learn to use this feature.
This function can make readme files containing caption information. You could post them with photos in file sharing environments such as Dropbox, Google Drive or an FTP share.
The best way to learn to use this function is to simply select a group of photos and experiment in the Text Exporter dialogue until you’re satisfied with the way your exported text file looks.
Ratings and labels
Photo Mechanic’s star ratings and color labels are, strictly speaking, metadata. They can be shared between Photo Mechanic and the Adobe Creative Cloud applications, and XnView.
Stars are automatically shareable. Star ratings in any of the programs will appear in any of the others.
Color labels can be synchronized between Photo Mechanic, Adobe Bridge, Adobe Lightroom, and XnView. In order to do so, you will have to modify preferences in Photo Mechanic. In a separate post, I will explain the process in detail.
There’s a lot of power in Photo Mechanic. And a lot of detail. And a long post. In the coming weeks, after my typing fingers recover, I’ll round out our tour of application How-Tos with a post on using XnView to work with metadata. Future How-To posts will include optimizing photos for use on the web (especially for WordPress) in Photo Mechanic, XnView, and Lightroom.
In the meantime, please help me correct any errors I have made by posting in the comments.
A mini-glossary post.......Labels. Most definitions of metadata start by saying that "'metadata' literally means 'data about data." In a technical, database-y kind of way, that's exactly true. But for us it's labels. We're talking about behind-the-scenes labels attached to digital content assets.
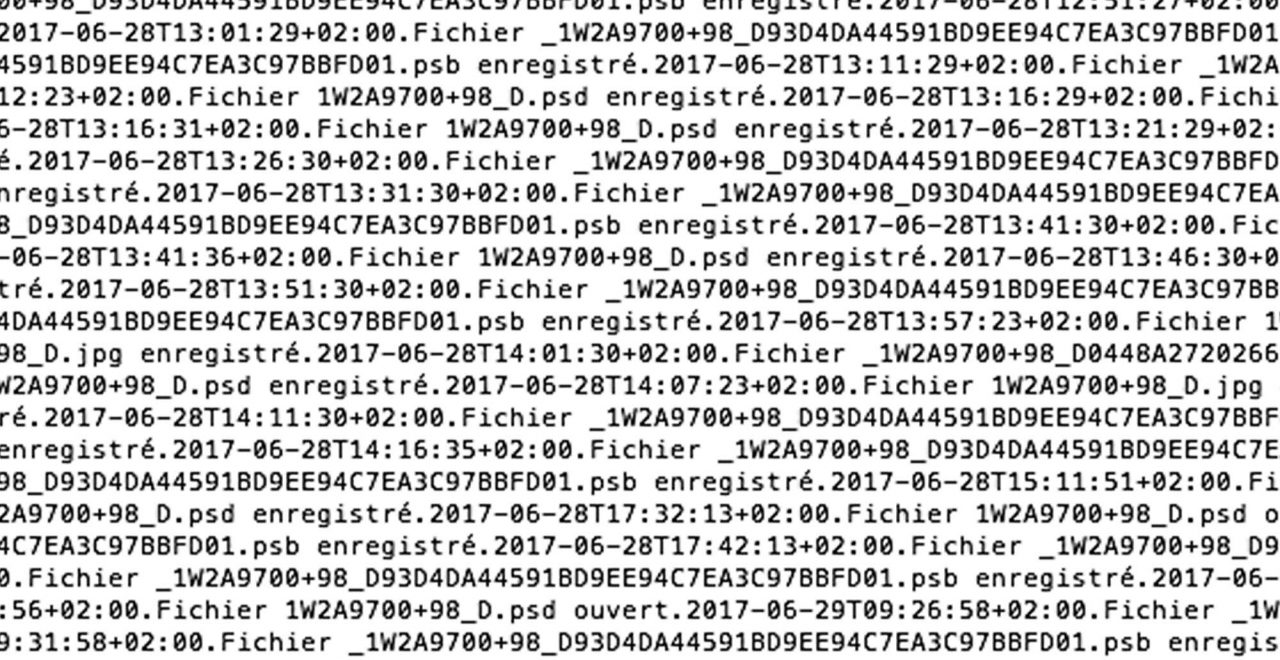
Last week’s release of new French president Emmanuel Macron’s official portrait, by photographer Soazig de la Moissonnière, caused a stir on Twitter. Metadata on the version of the photo released on the government’s website revealed that somebody had the picture open in Photoshop for some fifteen hours. But vital information was left off the photo.