Optimizing images for WordPress. There’s been a lot of digital ink spilled on the subject. There are tons of urban myths swirling around. There’s stuff that’s true, stuff that was true five years ago, stuff that was never true, and stuff that’s way over complicated or just plain wrong.
But the real lowdown, circa early 2020, is stupid simple.
You don’t optimize images for your WordPress site. WordPress does it.
All you have to do is upload a good quality image, at the largest size your site will need, saved at a JPEG compression of 82 or higher.
And, by the way, make sure you have ImageMagick enabled as your imaging library.
We may be seeing a long longed-for trend toward WordPress hosting providers enabling the ImageMagick imaging library by default. That causes their customers’ sites to respect embedded metadata on images. Preserving metadata means preserving rights information, powering rights-driven features like Google Images’ “Image Credit” and “Licensable”. Which makes life better for honest people all over the web. When hosts turn on ImageMagick for all of their customers, millions of sites at a time will switch to honoring metadata. If indeed we're seeing a trend, this is really good news.
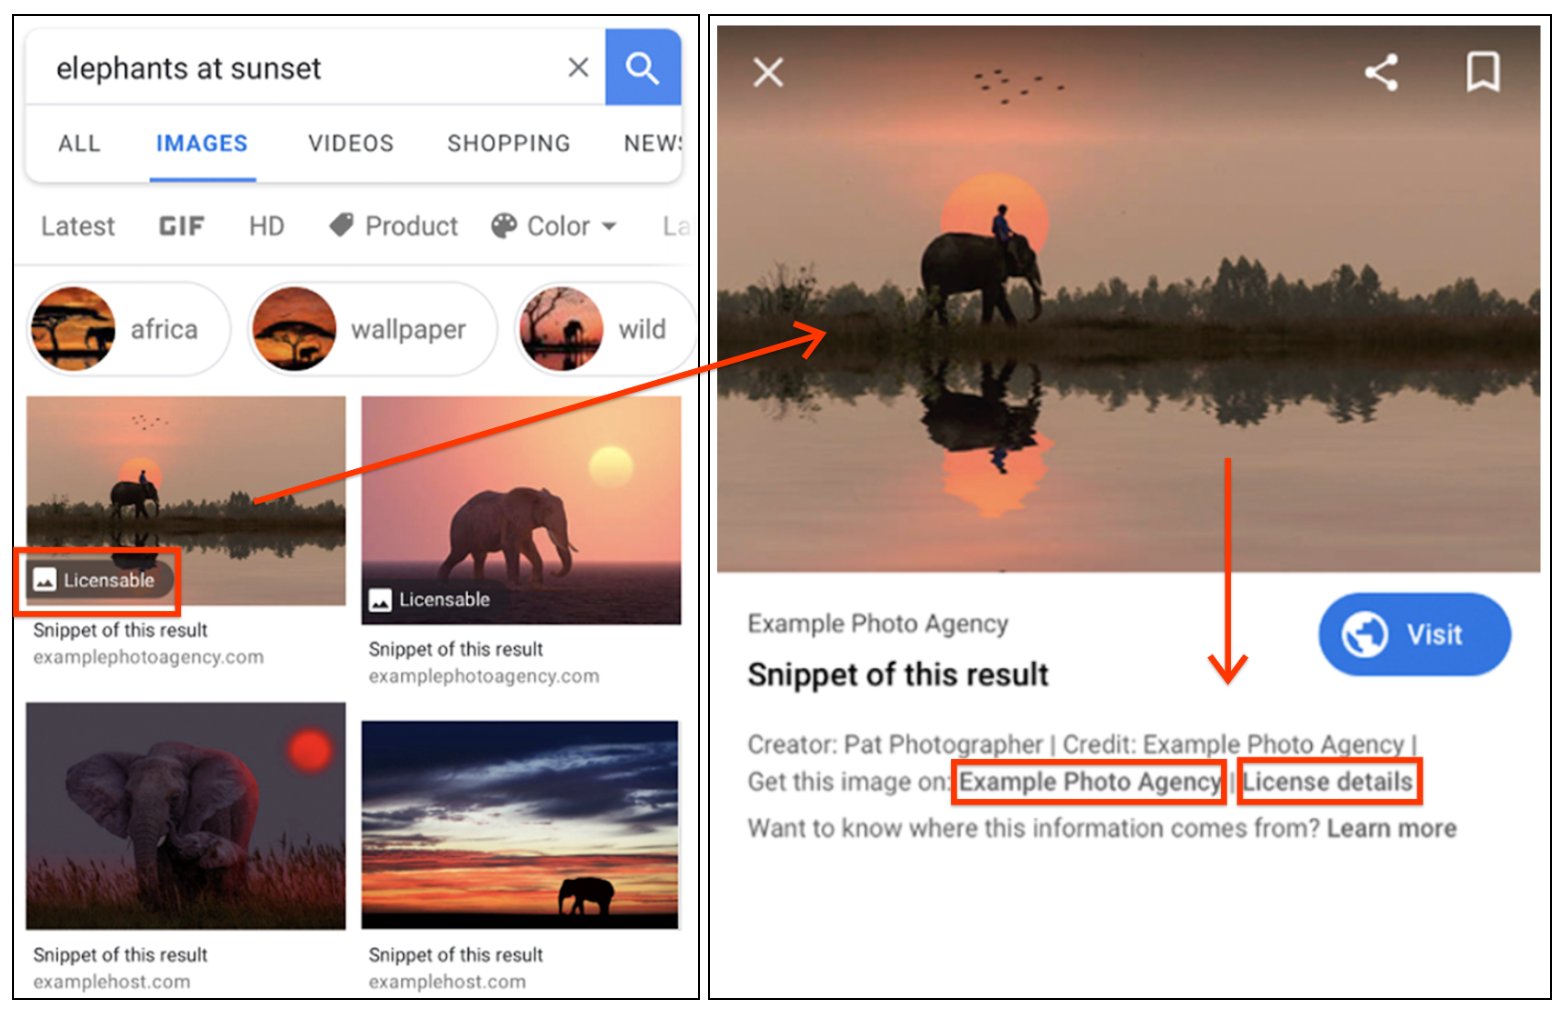
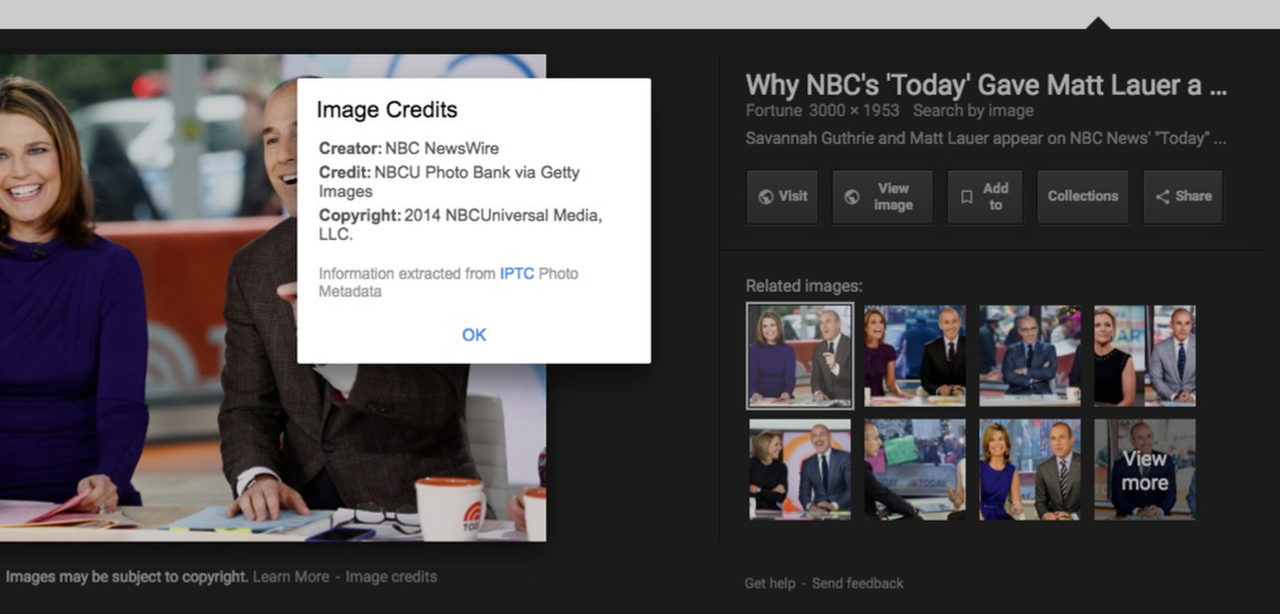
Google distributed this mockup of how “Licensable” might look when it is released. Photo courtesy of Google
IPTC fields will drive new “Licensable” feature
Google is beta testing a new feature that will help honest people obtain licenses to use pictures found on Google Images. “Licensable” will help identify images whose owners can be readily found. Cash can be exchanged and a license issued in the speed of a click. Or an email or phone call.
(Many copyright owners I have dealt with have been so blown away by somebody approaching them for a legit license that they have just given me the license. Honesty pays. I kid you not.)
How it works
Three IPTC fields new to Google Images will drive the new feature. This is in addition to the three fields that Google has supported since late 2018.
The Web Statement of Rights field, which is known in most software as “Copyright URL” will drive a “Licensable” badge on an image in Google Image search results (see illustration above) and, if the field contains a valid URL, a link for “License Details” will appear on the image’s preview. (“Valid” here means the whole URL, beginning with the protocol, like this: https://www.carlseibert.com/licenses ) This is the most important of the new-to-Google fields.
Google is now telling website operators that stripping metadata from images is not a good thing. Look at the bottom of this help page where Google tells webmasters – ever so gently – to leave copyright metadata alone! Woo! Hoo!
Google describes the URL in Copyright URL as “A URL to a page that describes the license governing an image’s use.” For most non-Creative Commons images, there is no license yet for whatever use a Google Images user might have in mind. That’s the idea – to arrange for such a license. So, Google’s description can’t be taken too literally. I’ll come back to this.
Missing from the mockup Google released is the image’s copyright notice. The contents of the Creator and Credit fields appear more prominently than before. But where’s the copyright notice? Maybe clicking on the photographer’s name brings up the copyright notice? If the contents of the Copyright field aren’t revealed, that could be a big issue. Hopefully, this will be sorted out in the beta process.
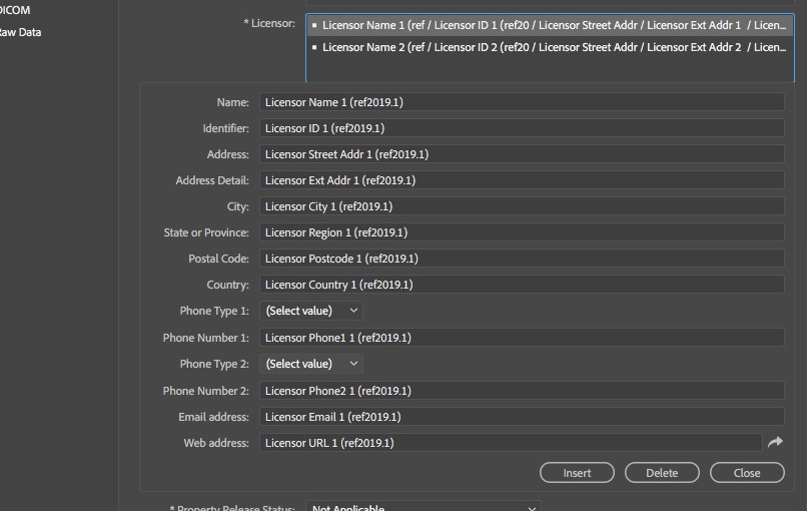
PLUS fields
Licensor and Licensor URL, relatively unknown fields in the PLUS portion of the IPTC’s Extension Schema Standard, will drive additional links for the name of an agency/licensor and “Get this photo on:”. This part of the feature is clearly aimed at photo agencies. The URL could point straight to a purchase page for that particular photo.
There’s no harm in just putting your company name and link to whatever page on your site is best for dealing with folks who want to license a photo here. Or, on the other hand, honestly, I don’t see any harm in individual photographers just skipping this field. Which is a relief, since most of us won’t immediately have access to the Licensor fields in our software anyway.
For what it’s worth, I think the way Google has laid out these links in its current beta (see the main picture above) is backwards. I think that they should start with a link for “Licensing Details” (which will be driven by the most likely populated field), followed by “Get this photo on:” which can really only help out in those cases where a license may be purchased online. We’ll see what happens as Google proceeds with the beta.
What does this mean to you and me?
Google is trying to clean up the copyright thieves bazaar that the internet and that their product, in particular, has become. It is in our interest as content creators and publishers to help out in any way we can. It’s our stuff that’s being stolen and our web pages where the stolen stuff ends up.
Moreover, it’s dead easy to be on the right side of this.
For photographers
What do we have to do?
Photographers need to make sure that they embed proper metadata in every image they send out into the world. Readers of this blog already know this.
To review, Google Images already exposes the contents of the IPTC Creator, Copyright, and Credit fields. Double-check to make sure your template fills these fields properly.
The Creator field just needs your name.
The Copyright field holds your copyright notice. There is no legally required format. Just tell everybody you own the copyright. Adding some minimal contact information, like your business phone number, really helps.
The Credit (or “Creditline”) field is trickier. Traditionally, this field holds the name of whomever the photographer is working for. For a published credit that reads “Suzie Photographer/The Widget Times”, ”The Widget Times” goes in the Credit field. Nowadays, some people are putting the entire credit string in this field. Which freaks out automated publishing systems, yielding something along the lines of “Suzie Photographer/Suzie Photographer/The Widget Times”. Sigh. Your choice. Or don’t use the field at all if you don’t need it. Neither Google nor I will judge you.
I have written about the Copyright and Credit fields before. Visit this post. The search feature on this site will return some more posts that talk about Copyright.
Add – or refine – content to the new fields
Check to make sure you have a valid URL, complete with the leading https// or http//, in the Copyright URL field of your template.
Copyright URL/Web Statement of Rights needs valid content for you to benefit from the new Google goodness. Make sure the value in your template is complete, including that beginning “https//” or “http//”.
But where should the URL point? Mine used to just point to the front page of my site. I figured that anybody who wants to reach me will be able to click “Contact” and all will be good. But I didn’t have “https//” in the URL, so by Google’s lights, it would have been for naught.
What I recommend here is for you to make a simple landing page for people who might want a license. “Hey, thanks for your interest in my work. Talk to me and we’ll hook you up.” is all you basically need to say.
I made this very simple license details landing page for my website.
I made such a page for this site in a matter of a few minutes. It doesn’t appear anywhere on the site’s navigation menus. The only visitors who will see it will be coming from a link in my metadata, so it doesn’t have to be fancy at all.
If you have a page on a photographer’s portfolio site like Photo Shelter or Zenfolio or SmugMug, from which users can buy licenses, you could link there. Or you could make a landing page on any of those sites, too.
Or… I imagine that just linking to your home page or contact page would still be OK.
What about Licensor and Licensor URL?
If you’ve got ‘em, smoke em. It’s basically no work on your part to fill them in on your template and then you’re good to go. If you don’t have access to those fields in your metadata editing software of choice, I wouldn’t sweat it. By properly filling Copyright URL, you’ve got the “Licensable” tag and 90% of the benefit of the feature. Anybody who wants to buy a photo from you has the information they need to do so.
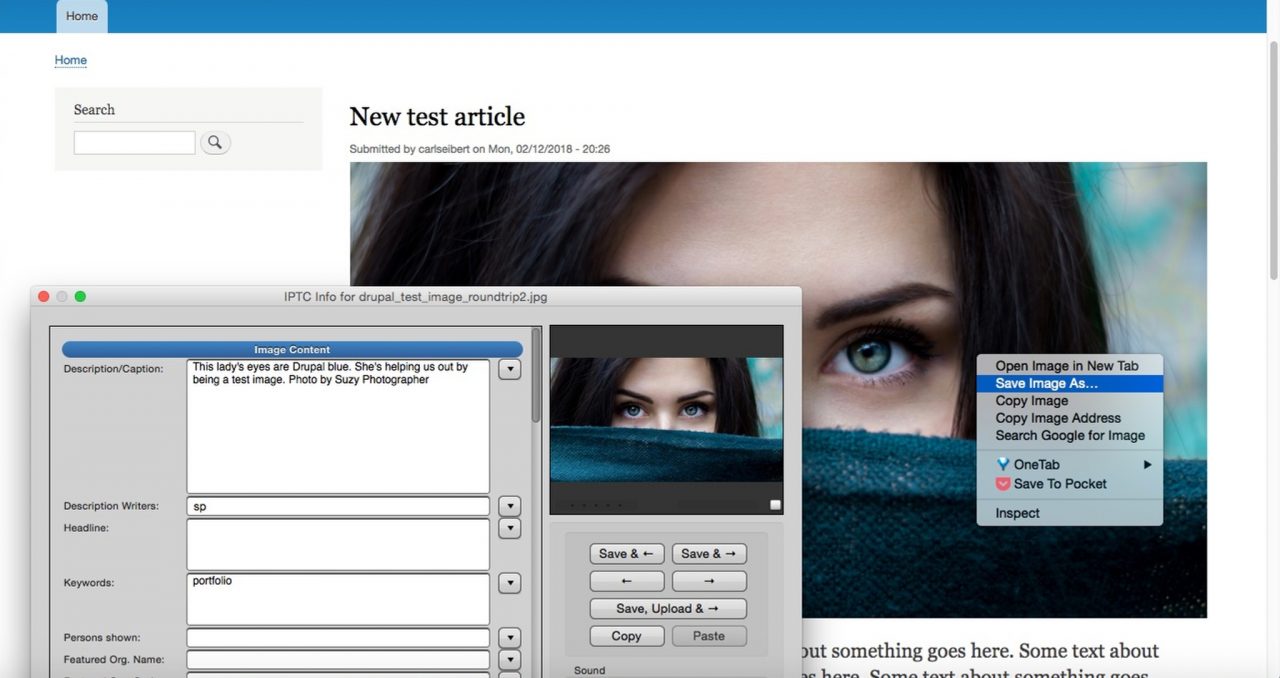
Of course, remember to add a good caption! Google doesn’t read embedded captions (yet). But identifying what’s depicted in am image is the main point of metadata.
Once a lot of images are tagged, the Google Images environment will be a better place – a little more honest-people-friendly and a little less thief-friendly.
Editing software support for these fields
The Licensor subfields appear in a pop-up dialog in Adobe Photoshop
I scanned through the software I cover to see which programs support these newly important fields and which didn’t.
Photo Mechanic – Supports Copyright URL, but doesn’t yet support Licensor and Licensor URL. Photo Mechanic’s lead developer Kirk Baker told me that his team is aware of the issue and is discussing potential solutions. Support is forthcoming.
Update Late April 2020: Photo Mechanic 6 now supports the entire Licensors structure, including Licensor Name and Licensor URL. See this post for more.
ON1 Photo RAW – Supports the Copyright URL field, but not the Licensor fields.
Photoshop – Supports both Copyright URL and the Licensor fields.
Adobe Bridge – Supports the Licensor fields, but not Copyright URL. Copyright URL is part of the Core Schema. What. The. Heck? I looked carefully. If I made a mistake, please let us know in the comments.
Adobe Lightroom Classic – Supports both Copyright URL and the Licensor fields.
Capture One – Does not support Copyright URL or the Licensor fields.
XnView – Does not support Copyright URL or the Licensor fields.
In sum, this is a zero-work thing. (Unless you’re using software that doesn’t support Copyright URL) Check your templates and you’re good to go. Depending on your software, “Get this photo on:” will either work now or be available to you later.
For website owners
What do those of us who operate “normal-size” websites have to do to make our web pages work with this new Google feature?
Not much.
Just make sure your website does not destroy metadata. Then Bob’s your uncle. Or substitute whatever cliche for things being hunky-dory you prefer. Regular readers of this blog probably already have their sites whipped into shape.
To make sure, just grab a photo that you know has IPTC metadata. Put it on one of your pages. Visit the page in a browser. Right-click and download the picture. Go to the IPTC’s online metadata viewer here, or from the link at the bottom of this page. Or use any metadata-capable program.
If the metadata is there, it’s all good. You don’t have to do a darn thing and you and your contributing photographers can rest easy.
If you don’t have a marked-up photo handy, you can download the IPTC’s standard test image here. It has LOTS of metadata. I wouldn’t put it on a visitor-facing page, but that’s just me.
If your website fails the metadata round-trip test, the chances are it can be fixed in a jiffy.
Fixing websites that strip metadata
A plurality of all websites (some 35% of the entire web) run on WordPress. WordPress will use the imaging library ImageMagick if it’s available and has been enabled in PHP. Most WordPress hosting services offer ImageMagick. By default, ImageMagick supports metadata.
Turning it on is incredibly easy, but the exact method you’ll need to use depends on your host. Some hosts have easy-to-follow instructions in their documentation. For others – most of them, really – you just contact customer support via chat or phone and they’ll either tell you what to do, or more likely, just take care of it for you. Problem solved.
More and more WordPress hosts are enabling ImageMagick by default. If your host has already hooked you up with ImageMagick, we don’t need to be having this conversation. But props to your host!
The “other choice” for WordPress sites is an imaging library called GD. GD ships with PHP and is used if ImageMagick isn’t there. GD strips metadata. Currently, GD is at version 2.25. Support for metadata is on the roadmap for GD v2.4. When that day comes, it will be good news for content creators everywhere. But it might be a while.
Big sites
Many big websites use the Drupal CMS. Drupal users need only install a couple modules and they will be able to choose their imaging library in Drupal’s GUI. That will take a good healthy three or four minutes. The hardest and most tedious part by far is reading my How-To post on the subject.
Super-fancy, custom-built websites, like the big news sites, may use any imaging library, but the chances are pretty good that a given site uses ImageMagick. And ImageMagick has likely been told to strip metadata. If that’s the case, it’s as simple as telling it not to by deleting an argument. Obviously, that’s a developer thing. And nobody is going to change a live server absent a pretty good argument for doing so. But when it comes down to it, it’s not a big deal.
If your website is static and your images are processed externally from your site and you have metadata stripping going on, just tell whoever or whatever is doing the stripping to stop doing that!
Another way to trigger “Licensable”
You can also enable the Licensable feature on your page itself, with schema.org structured data. This is a page-by-page and image-by-image thing, and you have to do it, as opposed to just letting Google parse the embedded metadata from your images. That’s a lot more work. Structured data is able to override embedded metadata, so that might be a reason to go that way.
Photographers and website operators alike – when should we make ourselves ready?
Well, right now would be good.
Seriously, we’re only being asked to do stuff we should already be doing anyway. All we really need to do is check and make sure our metadata templates are in good shape if we’re photographers and make sure our website is behaving as it should if we are website operators. We should check this stuff periodically anyhow.
Google says that Licensable should be up and running by late April, 2020. The more compatible content we have up before then, the better.
Will I zoom to the top of the SERP?
Google is saying that participation in Licensable will not be a ranking factor. That makes total sense. Right now there just isn’t enough properly marked-up content out there for Google to use as a basis for judgment. That said, in the long term, doing stuff that Google asks us to do is usually works out to our benefit.
Google has once again moved a step closer to a better world, where images are more likely to retain the information that makes them relevant to society. It took a bit of a lawsuit nudge to get Google’s heart in the right place, but no matter. Their momentum is in the right direction. Will it all help? Let us know your thoughts in the comments!
Google has begun actively surfacing copyright metadata on Google Images. Now that the Copyright field itself is working, users can see all three of the IPTC fields Google promised a few weeks ago. What does this mean for website operators?
It means that, if you haven't already, you should make sure your site respects metadata on images.
If you haven’t already, you should, ah… encourage your content contributors to put their names on their work.
So you run a website and you read my post about the Jessica Simpson lawsuit and destruction of copyright management information. Now you’re thinking about how not destroying metadata would help, well, everybody. True enough. You can protect your contributors, reduce pollution on the web, make assets easier to manage and, just maybe, prevent a nasty lawsuit by preserving metadata (and CMI).
You can grab metadata-less images from your server and paste the metadata back on in a jiffy if you have FTP access.
Replace stripped-away metadata on your WordPress server with this quick workaround
If your WordPress hosting provider makes ImageMagick available for your site, that’s good news. It’s good news for metadata. It’s good news for image optimization. It’s just a great day all around.
But what if you’re stuck with GD? Is there a way to fix the metadata damage that library inflicts? Yes. Probably. Maybe. I have a workaround for you. It works for most sites, depending on what sort of access your hosting provider grants.
You’ll need FTP access
If you have FTP access to your site, this will work. Most hosts that I’m familiar with do provide FTP access for self-hosted sites. But your luck may vary. (And since you’re probably reading this because your provider already doesn’t provide ImageMagick, you might want to hold off on buying that lottery ticket.) WordPress.com, by the way, does not support FTP access for its users.
Your hosting provider may have given your FTP credentials when you first opened your account. Or, your FTP details may be somewhere on your account’s homepage. Or, maybe there are instructions in the support documentation. Or, you might have to use your account’s control panel to enable an FTP account. Or, quite likely, you’re already well familiar with all that and you’re just waiting for me to get on with this.
If you’re not familiar with using FTP, there are lots of How-Tos on the web. Just Google “FTP and WordPress”.
What we’re going to do here is FTP to our WordPress server, grab the image files that have been stripped of their metadata, paste the metadata back on and put the files back where we found them.
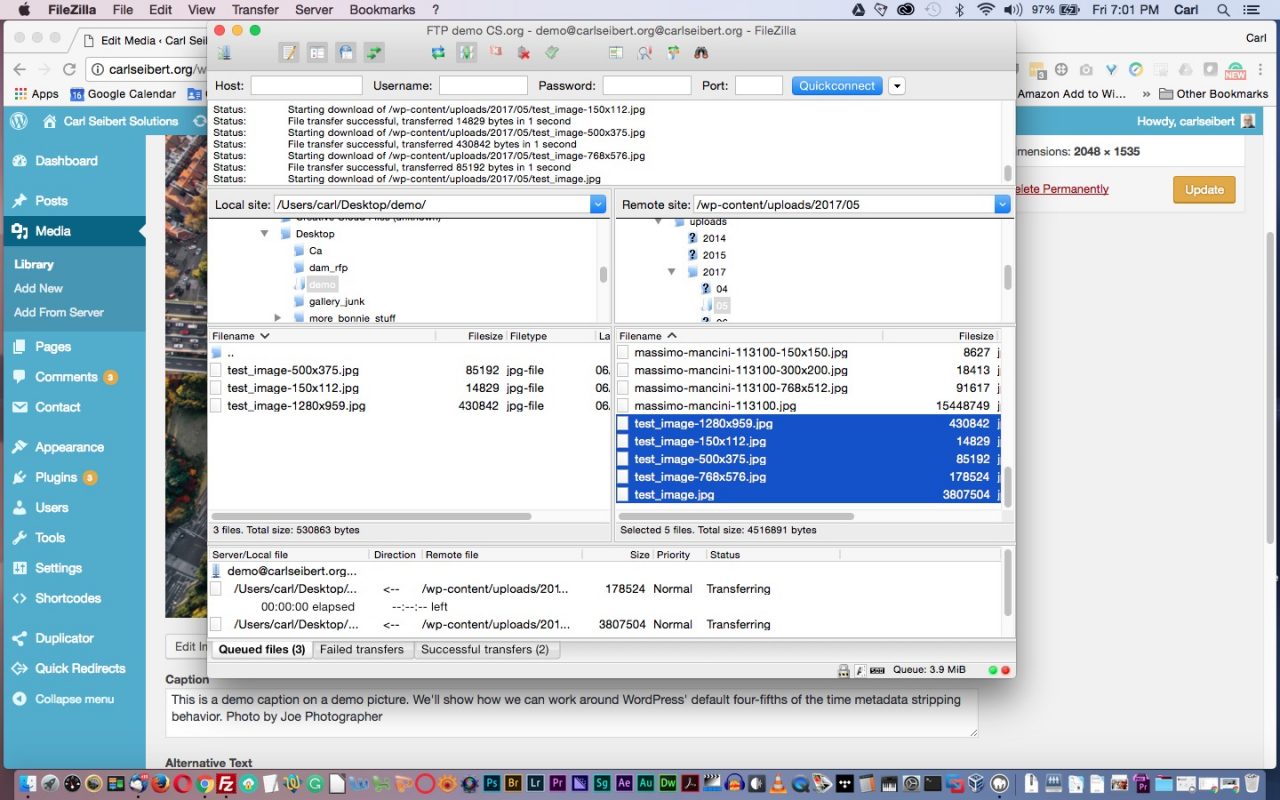
Download images
Fire up your FTP client. If you need an FTP client, Filezilla is a good one. I use it. And it’s free. But they all work, FTP isn’t brain surgery.
Connect to your WordPress server. Now, your FTP root may be the your home directory, or it may be the web root for your site, or it may be any arbitrary directory that some admin (or you) thought would be good. We’ll assume that it’s your home directory. If it’s your web root, no worries. You’ll just start a click or so closer to your destination.
From your FTP root, navigate to your web root. It will be called something like “public_html”, or “htdocs” or the like. Inside it, you’ll see a bunch of WordPress files and directories, “wp-this or that”.
Find “wp-content” and open it.
Now find “uploads” and open it.
Uploads will (usually) contain subdirectories for each year and then, inside, each month. Navigate into the correct month’s subdirectory.
In your uploads folder, you’ll find your original image and its resized (and stripped) offspring. Download them to your computer.
(You can make a shortcut in your FTP client to save drilling through so many directories.)
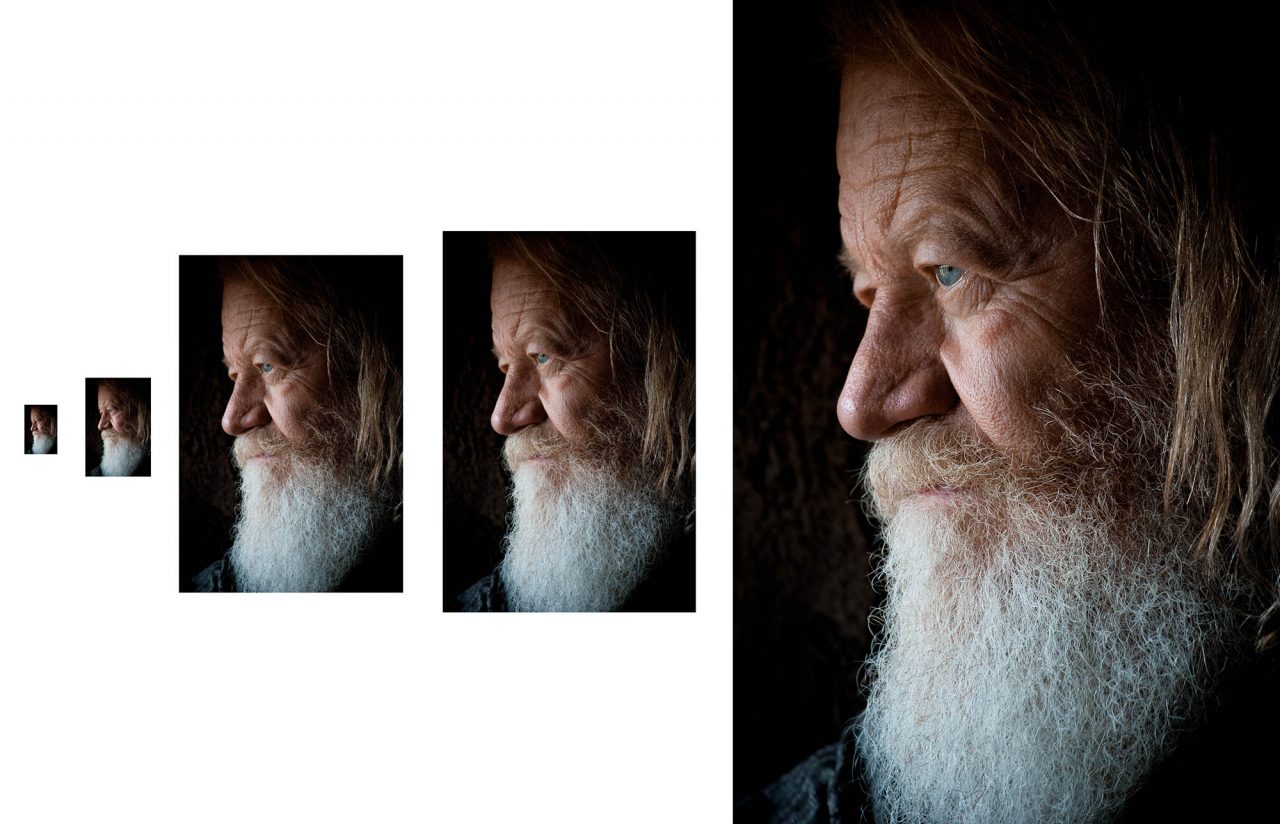
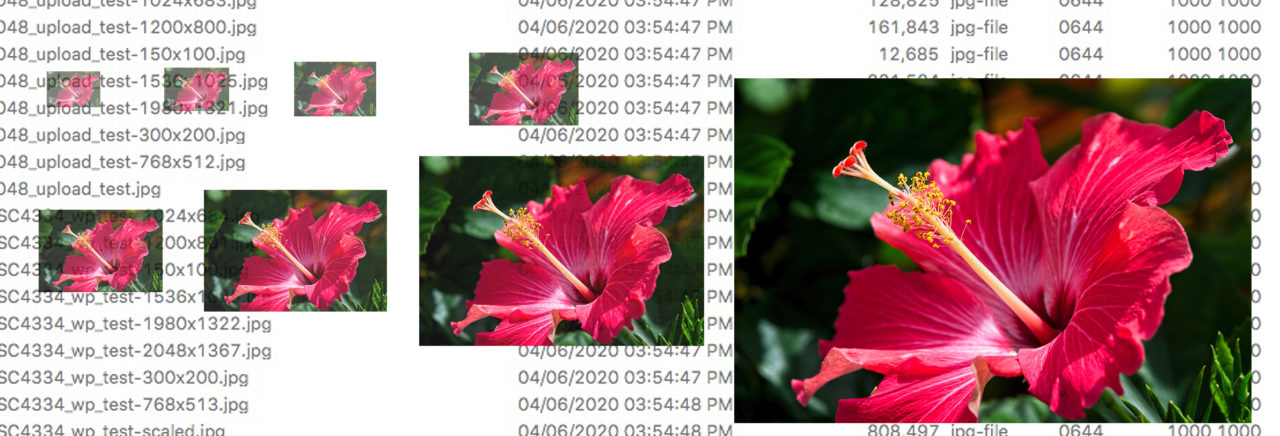
Once we have safely arrived in the correct directory, we’ll be looking at our media files. Each image will appear along with several resized copies. (Four, by default)
These resized versions of the image are served to visitors responsively, according to the size of the visitor’s viewport. The original, or full-sized, image is exactly the file that you uploaded to your Media Library. It will have its metadata just as it did when it was on your desktop. The smaller ones, which have dimensions appended to their filenames, were created by your imaging library. If that’s GD and not ImageMagick, these files will stripped of all metadata. We’ll fix that.
Download one or more complete sets of pictures, including the full-sized one(s).
(Don’t worry about interrupting visitors’ access to the images. You’re copying them. The files will be available on your site while you work on them. There will only be a period of a second or so, when we put the files back, when each file wouldn’t be available.)
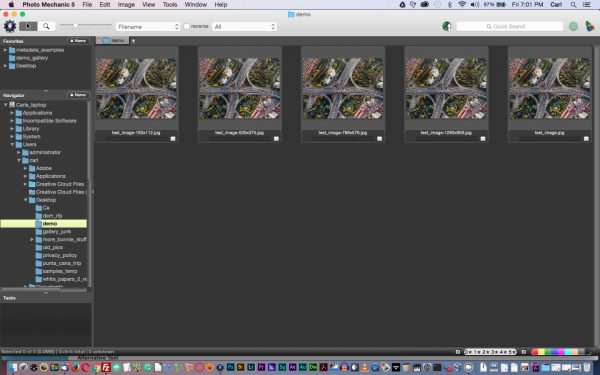
On your computer, paste back your metadata
Now, you should have the images on your local computer, in whatever folder you chose in your FTP client.
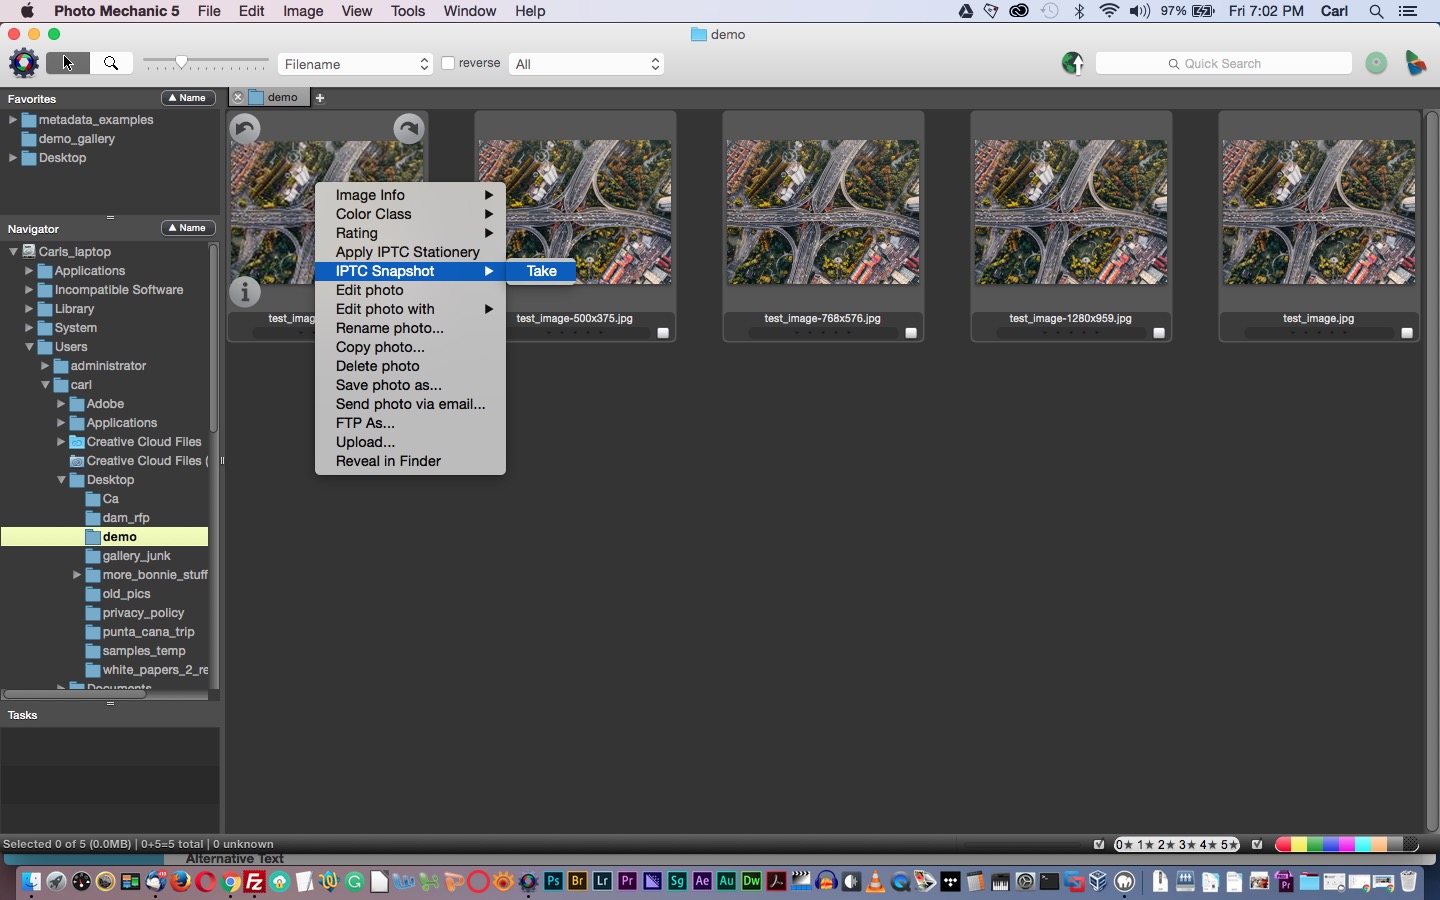
On your computer, copy metadata from the full-size image. In Photo Mechanic, you’ll probably use ‘IPTC Snapshot – Take’.
Open that folder (I just use the desktop) in a suitable metadata-editing tool. Photo Mechanic or XnView are good choices. I’m going to use Photo Mechanic.
If you look at your files’ metadata (“I”, or the tooltip in Photo Mechanic), you’ll see that the full-size one has all its metadata in place. The others are stripped clean. We’re going to simply copy the metadata from the full-size image and paste it on the other files.
In Photo Mechanic, the easiest way to is to take an IPTC snapshot of the big image and paste it on the smaller ones. It takes less time than reading this paragraph. See this post for detailed instructions on Photo Mechanic’s various metadata tools.
Paste the metadata onto the resized images. In Photo Mechanic, you’ll probably use ‘IPTC Snapshot – Paste’.
In XnView, the process is a little different. You’ll open the IPTC panel for the big image, save its metadata to a reusable template, and apply that to the other files. See my post on moving templates between programs for a fuller explanation.
Repeat the process for each set of images you downloaded.
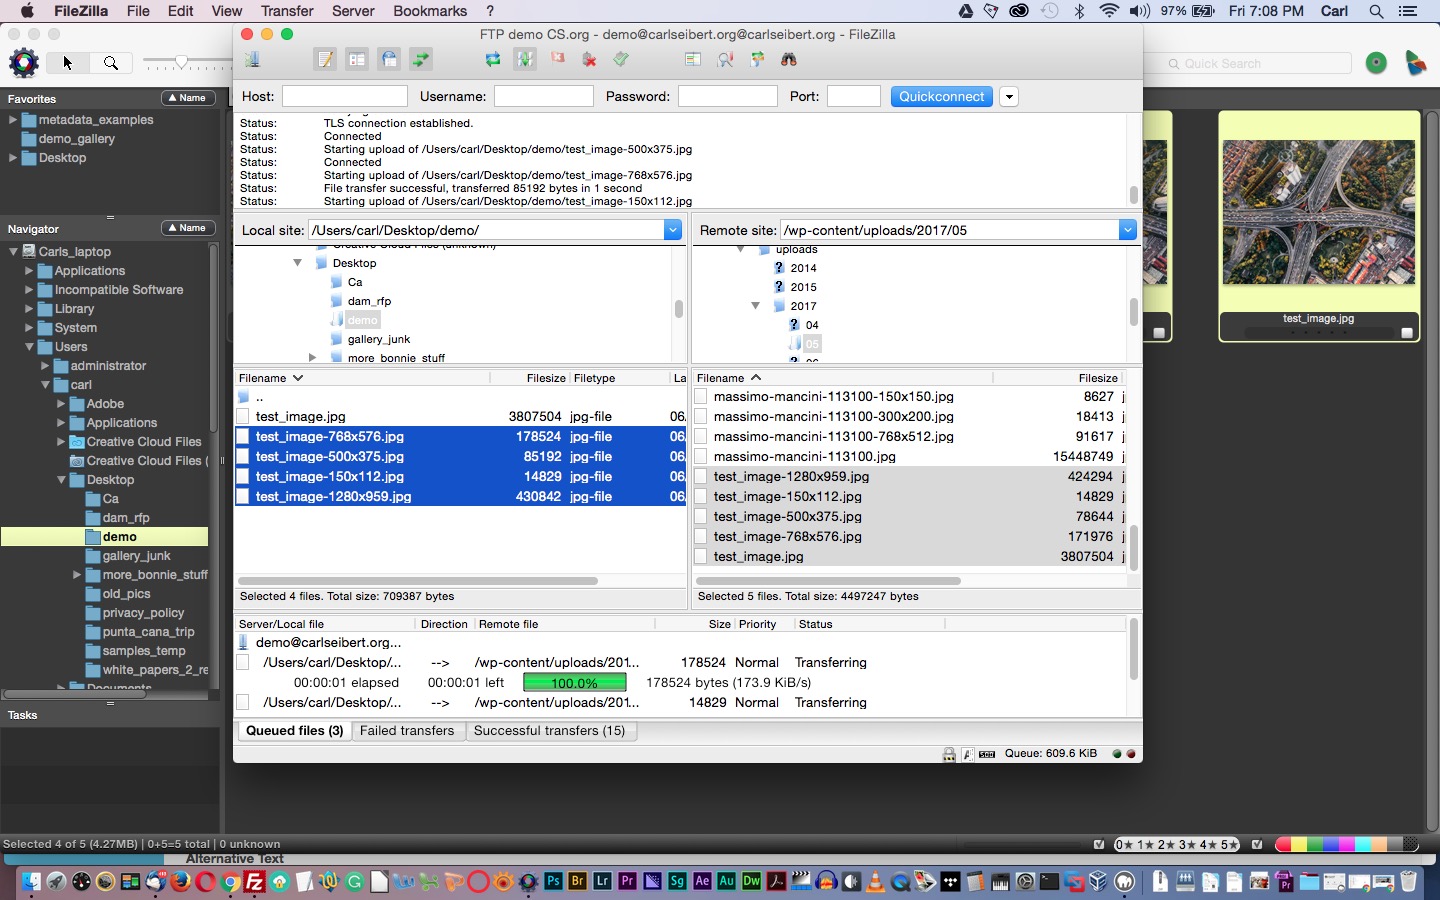
Upload the images again
Now, upload the resized versions of the images right back to where you found them. There’s no need to upload the full-size ones. We didn’t do anything to them. We only copied their metadata. Uploading them would just be a waste of bandwidth.
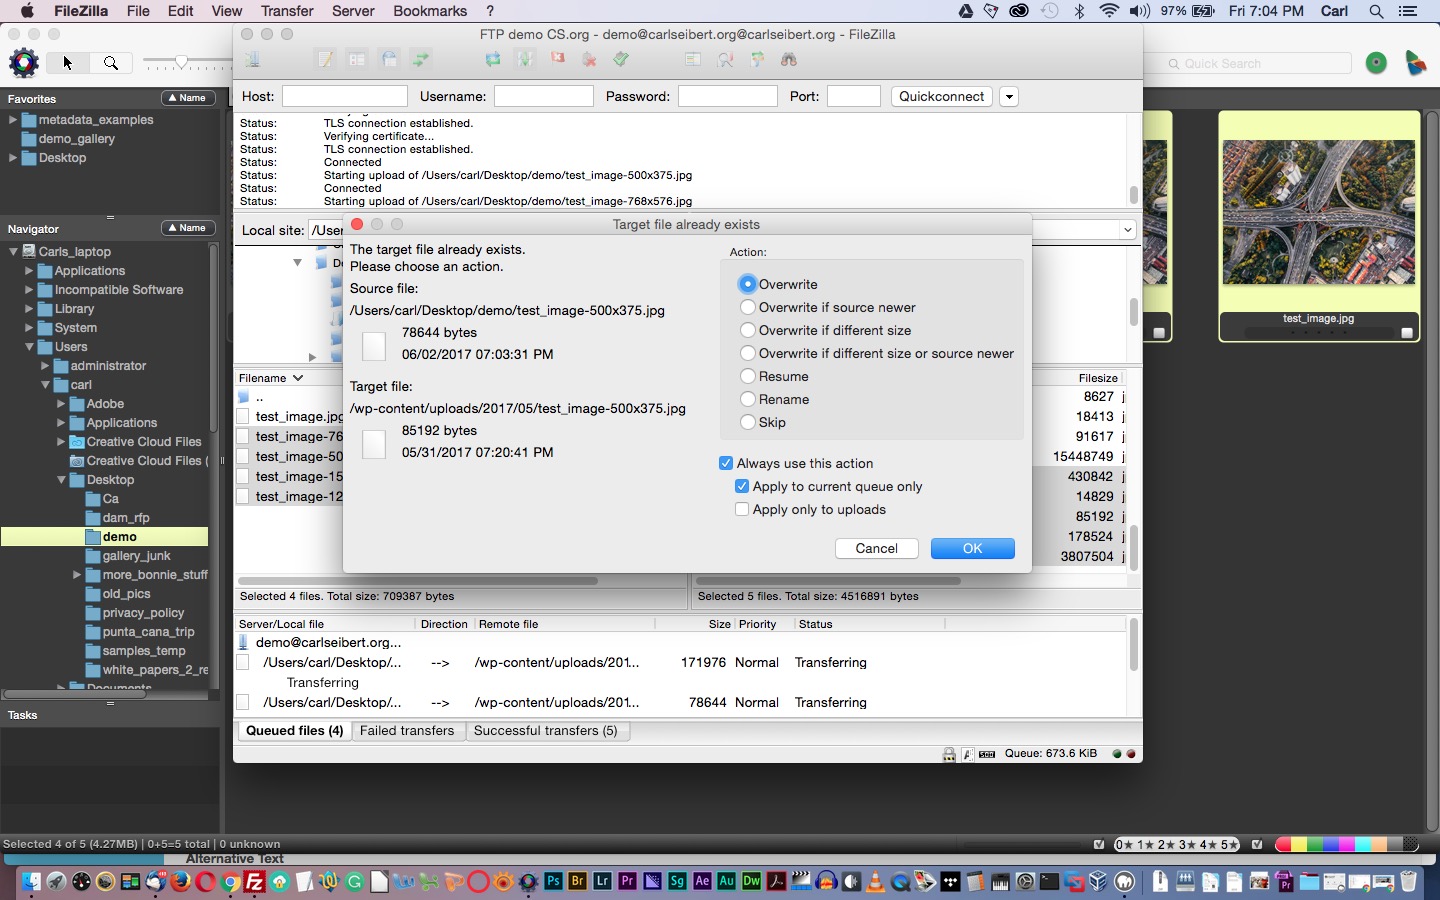
During your upload, you’ll need to tell your FTP client to overwrite the files on your server with your new, fixed, files. FileZilla has a handy radio button that lets you overwrite all files in your current upload queue. In other FTP clients, You may have to click once per file.
Overwrite the existing resized image files with your new metadata-restored versions.
Your repaired images will be exact replacements for the files you downloaded, except for being a few kilobytes bigger and having working metadata.
Test to see that it worked
Now you’ll probably want to go to your website and right-click and download one of your pictures to assure yourself that your work-around-ing did indeed, work. You won’t need to do this next time.
If you put fifty photos on your website whenever you post, fixing your metadata like this could be a fair amount of work. If you’re like me and it’s a half-dozen or so pictures at a time, we’re only looking at a minute or two. It’s just a matter of making it a habit. (Full disclosure: The server on which you’re reading this is ImageMagick-challenged. I haven’t fixed the photos in last week’s post. I’ll take care of them when I post this.)
You can download a picture from your site to confirm that the workaround worked. Make sure you’re getting a resized version, not the full-size. The full-size copy never lost its metadata in the first place.
There you have it. Hopefully, this technique will tide you over until you can get that ImageMagick situation in order. And yes, the technique can be used for other stuff, like running ImageOptim (in lossless mode, please) on your resized files while you have them in front of you. Just be sure not to change the images’ dimensions.
Stay tuned. In future posts, I’ll look at optimizing images for WordPress in a metadata-safe manner, and I’ll do How-Tos for that task in our supported range of software. And, oh yeah, I owe you a metadata How-To for XnView. Dive into the comments and…comment.
WordPress uses an imaging library to make variously-sized versions of a photo to accommodate different view port sizes. But which imaging library is used determines whether metadata is preserved or destroyed.
Enable ImageMagick on your server and your WordPress site will be metadata-friendly
The good news: WordPress, by far the most popular content management system on the web, supports embedded metadata. The bad news: Well, not always. But we can fix that.
ImageMagick is, well, powerful. Illustration courtesy ImageMagick Studio LLC
If you import a photo into WordPress that has a caption, WordPress, by default, will read that caption from the photo and place it in the picture’s caption field in the Media Library. From there, when the photo is placed on a page or in a post, voila! the caption appears under the picture, formatted by your theme and ready to go. After a little touch-up editing, perhaps, but ready-to-go and I-didn’t-have-to-type-it have got to be pretty great. ¹
But what about the photo itself? Will it be served with its embedded metadata intact, or will be it be doomed to wandering the internet without its copyright information or caption? That’s where things get a little tricky.
ImageMagick
WordPress, by default, prefers an image-processing library called ImageMagick. If ImageMagick
Is available to WordPress, everything is awesome, and your picture will go forth into the world in possession of all the vital information it needs to be relevant for (hopefully) decades to come. Well, all the vital information that was in the metadata when you uploaded it, anyway.
(Also, by many accounts, ImageMagick produces better visual quality at smaller file sizes than its competitor.)
There are two sticking points.
ImageMagick, which has been an industry standard for many years and is the image processor for many, many, server-based systems, is either on your web host’s server, or it’s not. There’s no requirement that
Enable ImageMagick and your WordPress site is good to go. Karma will be on your side and you won’t have to worry about being sued for removing Copyright Management Information from images.
hosts provide it. Many –or even most – do. But some don’t.
And, if ImageMagick is available on your server, you will generally need to enable it in order for WordPress to be able to use it.
If ImageMagick isn’t available on your server, WordPress falls back to an imaging library called GD. GD is bundled with PHP, upon which WordPress depends in order to function at all. So GD is a sure thing. It’s guaranteed to be there.
Making resized images
When you upload an image to WordPress’s Media Library, it makes copies of your image in various sizes, from Baby Bear little to Poppa Bear big. Four new files are created by default, plus the original, yielding five size choices to fit browser windows on devices ranging from itty bitty phones to great big desktop monitors. There may be more sizes created. You might add more sizes, or plugin software might require more sizes.
The biggest instance of your picture is the original file you uploaded. It’s untouched. If it’s the file that is served, say to a visitor with a really big monitor, you’ll serve exactly the same file that you uploaded. So, if you uploaded a file that has proper metadata, that’s what goes out on the internet. If you set clicking on your photos to open the media file (so that a large view of the photo is shown to the visitor – that’s usually expected behavior) then such a click will cause the original file to be served. If someone is, ahem, obtaining your picture, it’s likely that they will grab the largest version, and they’ll get a file with caption and copyright information. So that’s good-ish.
Here’s the rub
If ImageMagick made the smaller-sized versions of your picture, great. They’ll all have their metadata, too. That’s great.
But GD doesn’t do metadata. (It can, a little, but doesn’t by default) If your WordPress installation is relying on GD, you’ll strip metadata from all your images except the biggest, full-sized versions. Naked. Bereft. Raw statistical probability says that at least four out of five times you’ll serve a stripped image. That’s not good.
So, by now, the picture is clear. (sorry about the pun) ImageMagick = good. You want it. Now what?
Available? Make sure your host provides ImageMagick. If you’re shopping for a hosting provider, you may have to ask. Sometimes if you Google “your-would-be-host ImageMagick” you’ll get an answer in the form of
some sort of knowledge base article. Hosts rarely mention ImageMagick on their benefits page. (Are you listening out there, hosting providers?)
Obviously, if you are shopping for a new provider, you want your ImageMagick. If you’re staying with your current host, ask and cross your fingers.
And enabled. Once you have confirmed that ImageMagick is available, enable it so WordPress to access it. Enabling ImageMagick usually involves un-commenting a line in a PHP configuration file (doing so enables a PHP extension, either IMagick or MagickWand, that talks to ImageMagick, ) and perhaps adding a path statement somewhere.
Enabling the IMagick extension in php.ini
Check with your host’s customer service department. The whole process only takes a minute or two. If your provider has good customer service, the rep will probably enable ImageMagick for you, while you’re still on the phone or chat. Or maybe they’ll provide you with instructions, or have documentation on their support site. Remember to backup any configuration files before you change them!
You don’t have to do anything on the WordPress side. WordPress will, all by itself, use ImageMagick henceforth.
I checked some hosting companies
I called some hosting providers while preparing this post. ImageMagick support wasn’t exactly on the tip of most providers’ tongues, but I got the impression that most good providers do provide the service. You might have to be a little bit persistent, though.
Liquid Web
At Liquid Web, Imagine Magick is installed and already enabled by default. “We make sure that ImageMgaick is already there,” says Managed WordPress Product Manager AJ Morris, “On the WordPress side, we take care of all that for you.”
There is a catch, though. Liquid Web is developing an in-house image optimization tool. Morris says that tool will be metadata-friendly. But in the interim, they have temporarily provided their customers with an image optimization plugin. That plugin eats metadata. So, for the moment, Liquid Web customers who want to preserve their metadata will need to work around that issue. They can either disable the plugin, and just make sure they’ve prepared their images properly before upload, or they can keep the plugin active and use a workaround for a little while. Or even possibly substitute their own plugin. (I’ve tested some optimization plugins that are metadata-friendly if the underlying server is using ImageMagick. I’ll post some reviews soon.) But remember, it will only be a short while until the proprietary tool is up and running.
Flywheel
A Flywheel rep told me that ImageMagick was enabled by default on their servers.
Bluehost
At Bluehost, a rep told me, “Our servers do supply MagickWand [a PHP extension that enables ImageMagick] 100%, but that would be something the customers would have to do themselves.” My call was the first time anyone had asked that particular rep about ImageMagick. But their ImageMagick knowledge base page says it has been viewed 68,000 times.
SiteGround
At SiteGround, enabling ImageMagick on my test site only required adding a configuration file to my web root and adding a path statement in my .htaccess file. SiteGround’s spokesman said, “We fully support the ImageMagick extension – with all of our packages. It is not enabled by default. However, our support teams can enable for you in a matter of a few minutes only.” Which is exactly what happened when they did it for me. It wasn’t done quite while I was still on chat, but they came pretty close.
(The server that hosts this site won’t be so simple, by the way. But we’ll get there.)
If your host doesn’t provide ImageMagick
But what if ImageMagick just plain isn’t available on your server and, for whatever reason, you don’t want to change hosts? There is a workaround that works OK in many cases. It’s a bit of effort, but it’s not too bad. I’ll explain in next week’s post.
That’s it. Enable ImageMagick and your WordPress site is good to go. Karma will be on your side and you won’t have to worry about being sued for removing Copyright Management Information from images.
How was your experience when you asked your hosting provider about enabling ImageMagick? Post in the comments and I’ll include your input in an upcoming post that will feature a list of hosts who support ImageMagick.
Footnotes
¹ You’ll notice in Media Library that there’s a field called “Description” underneath the Caption and Alt text fields. That’s confusing because the IPTC “Caption” field is also called the “Description” field. So what’s WordPress’s “Description”?
Well, every media object in WordPress has it’s own “Attachment page”. The attachment page displays your image with your header and footer, a headline, caption and a text block. That text block is the “Description” field you see in Media Library.
In Media Library, you can see the attachment page by clicking on an image’s permalink. You can link from an image to its attachment page instead of the media file when you place an image into a post or page, if you so desire. It’s kind of cool, but frankly, I’ve yet to find a use for this feature. It might be a nice way to display an infographic, I guess.
You can’t edit the attachment page in the editor. The headline is mapped from the Title field in Media Library. The caption is mapped to Caption, and Description becomes the text block. The only way you can edit any of that on the attachment page is in Media Library, which means that edits to the Caption field will then show up when you place that image on a post or page. That’s kind of inconvenient.²
And the footnote has a footnote:
² Note that editing a caption in Media Library or on a page does not affect metadata in a photo’s file. WordPress does not write edits into a file’s metadata. This conforms to normal conventions. Best practice assumes that where ever it may go, an image is expected to have the original metadata it was published with. You can probably live your whole life without ever having to worry about this, but it’s always better to know how things work. If something is outrageously wrong on a photo’s caption, correct it before you upload the photo to WordPress.
It’s a quick task to set up your desktop WordPress server to run ImageMagick
Recent versions of the local desktop WordPress server MAMP come with ImageMagick already installed. If you want to check out ImageMagick on a locally-hosted test site, enabling ImageMagick on MAMP is a one-keystroke process. (Granted, you will make some clicks before and after the keystroke. Just go with me here, folks. How often can you do anything in one-ish keystroke? We’re on course to the quickest How-To ever.)
We’re going to enable the IMagick PHP extension that talks to ImageMagick, by uncommenting a line in PHP’s configuration file.
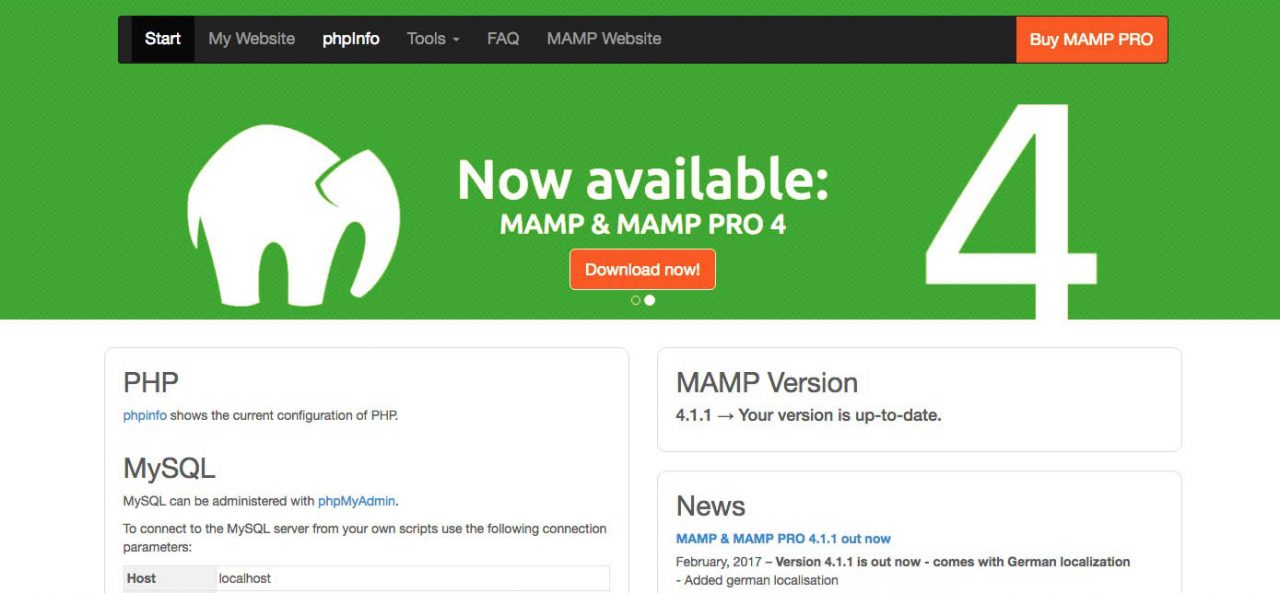
Go to the MAMP webstart page. (Usually http://localhost:8888/MAMP/ There’s a link in the MAMP interface.)
On the MAMP webstart page, click on “phpinfo” at the top of the page.
Click on “phpinfo” in the header of the webstart page.
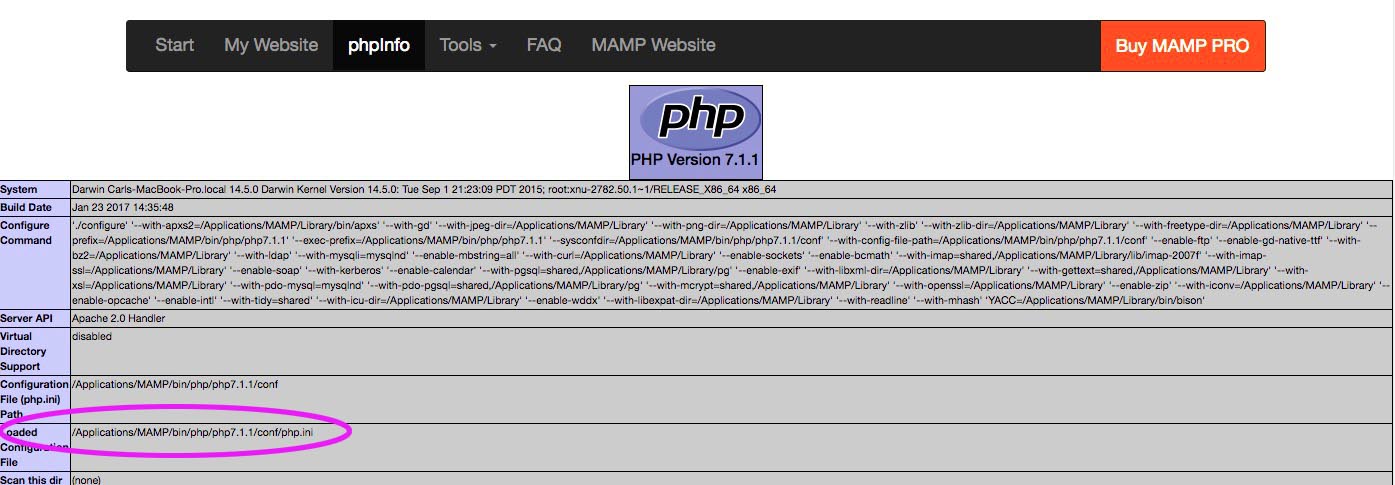
On the phpinfo page, look at “Loaded Configuration file”. It’s about the seventh item down from the top. There, you see the path to the currently loaded instance of php.ini. For me, it’s “/Applications/MAMP/bin/php/php7.1.1/conf/php.ini”.
In php.ini, look for the loaded php.ini
In Finder, navigate to the folder shown. Find php.ini and open it in your favorite text editor (TextWrangler or Text Edit or whatever you like). Make sure you are in the correct folder, looking at the correct php.ini. There are multiple directories with php.ini’s in MAMP. (By my count, you should be at 11 clicks, no keystrokes, at this point)
Navigate to the correct php.ini file
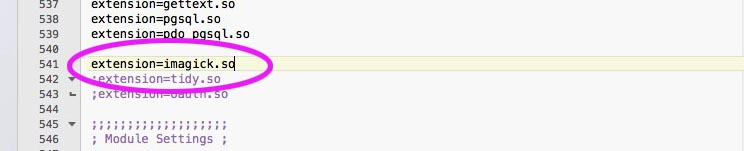
In php.ini, scroll down to the line that says:
;extension=imagick.so
It’s about line 540 or so in my php.ini. You might think of just searching for “imagick”, but hold on there. Nobody authorized the expenditure of extra keystrokes!
Uncomment the line by deleting the semicolon (Plunk. There’s your keystroke!) The line will look like so:
extension=imagick.so
In php.ini, scroll to the IMagick extension line and uncomment it.
Save the file. (From the menu! No keystroke!)
Restart the MAMP servers and you’re done! (15 clicks, counting the one double-click as two. One keystroke.)
Now see if it works; metadata should be preserved
To check to see if it’s working, you can call phpinfo again and scroll down past the table part to the part of the page that’s divided into alphabetically-arranged sections. There should now be a section for IMagick. That tells you that the IMagick extension loaded.
The real, for sure, way to see that ImageMagick is working, is to find a test image that has metadata and upload it to your test site’s Media Library. Then place one of the resized versions of your test image in a post. Then, download the picture from a Preview. Now, look at the downloaded file it in an application that reads metadata. If your metadata is still there, then all is good and ImageMagick is working.
(Note: When you right-click and download your file, you should see dimensions in the filename, like “test_image-300×150.jpg”. The original image won’t have dimensions appended to its filename. The original image hasn’t been touched, so it will still have its metadata, ImageMagick or not.)
Another way to see that metadata is being preserved is to simply point your metadata-reading image browser (Photo Mechanic, Bridge, XnView, at al) at your uploads folder and look at the files. The path on my machine is /Applications/MAMP/htdocs/the_name_of_your_test_site/wp-content/uploads/some_year/some_month/
Not too different on a real server
The procedure to enable ImageMagick isn’t terribly different on a real ImageMagick/IMagick-equipped web server. Consult your hosting provider’s documentation.
Switch off and on
Once you have ImageMagick working, you can turn it off again by commenting that line in php.ini. Just put the semicolon back.
Experiment with image quality
With your on-and-off switchable ImageMagick installation working, you can experiment with how ImageMagick handles compression of your images, compared to GD. Every image responds somewhat differently to the JPEG process, so this is your-mileage-may-vary territory, but many people report both better image quality and smaller files with ImageMagick.
I’ll do a future post listing hosting providers that support ImageMagick. If you have a good or bad ImageMagick hosting experience, please let me know!


 mageMagick, these files will stripped of all metadata. We’ll fix that.