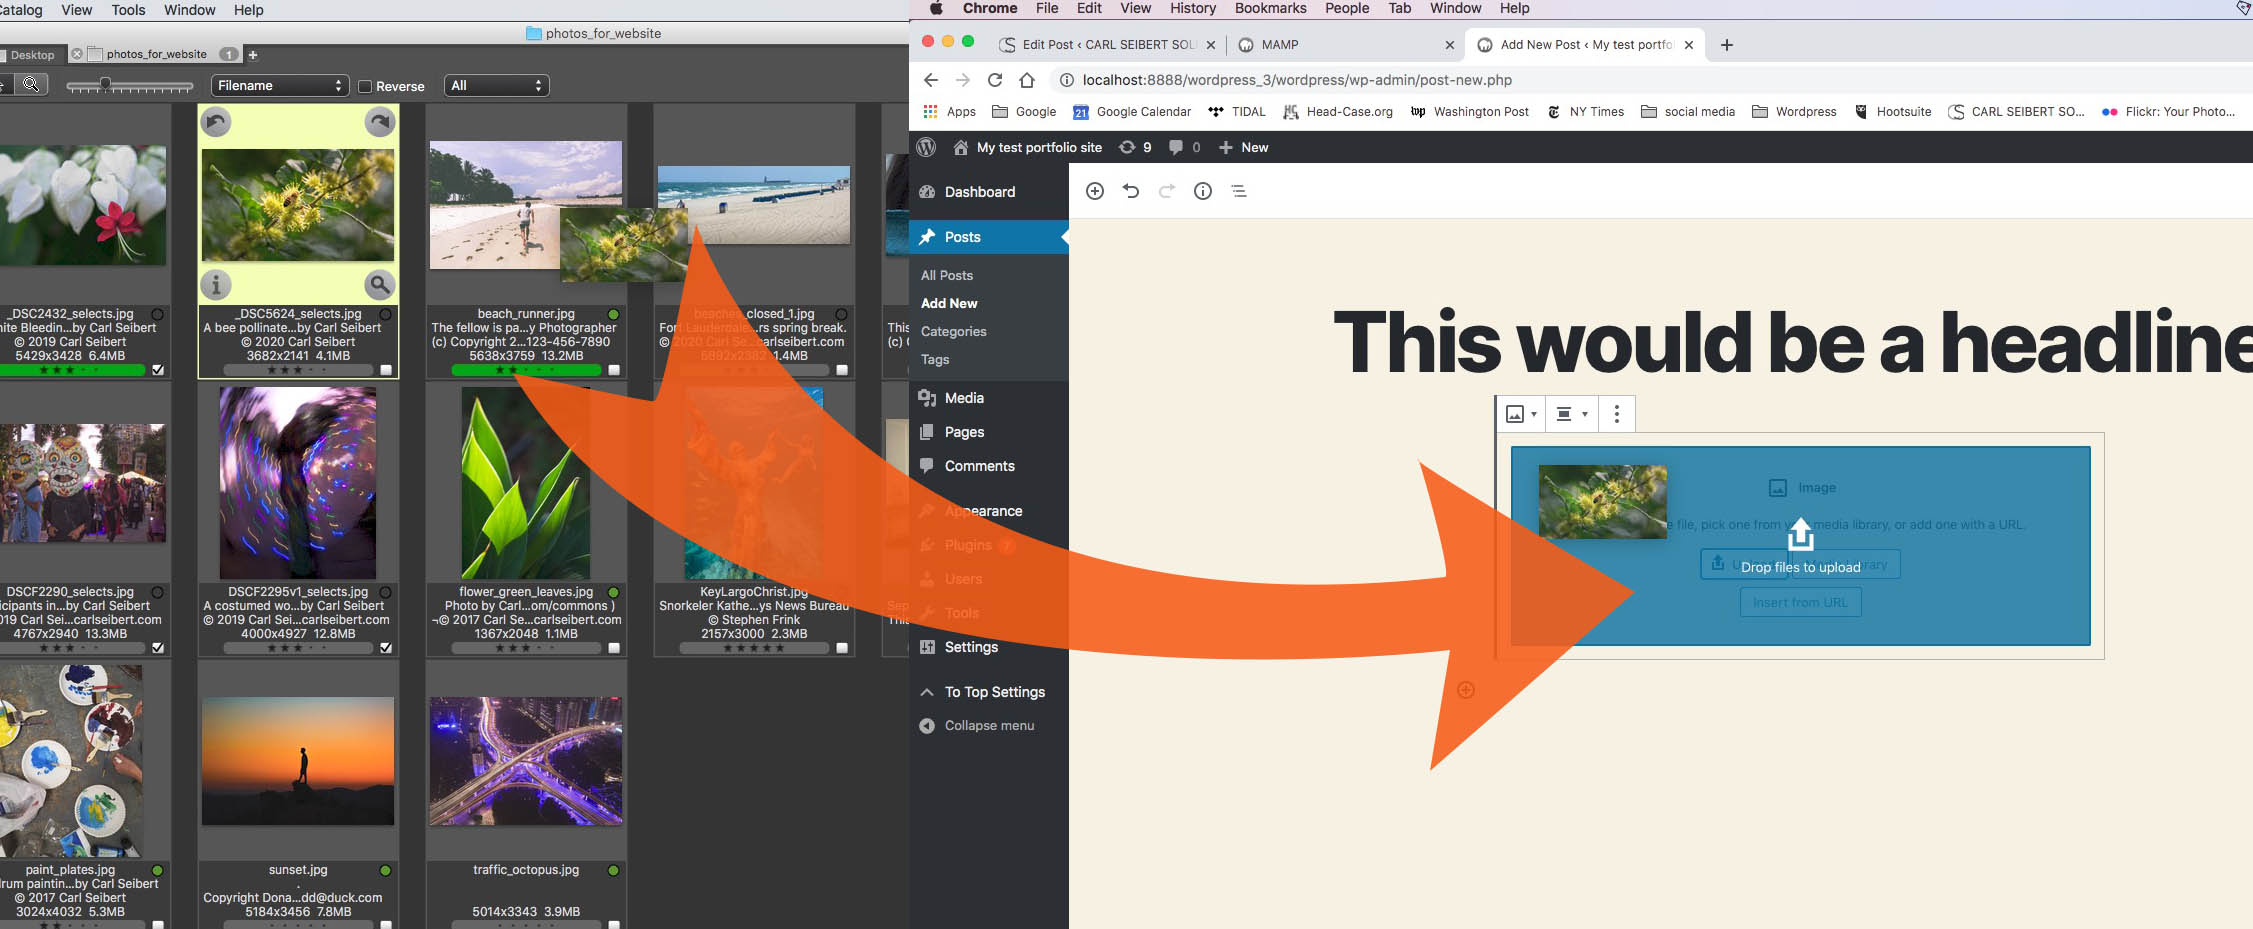
Preparing images physically is almost too easy; optimize workflow, too
Let’s optimize some images for uploading to WordPress, step by step. In this How-to, we’ll use Photo Mechanic. Photo Mechanic is known as a hard-core tool for professional photographers. It’s not usually thought of as a program that web designers would turn to.
But, as it turns out, Photo Mechanic is a great tool for this particular job. It’s powerful, comprehensive, fast, and straightforward to use. Maybe it’s time to commend it to the attention of the web design community.
It’s what I use in real life for this kind of thing, if that means anything to you.
Other applications can certainly be brought to bear. I often recommend XnView for doing this. It’s a bit nerdy to use. But it’s price is super reasonable. (29€ for commercial use; free for personal use) I have a post and video that cover preparing images for the web in XnView, but they’re not WordPress-specific.
Photo Mechanic is much pricier at $139 USD. You get what you pay for, as they say. (Photo Mechanic is pretty much never on sale. But, as I write this, covid-19 has the world’s photographers on lockdown and Photo Mechanic’s developers are accordingly offering discounts.)
Adobe Bridge and Photoshop together will work. ON1 Photo RAW will do a good job. If you are a photographer and you’re working on your own website, Lightroom Classic can work. But Lightroom Classic’s centralized database makes it a poor choice for designers, in my opinion.
WordPress does heavy lifting
WordPress actually does the work of preparing optimized image files for our sites. All we have to do is upload good quality images sized and compressed in a standard way. The tools I have recommended are workflow tools. So, given that the physical preparation of our images is such a non-event, let’s take this opportunity to do some “optimizing” in a broader sense, like making sure our images are up to snuff and minimizing the amount of time we spend futzing with them.
In more or less in one bold slash of our sword, we’ll do a bit of quality assurance, make ourselves as comfortable as we can that we’re not going to get nuked because of a rights and licensing catastrophe, then – yeah – we’ll upload our JPEGs to WordPress.
When we do that, the dimensions of our images will be whatever we have decided are the biggest our site will need and we’ll compress our images to a JPEG quality level of 82 or higher.
That’s the technical part, such as it is, of optimizing our images for upload, in one sentence. In this post I expend almost four thousand words explaining the gory details. Jump over to that post, if you feel the need. I’ll wait.
And since this blog is about “Metadata empowering honest people”, we can’t go on without me pleading, or nagging, that you should make sure your WordPress site honors metadata by making sure you are using ImageMagick as your imaging library. The skinny on that is in this post.
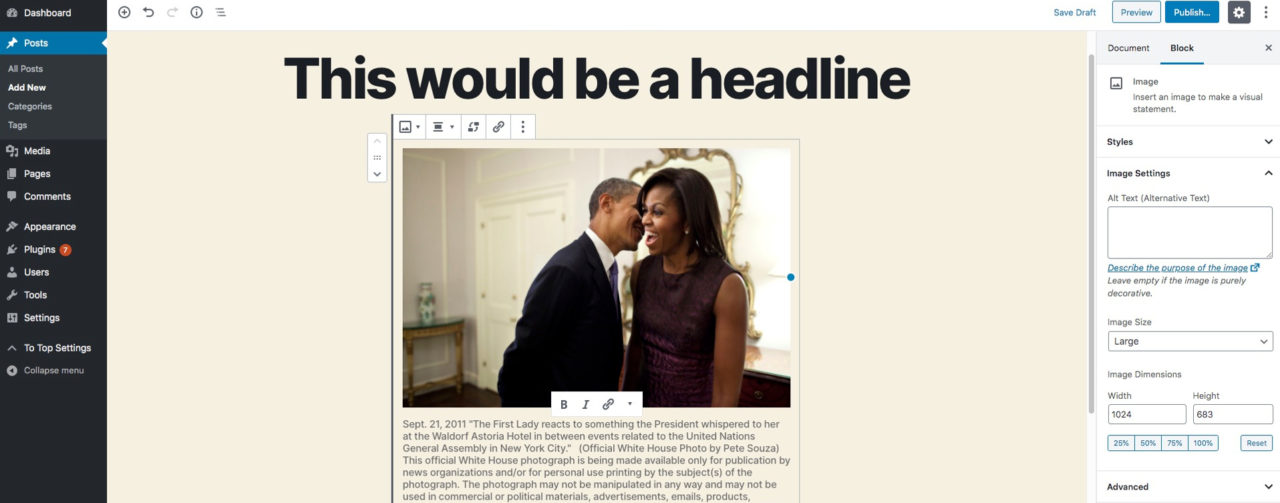
Our software will make the actual technical work of getting images ready to upload essentially zero. And it is workflow software, after all. So, let’s optmize some workflow steps that happen before we press the button and drag images to our site.
Or jump
If you want to jump ahead to that big button push, go here.
Our first stop will be some metadata stuff. Of course. This is a metadata site, right?
It turns out that, at least in my experience as a photo editor, the biggest time-suck dealing with images that aren’t produced inside the cozy confines of one’s own company is metadata.
Metadata? The information that’s all organized and standardized and attached to the images themselves? How could that be a big time-suck? Well, actually, if it’s all organized and disciplined and all, it’s not a big time-suck.
It’s when that same meta-information is scattered all over the place on PostIt notes and emails and somebody thinks somebody said something that it drains away our time and sanity.
What to do? Well, if circumstances allow, we can certainly urge – strongly urge – the people who produce our images to have enough common sense to include at least basic information, like their name, copyright notice, and contact information, with our images. That would be at least on the road to “organized and disciplined and all”.
If we’re just stuck with a mess, knowing how it’s supposed to work and applying that same workflow logic to wrangling untidy information could save us some time.
Or, we could be working in a segment of the industry where this stuff is universally done right. In which case, we’re golden. but just knowing a bit about how to best utilize Photo Mechanic will just make things faster and easier.
Perfect, just perfect
In my experience, the meta-information we need to publish pictures is usually perfect. As in perfect, perfect. Or a perfect disaster. The proportion of images with one kind of perfect to the other will depend on your industry segment and how much you’re able to shape your own environment. Let’s crash onward through the jungle.
Here is a whole post about dealing with metadata that’s scattered all over the place.
We’ll start with our candidate photos in a folder.
Set up correctly, Photo Mechanic will let us see what we need to see. At. A. Glance.
We should take that first glance the moment the picture lands on our desktop. It’s best to get a jump on things.
How-To
Open up your folder of photos. Or, do what I do and leave a Photo Mechanic tab set to show the desktop. That way, when I detach an image from an email or download it from a sharing service like Box or Dropbox, it instantly appears.
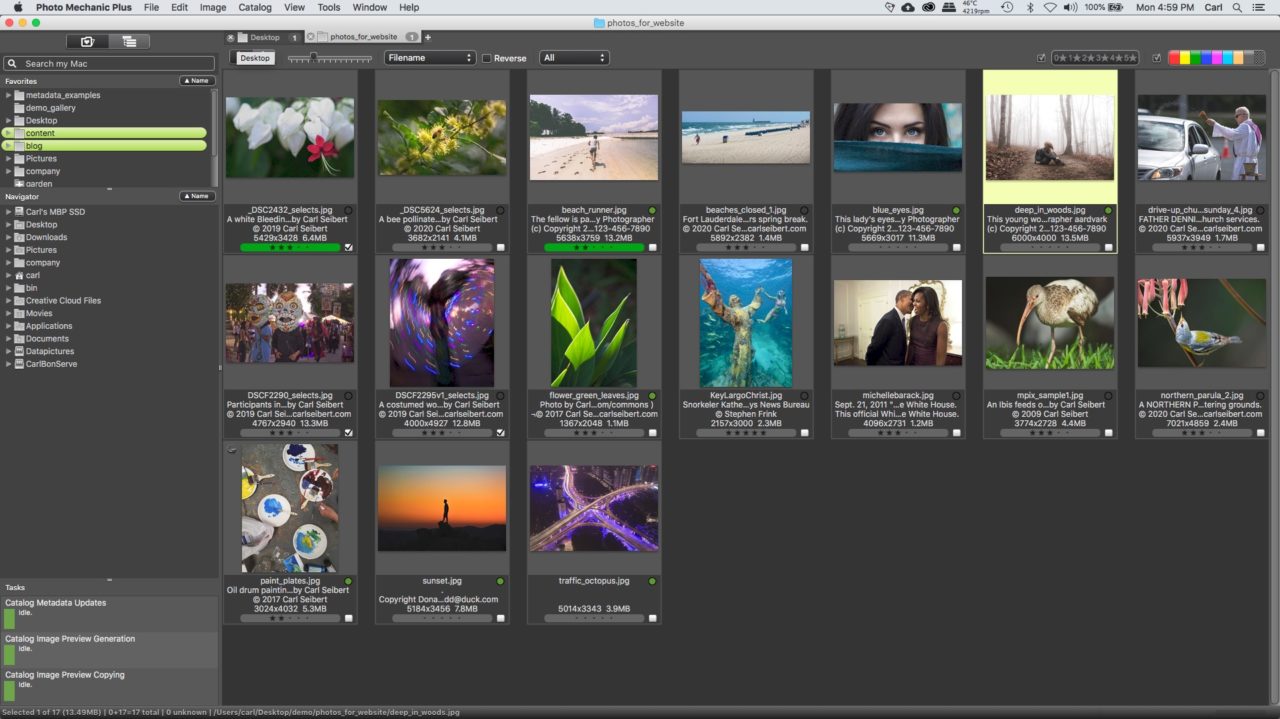
Photo Mechanic has a folder navigation tree on the left. It works pretty much like the folder navigation pane in a zillion other programs. Except in Photo Mechanic, you can customize things like whether you use single or double clicks and what keys you use to make selections.
On the right are tabs with thumbnail grids. Photo Mechanic calls them “Contact Sheets”. From there, we can call large previews of our images, rank and sort them, resize and compress them, read, apply and edit metadata, and send them on their way, either by drag and drop or by using Photo Mechanic’s built-in FTP client or one of its dozen or so custom upload tools.
What will we look for in our first glance?
There’s legal stuff. As in, “Please, please, please let the license the client claims to have for this image actually exist.”
There’s ordinary QA stuff. Like, “Is this file an appropriate size to use? Is the photo technically OK? What, exactly, is depicted here? Is the photo what I really want? And does the client and/or photographer have the CEO’s name spelled right?”
I have rights
Our first stop is rights and licensing. We’re optimizing workflow. Getting in legal hot water for infringement, at $150,000 per image, or alteration of Copyright Management Information, at $25,000 per picture, could be considered suboptimal.
We’re making this the first stop in our journey because, if something’s wrong here, it’s going to take a while to sort it out. Waiting untill the last minute would not be good. We want a head start.
(I am aware that it’s very likely already the last minute already, since no client that I’m aware of has ever turned in content on time.)
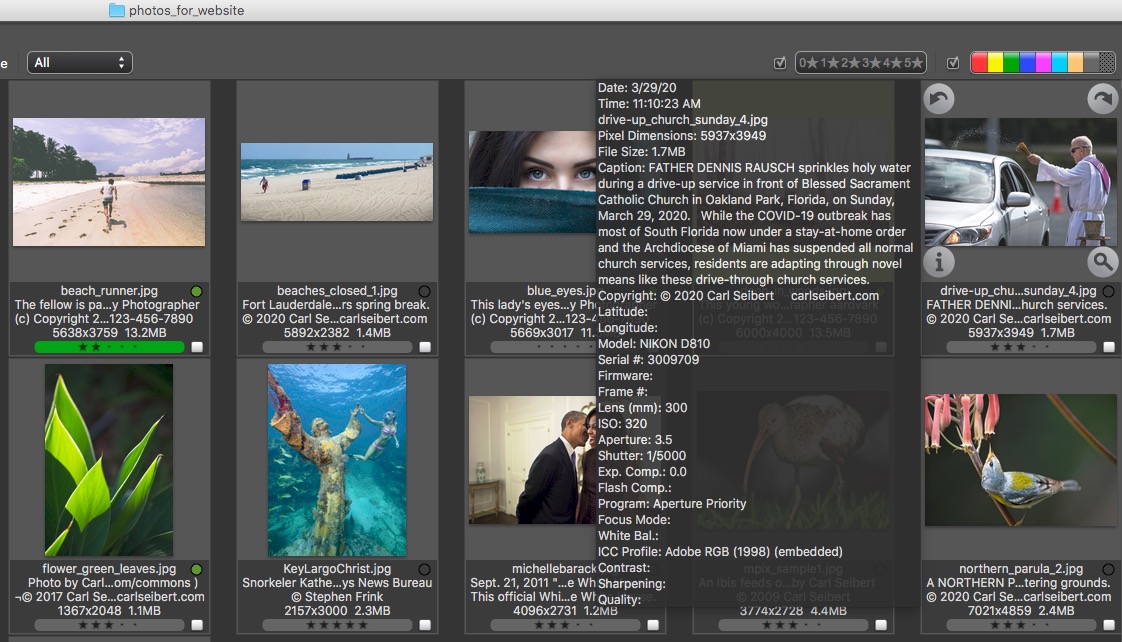
You can see in the screenshot above that I’ve set up my copy of Photo Mechanic to show part of the picture’s caption, its copyright notice, and its pixel dimensions and filesize, right under the thumbnail, next to the filename. Good for glancing.

Go to Preferences>Genaral>Contact Sheet> Labels to configure the information shown under the thumbnail (on the “Slidemount” in Photo Mechanic parlance).
Captions?
Is the caption and copyright information even there? Are pixel dimensions sane? In the first half a second, we can see whether we’re dealing with a socially conscious, diligent photographer/agency/client. Or not. For me, just this first glance gives me a good idea of how much time and stomach lining an image is going to burn.
To know more about a picture’s metadata, click the “i” button. (Or press the “i” key on the keyboard.) That will open the IPTC editor. In it, you can see all the IPTC metadata fields. If things are going optimally, you’ll see its caption, copyright notice, and contact information for the photographer, and maybe more.
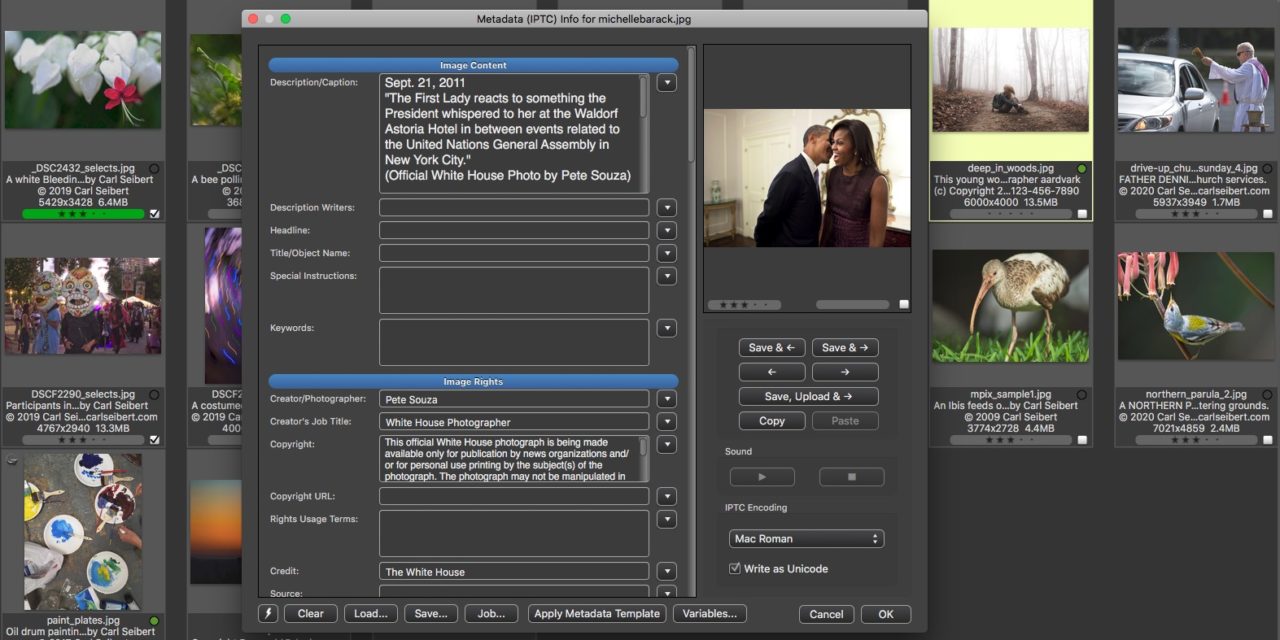
By the way, if an image has a caption, WordPress will place the caption from the picture’s metadata under the photo on a page or post, all formatted and ready to go. Edit to taste. That’s a time saver and error safeguard. No re-typing of names needed! If a picture has its IPTC Headline field filled in, WordPress will use what’s there as the image’s title in Media Library.
Unless somebody wrote a note in the metadata, we generally can’t tell at this point whether we specifically have rights to use a particular photo. But, if the workflow gods are smiling, we have the photographer’s contact info right in front of us if we need to check with him or her for ourselves.
It is quite possible that the photographer did write something like “Licensed to WidgetCo for website use for one year from (some date)“ in the Rights Usage Terms or Special instructions field of your picture. If your client is WidgetCo and the date is last week – Hooray! No worries for you.
Lacking that, having that name and contact information of the copyright owner could come in handy in the next few minutes.
Trust. Then verify
You probably got this picture from some human being at the client. Who got it from some other human, who got it from somebody else, all the way back to somebody who actually bought a license from the photographer or illustrator. How much do you trust that each person in that chain was crystal on what rights were bought from the photographer at the very beginning of the chain? And what is going to be needed by the poor soul at the other end? That poor soul is you, by the way.
In my experience, it’s pretty likely that I’ll need to call the photographer to sort it all out. In which case, I really appreciate having that contact info right at hand. While calling will burn up some time, wasting even more of our time chasing down the phone number just adds insult to injury.
I’m belaboring this for two reasons.
One is that a screw-up at this point in the workflow could be fatal. No matter if your contract makes the client responsible for the content they provide. Fatal for the client still means you lose a client.
The other is an ongoing theme that says that having (and reading) proper metadata on the pictures that land on your desktop makes your life better, your workflow more optimal. And life better for honest people who may come into contact with that picture later.
If necessary and possible, educate your suppliers to get this stuff up to standard. Gently. Or by hitting them up ‘side the head with a two-by-four, as appropriate.
Embedding metadata isn’t much work
By the way, adding copyright and contact information to photos requires virtually zero effort on the part of a photographer. They just need to be told to do so. Good captions, on the other hand, come from an investment of resources. So, getting them at the beginning of an asset’s lifecycle might cost more. But somebody is going to have to do that work eventually, one way or the other. By the way, if that somebody works out to be you, consider billing for the time. Optimize your profits a little.
Disclaimer: I should point out here that metadata embedded in pictures is public. That’s the point of it. It’s a historical record. Obviously, it’s perfectly fine for someone reading the metadata later on to see the caption you published with the picture. Knowing that WidgetCo bought a license is fine. The photographer’s business contact info is public information. But trade secrets or sensitive security information should not be attached to photos. You’re not working on the original photos (I hope!). So, if something needs to be redacted, delete away.
It makes me feel creepy even having to point that out. But people nowadays behave very strangely about privacy, wildly disseminating intimate and potentially compromising information on the one hand, and getting their undies all in a knot about stuff that is rightly public knowledge on the other.
Few of us have to worry about confidential sources and secret agent tradecraft. We can chill. There. Due diligence rant over.
Back to the pictures
(My Photo Mechanic interface is customized from the default. Not just the information under the thumbnail, but fields in the dialogs, too. But it will work just fine straight out of the box. (As opposed to Bridge or XnView. Again…you get what you pay for…..) If you want to learn more about setting Photo Mechanic up to meet your needs, check out my main Photo Mechanic How-To here.
Are we comfortable rights and licenses-wise? Or at least that we know where the issues lie and that we’ll be OK when we click “Publish”?
OK, good.
Now, let’s take a look at the quality of the picture itself. In Photo Mechanic, double-click on the thumbnail. Or click the magnifier icon. Or tap the spacebar. A big preview will open. The arrow keys will move you from picture to picture.
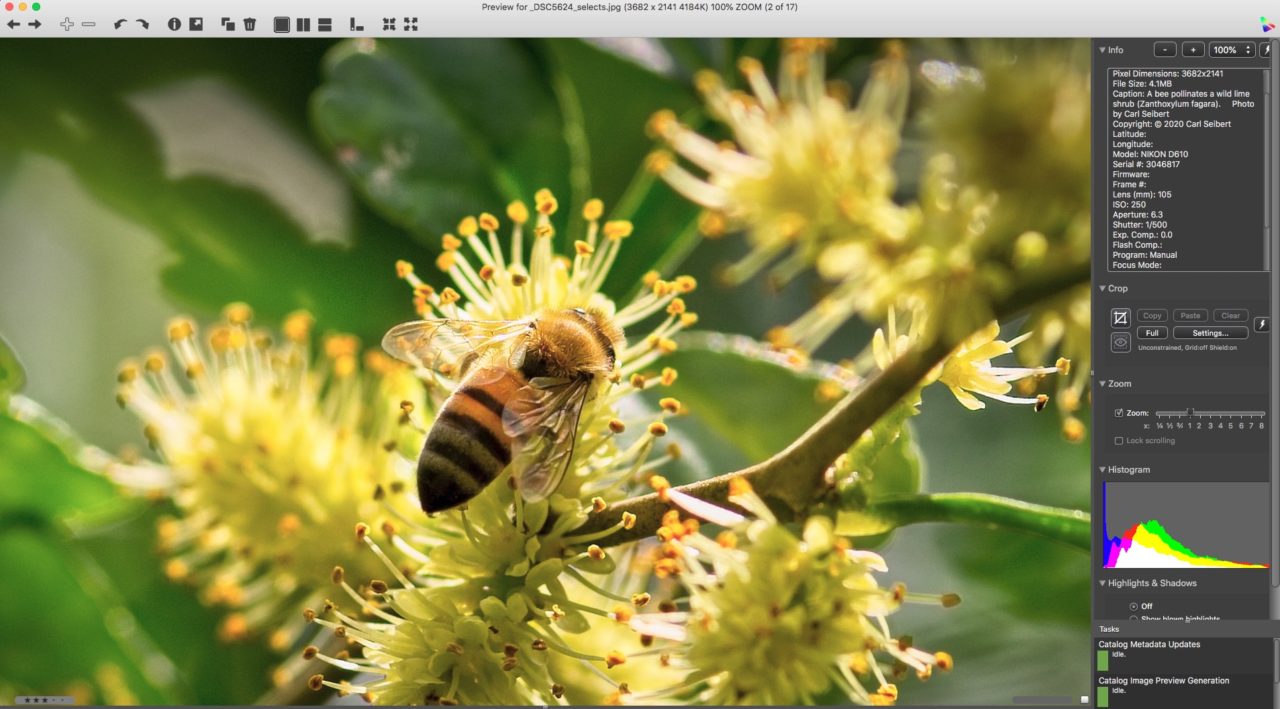
Photo Mechanic can be set up to zoom in to 100% (or any magnification you choose) anywhere in the preview image, with a single click. (Preferences>Preview>”Single clicks toggle zoom when no tool is active”) That’s quick and easy. I highly recommend setting that preference.
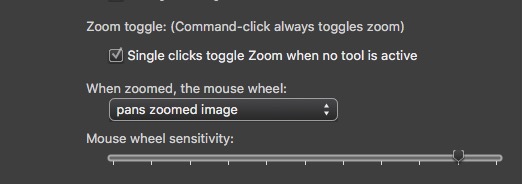
Photo Mechanic displays the image’s dimensions in the title bar of the large preview window, as well as optionally in some other places.
Is the file big enough? That question has quality implications, for sure. But it also speaks to the matter of rights. A too-small image can send up red flags. Is it small because it was lifted off a website? Stolen from a website, perhaps?
In the picture
Is the content of the picture what we want? Is the quality OK? Again, it’s always a good idea to take a look the moment the picture arrives. Because, if we have to reject it, it often takes an astonishingly long time to pry a replacement out of the client.
There’s a crop tool in the preview. Mark a crop and it can be applied when we resize and compress the picture. It’s non-destructive. We don’t have to save a new file or anything. Sweet.
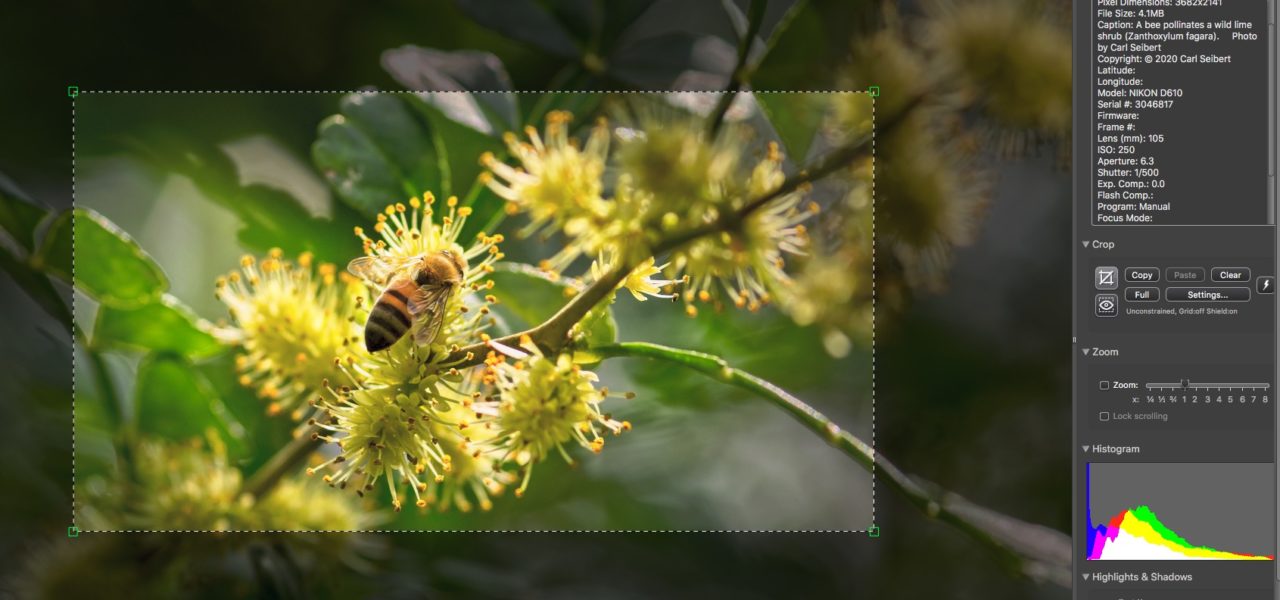
We cannot tone or retouch an image. If we need to do that, we press “CTL/CMD + E” and the picture will open in Photoshop or whatever editor we have chosen in Photo Mechanic’s preferences. Don’t worry about resizing and compressing. That, we will do right in Photo Mechanic.
In the upper right corner of the preview window there is a panel that displays information about the photo. It’s called the “Info Text”. By default, it shows some Exif info. But it’s totally configurable. I have mine set up to show some basic file info, caption and copyright info, and GPS data. The very same box of information can be popped up in the Contact Sheet as a tooltip by pressing “CTL/CMD+T”. You can have different Info Texts for different purposes and switch between them.
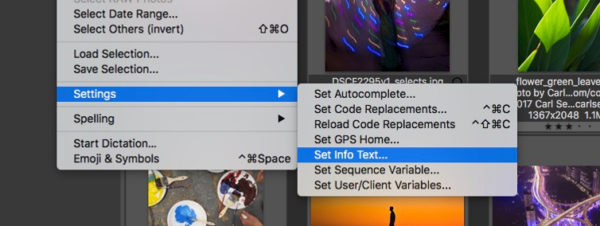
You can configure the Info Text from “Edit>Settings>Set Info Text…” in the main menu. Make a Snapshot of the old one. Craft a new version to your needs. Remember to make a Snapshot of your new version before you leave the dialog.
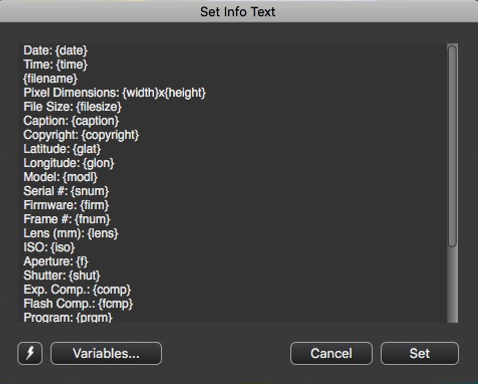
(Snapshots are Photo Mechanic’s version of presets. Look for the Lightning bolt icon all over the interface.)
Check my YouTube channel for Photo Mechanic power user tips.
Physically prepping your file
If you’ve saved some time and headache along the way to this point, so much the better. Next, we’ll save almost all of whatever amount of time you used to put into the physical readying of images for WordPress. We’re optimizing all over the place.
Moving right along. We’re about five seconds from being done. (Once we have Photo Mechanic’s file handling set up, that is.)
What we’re going to do at this point is to select the image(s) that we want to upload and right-click and choose “Save images as…”. Or press “CNTL/CMD+S”. That will bring up the Save As dialog.
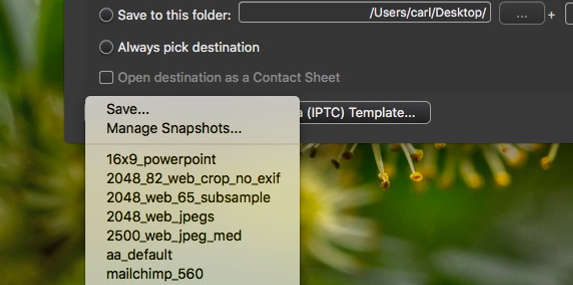
Click the lightning bolt (Snapshot) button at the bottom left of the dialog and choose the correct preset. (It’s a really good idea to choose the Snapshot at the start of every uploading session. On-the-spot adjustments we make in the Save-As dialog are sticky. It easy to blindly hit the button only to realize you just used some settings you didn’t want.) Now click the save button. Or just press the Enter key.
Grab the resulting files’ thumbnails and drag them straight from Photo Mechanic to WordPress’s media upload dialog. (Click and hold for a second to start to drag. If you move the cursor too quickly, Photo Mechanic will think you want to make a sweep-selection.)

That’s all. You’re done. WordPress will go ahead and do all the drudgery work of making a set of files to suit responsive images for your site. It’ll be optimal. Or pretty close to it. And you don’t have to lift another finger.
Set up
Let’s get that Save As thing set up.
There’s a screenshot you can copy from right here. So, this will be a one-time investment of, maybe, a couple minutes.
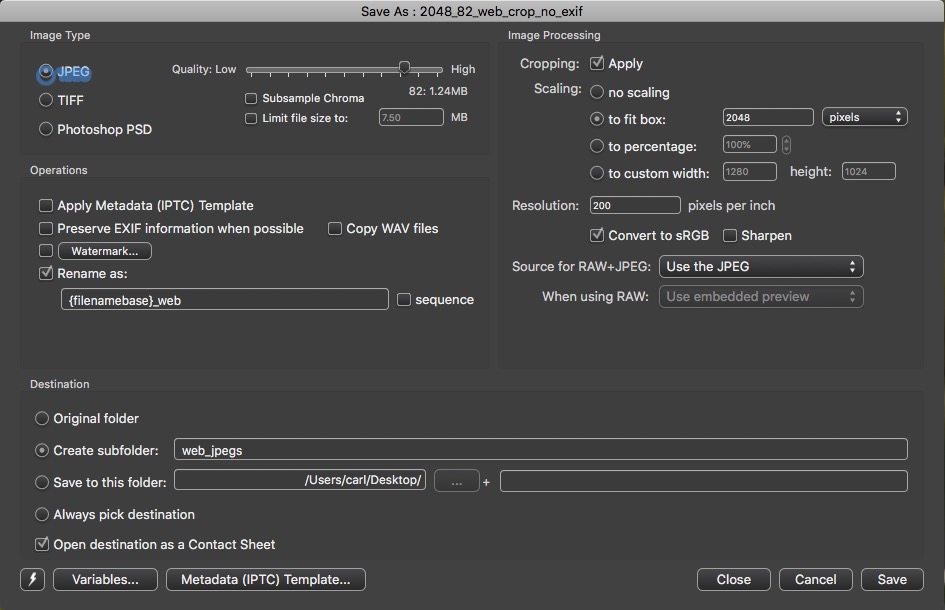
Starting at the top left of the dialog.
Check “JPEG” for your output file type.
Set the slider at 82. (Or whatever you decided after considerable deliberation and reading that four thousand word post.)
Leave “Subsample Chroma” and “Limit file size to unchecked” (99% of us, 99% of the time, anyway).
In the “Operations” section:
Let’s optimize our metadata. Uncheck “Preserve EXIF information when possible”. Unchecking this tickbox will preserve the IPTC metadata that we as good citizens need and banish the bulky and unneeded-at-this-point Exif data block from our file and our lives.
(Yes, 1% of us, 1% of the time will need to do something fancier. And “EXIF” is really spelled “Exif”, the only mixed-case acronym ever. I acknowledge these truths. But we don’t need to worry about them.)
More settings
If you want to rename your file, you can simply take care of that in the appropriate box. Photo Mechanic has rich variables support. The way I have rename set up in the screenshot, “{filenamebase}_web” will automatically append “_web” to whatever the existing filename might be. One less thing to fuss with. I have an entire video devoted to cool things you can do to filenames in Photo Mechanic if you want to know more.
Under “Image Processing”, ticking “Cropping: Apply” will apply a crop set in Photo Mechanic’s Preview to your output image. Probably a good idea.
Then, click the “Scaling: … to fit box:” radio button and enter the pixel dimension of the longest side for the largest size you need. Which you may have chosen after reading that monster post on how this all works.
Ticking Convert to “sRGB” is probably a good idea. Honestly, you are unlikely to go too far wrong either way here.
In the “Destination” section, you may want to tick “Create subfolder” and “Open destination as a Contact Sheet” if you want your processed images in a subfolder.
Hint: If you put your processed images in a subfolder, you will preserve the selection of the images you started with. That might shave a second or two off your workflow. Optimize where you can.
Now, click the Snapshot button (lightning bolt icon) and save your settings as a Snapshot/Preset.
There
It takes a little while to read and follow the How-To. It will take a scant few minutes to actually do the work. (Unless you have one of those jerky clients.) That’s all there is to optimizing images for WordPress in 2020.
Using the best software for the job can take a process that’s pretty easy and make it dead easy. But sometimes it’s hard to justify the extra spend. What do you thing? Jump in the comments and let us know.

Thank you for the detail guide. I am always trying to make my image data on wordpress easier. This will save so much time after I upload images to wordpress.
Thanks. We tend not to think of Photo Mechanic for this sort of work. But it’s pretty good for it, eh?