Optimize and prepare photos for the web with a fast workflow and good tools
You’re a web designer. An email full of images lands on your desktop with a thud. You experience a momentary euphoria. Your client has sent the last batch of pictures. Before your deadline. Well, almost before. Not long after, anyway. But euphoria slowly turns to dread as the prospect of actually dealing with those photos looms.
They might be the size and quality you specified, all nice and optimized for your site.
Or not.
They may be labeled with captions and copyright information.
Or not.
You may have the appropriate rights or licenses to use them.
Or not.
You may trust the person who told you that you have rights to publish them.
Or not.
And you don’t have all day to deal with this.
Allow me to make a modest proposal: What this world needs is a system that makes it easy to triage photos submitted for publication on the web. We should be able to tell the good ones from the bad ones from the ones that are time bombs more or less at a glance and send them all on to their destinies. Before lunch.
Good tools
In this HOW-TO post, we’ll lay out a workflow that gives you the tools you’ll need to bring order to the mess, be duly diligent about rights and licenses, automate the drudgery of optimizing images, and it’ll be dead fast.
The workflow will be dead fast, but this HOW-TO won’t be. We have a lot of stuff to talk about. Go get a coffee and settle in.
For this outing, we’ll be using the photo management application XnView. I often recommend XnView to web designers.
It’s a low-cost photo browsing, metadata editing, and batch processing tool. I mean it’s seriously cheap. It’s free-as-in-beer for personal use and costs €26 for company use, with multi-seat licenses available at a discount. For photographers and high-production content creators, it has some metadata writing limitations that make me rather strongly recommend the more expensive Photo Mechanic. But for web designers, XnView has compelling features and you just can’t beat the price. …we don’t want to be sloppy. We have to get some of this stuff absolutely right the first time…
Full disclosure: In all honesty, I do this sort of work mostly in Photo Mechanic. That’s in no small part because I use it every day and I’m fast in it. I don’t have to factor cost of acquisition into my choice because I have long since paid for both tools. Every program comes with trade-offs. Depending on your needs, personality, and pocketbook, you may ultimately prefer one or the other.
I’ll do another version of this post with Photo Mechanic later.
And a simple workflow
The workflow boils down to: We inspect our photos carefully, maybe make some minor fixes, and press the button that prepares our files to meet our technical specs.
We’ll take some time up front to make sure we understand our own situation and set some sensible defaults so we don’t get bogged down. We want to keep our attention focused on the important stuff within this task and move on quickly so we can focus on all the other important stuff on our plate.
This is a repetitive, not fabulously creative task. The images we will be dealing with here have already been selected and edited. Our job here is to quickly sort through the files, identify the ones that are going to cause us problems later, set those aside, and get the ones that pass muster ready to upload to our website.
That said, we don’t want to be sloppy. We have to get some of this stuff absolutely right the first time. A copyright or libel case could cost our whole business. Staying focused on the important stuff in large part means being super diligent about things that might hurt us later.
If you run a website, pictures don’t usually arrive en masse, and they don’t usually arrive in perfect order. Usually, they come from the client or a coworker in heaven-knows-what-department. You get a handful at a time – via file sharing sites and emails, most likely. And if you get five photos from your client on a given day, the chances are that you needed seven for the page you’re working on that day. And a couple you do get will require communication with the client, your lawyer, or maybe clergyman or yoga coach.
Watch the video version of this post.
Part 1 talks about planning a workflow. Part 2 is all about building your batch convert actions.
Let’s get started
Dump the bag of images in a convenient place. I usually start on my desktop and organize the files into folders later. Or you can start with the images in a well-named folder if “organized” comes naturally to you.
You can open a folder full of files in XnView by dragging it to the XnView icon (It’s a little different experience in Windows and Macintosh, but the idea is the same.) Or you can use the file navigation pane in XnView’s browser window (I keep it on the left – a modification of Layout 3 in XnView). Or, you can leave XnView minimized, already pointing to the desktop or your favorite folder and simply click it to open a browser window. (Sometimes, I have to click refresh or navigate away and back if I don’t see my new files in the browser.)
Out of the box, XnView is configured perfectly for somebody. Not somebody you or I know, but somebody. You will need to take some time to configure it to your needs. Learn the mechanics of using and configuring XnView in this post.
Look over the thumbnails
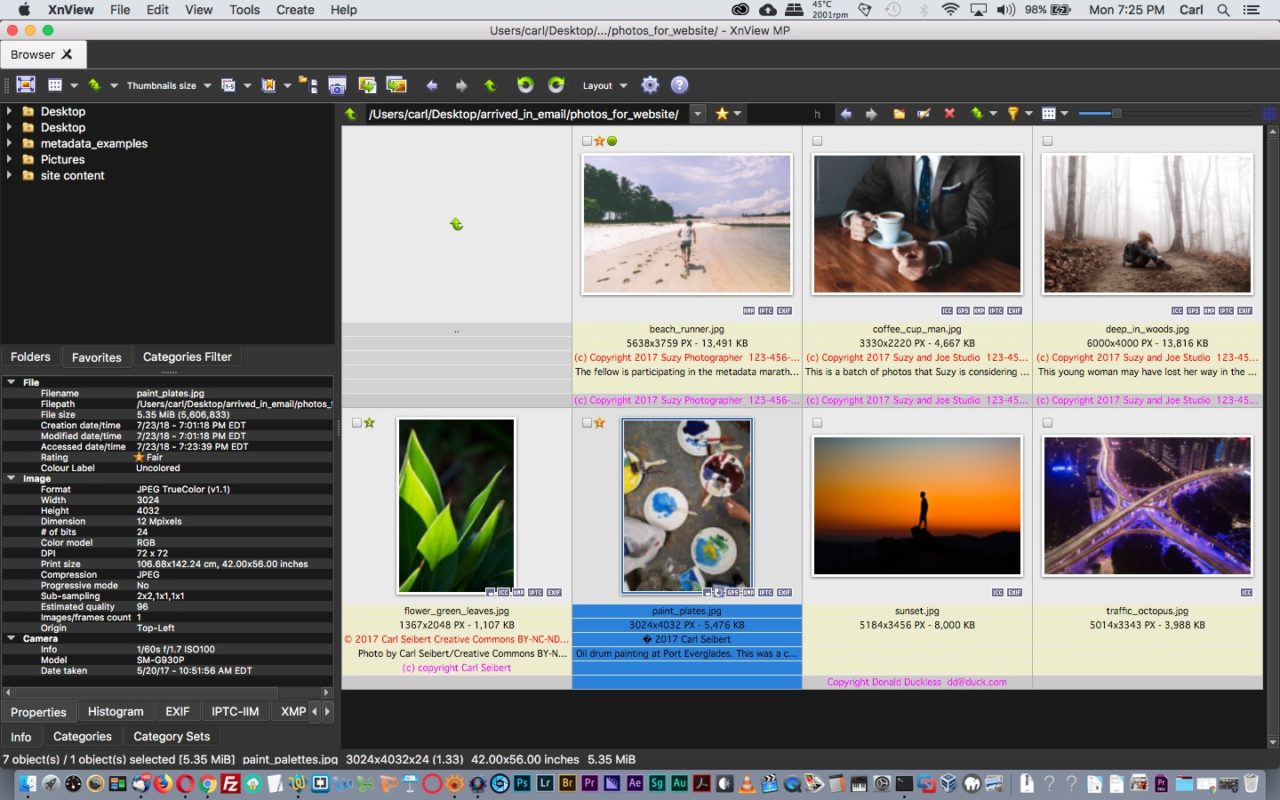
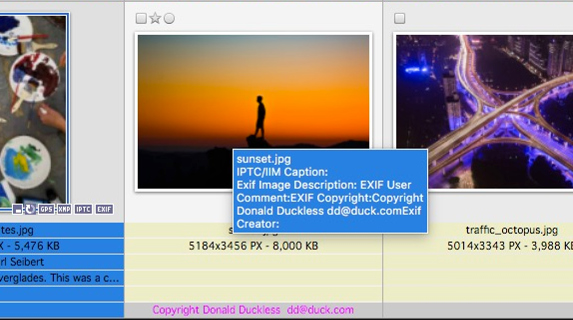
In XnView’s preferences, you have some configuration options for what information to show on the thumbnail slide mounts. I display six lines under each thumbnail. I can see the filename, pixel dimensions and file size, the IPTC Copyright field (in red!), the beginning of the caption, and underneath, I have the Exif User Comment and Copyright fields (in magenta) (See my main XnView HOW-TO for details on setting this stuff up.)
UPDATE: Since this post was written, Google has announced support for three copyright-related IPTC fields in Google Images. It would behoove us to know what’s going on in those fields, so now my slide mount labels show filename, pixel dimensions and file size, the IPTC Copyright field (in red!), the beginning of the caption, the IPTC Byline, and the IPTC Credit fields. I still care about the possibility of data hidden away in the Exif, so I continue to display the Exif User Comment and Copyright fields in popup tooltips, which I describe below.
XnView has tiny overlay icons on its thumbnails that can show which metadata data blocks have data, whether there’s GPS information on the photo, whether there’s a thumbnail in the metadata, and whether XnView is using Exif orientation data to display the image right-side up. (These last two are a tiny square containing an even tinier square, and a circular arrow, respectively.) Make sure all are turned on in your preferences.

There’s a tooltip functionality available in the XnView browser. For our needs, it’s a good idea to turn this on, too. I have mine set to display the filename, caption, and the Exif Image Description, Copyright, and Artist (creator) fields. In the tooltips, you can see the entire contents of displayed fields, not just the first few characters.
(For photo editing, this much information on the thumbnails would probably be distracting. But for the task at hand, it fits our needs.)
Read the caption
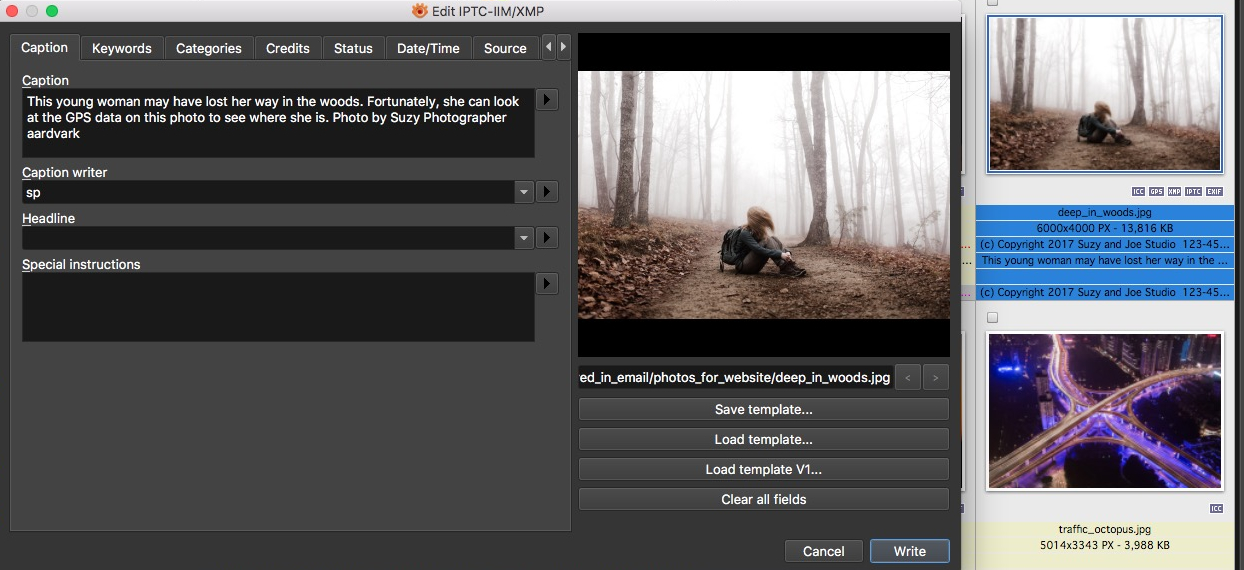
We can open the IPTC editor dialog to see IPTC metadata in a nice readable format by using the right-click context menu and choosing “Edit IPTC/XMP”, or by pressing “CMD/CTL+I” on the keyboard, or from the main menu at “Tools>Metadata>Edit IPTC/XMP”.
And finally, there’s an Info pane. I display it on the left side of my interface, under the folder navigation tree. In it, there are tabs to display the contents of each metadata data block on a selected picture. You can see information in this pane that is not displayed in the IPTC editor.

We’ll use these tools as needed to take a quick look over our newly-arrived pictures. We’re looking for harmony here. Or the lack of it.
Do the images look like we expected them to? Do they all look like they were shot by the photographer(s) they are supposed to be shot by? Are the pixel dimensions OK? Do the file sizes look appropriate for the pixel dimensions? Too big and we may have a CMYK or a 16 bit file. Too small and we may have a file that has been compressed too much. For that matter, are the files in the format we expected?
What metadata do we see? If there is any at all, that gives us a little more confidence that our photos are what they are supposed to be and came from where they were supposed to have come from. As opposed to having been right-clicked off some website, say. Are the captions clear and complete? If so, that builds some more confidence in the provider. Are the copyright notices what we expected? If they match what we were told about the images, that’s another good sign.
If it’s not right, it’s…
At any point in the process, if an image seems off, if a parameter is out of whack, or conflicts with another parameter, just mark that image for follow-up later and move on. (For this you can use color flags, star ratings, tags, moving the file to another folder, or drag the thumbnail to another position in the browser.)
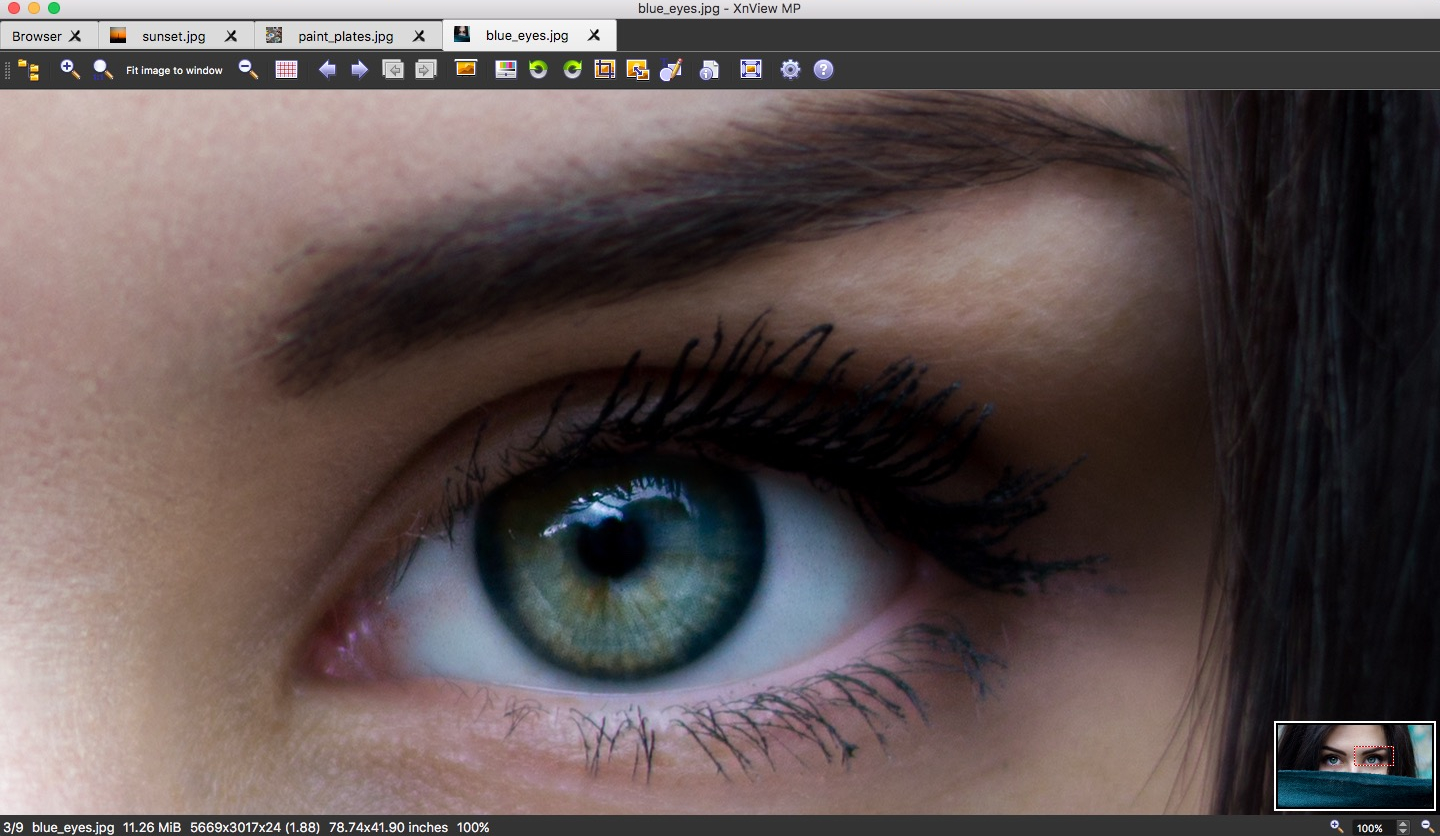
Step through the pictures in the large preview, using the 100% view feature as needed. Are they sharp? Are the colors OK?
After we check over our pictures – the process will only take a minute or so – we’ll be able to group them and deal with them accordingly. Images that we trust to meet our needs – right size, good quality, the right license, good caption – we’ll dispense with in a single batch action click.
We’ll circle back to designing and implementing batch actions. The important point here is that we want our workflow designed so that we put our effort into decision making and we delegate the mechanical stuff to automation.
Special cases
Images that don’t quite have all their ducks in a row, but are otherwise trustworthy, might still do-able with a single click. Running them through a different batch action may be all that’s needed. For example, if you have images with no metadata, your workflow might be to infuse a generic copyright notice and caption explaining that copyright applies and prospective users may contact you for more information and you’ll help them find the copyright owner. (You good, helpful person, you!)
Or maybe you see that a picture has GPS data and you need to preserve it (or vice versa). In that case, we can just send that image to a batch process that preserves (or destroys) GPS data.
Then there are the images that didn’t earn your trust. Maybe the hair on the back of your neck stood up because something about copyright and licensing didn’t quite add up. Maybe an image was a little dark, or light, or had a color cast, or needed a crop. Those exceptions will need individual attention.
If something image quality-wise is a bit off, but easily fixable, XnView has a built-in photo editor. On the Preview tab, you’ll find some cropping and color tools in a toolbar at the top of the tab. They’re kind of crude, compared with Photoshop, but they can be handy.
Photoshop integration
Or you could open the image in Photoshop or the editor of your choice. (“Right-click>Open With”, or “Tools>Open with”, or drag the thumbnail to your Photoshop icon.) Remember that if you have to tone or crop an image, do it on the file you received and save it out as a new file. Don’t work on a file that you’ve already compressed.
If the issue is technical and beyond your fixing, or there is a creepy feeling about copyright, your tool of choice will likely be the telephone or email or a chat client. You may reject the picture outright and let your client deal with it. Or maybe something needs to be clarified with the client. Or maybe you want to go right to the source and clarify some issue with the photographer or image provider.
In this case, metadata is your friend. A properly prepared picture will be labeled with contact information for its creator or copyright owner. Sometimes a phone number or email will appear right in the copyright notice itself. Open the IPTC editor and take a look around. In addition to the Copyright Notice, be sure to check the Special Instructions and Caption fields.
If you don’t find contact information in XnView’s IPTC editor, it may be in some fields that XnView doesn’t display in that dialog (…or write to, which is why I prefer Photo Mechanic for people who are in the authoring end of things). There are contact information fields and a Rights Usage Terms field that you may find in the XMP data block in the Info pane.
More info when needed
The XMP tab in the Info pane in XnView will show you these fields. The Info pane tabs display a wealth of information, albeit in a less than glance-friendly manner.
In the XMP tab, there are groups of fields, which expand by clicking on a tiny triangle. In the “dc” group, you’ll find “rights”, which is Rights Usage Terms. Under “Iptc4xmpCore”, you’ll find fields (if filled in) for contact information including phone numbers, emails, and websites.
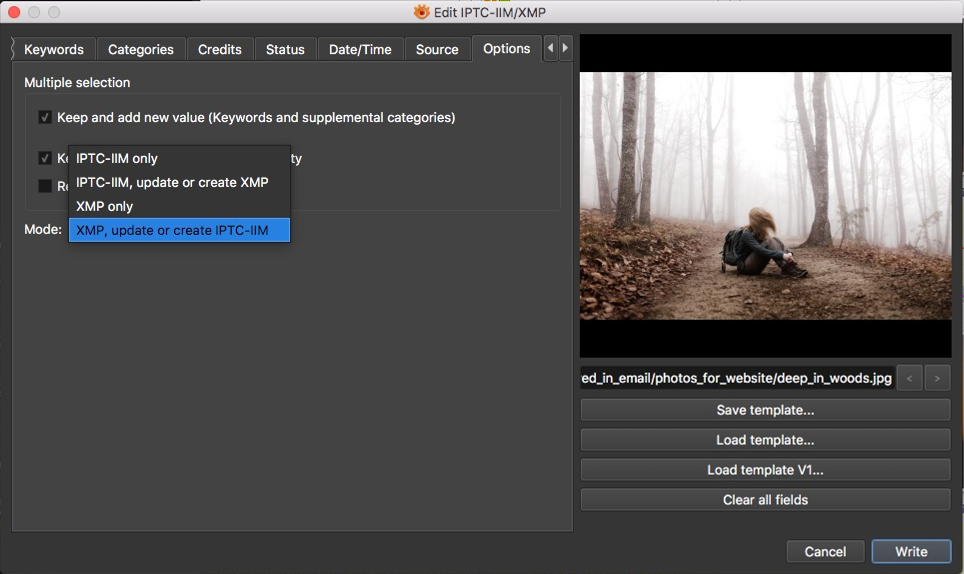
I should note here that XnView only shows IIM or XMP data in its IPTC editor. One or the other. You choose in Options in the editor dialog. It does not fall back from one data block to the other if one is empty or missing. Which shouldn’t matter to us, since the fields that are common to the two data blocks should always be synchronized. But weird stuff happens. In any case, the Info pane shows all your metadata all the time. If something in the metadata seems off, you can look there.
By the way, if you are poking around in the Info pane’s Properties tab, under Color Profile you’re likely to see “No copyright, use freely”. Don’t get excited! The picture is still copyright protected. That’s the color profile that doesn’t have a copyright, not the picture! Just sayin’.
Watch out for out-of-sync CMI
In the illustrations, there’s a picture that has no metadata except some copyright information in an Exif field. Hopefully, we won’t see this very often.
If this happens, the cause is likely to be that certain professional level cameras have the ability to write copyright management information into any of three fields in the Exif data. These fields aren’t IPTC fields, but are semantically equivalent to similar IPTC fields. Photographers can program their cameras to write their copyright info on every frame shot.
Usually, any such information will be automatically transferred to IPTC fields when the photographer applies his or her baseline metadata. Which, of course, would normally happen long before a picture lands on a web designer’s desktop. But it is possible that something happens and we receive such a picture. We might well need to be concerned.
We might want to strip Exif metadata off our file before we upload it to the web. I often recommend doing so, in fact. By the time a picture is ready for publication, Exif data is usually useless. And it takes up space, particularly if it contains (super-useless) thumbnail images.
Careful! careful!
But if there’s copyright management information in the Exif data block that hasn’t been synchronized to the IPTC, that could complicate matters. Stripping CMI could wind up costing us a $25,000 USD penalty. (“Could”. It hasn’t happened to anybody in the US yet. Only in Germany, thus far.) We don’t want to shell out $25K, so if we get one of these little time bombs, we’ll need to adjust our plan accordingly.
(This is why I expose all those Exif fields on my thumbnails. XnView does not expose any Exif data in its IPTC editor. Nor does it synchronize Exif to the IPTC.)
If there’s CMI in the Exif that is already synchronized into IPTC fields, we can just not worry about it. IPTC fields are where such information belongs if people are to actually see it. Most software that displays metadata reads first, or exclusively, from the IPTC fields. Only a few programs can read CMI from the Exif.
If we do find CMI in the Exif, the obvious answer is to not strip the Exif on that particular image.
In XnView, we have the option of stripping just the thumbnails or GPS data from the Exif. That could do the trick if we need to leave some Exif data intact. For either of these courses of action, we need only set up an alternative batch action.
Let’s talk about those batch actions
Now we’re at the point where we click the batch action and sit back (well, blink. This is only going to take a couple seconds) while XnView automatically takes care of the technical stuff.
In order for that to happen, we’ll need to build one or more batch actions that will (at a minimum) resize our pictures appropriately and save them with appropriate compression settings. We may also need or want to strip some metadata or add some information to one or more metadata fields.
This is where we “optimize” our images for the web.
Over the years, much ink has been spilled and many unnecessary programs have been written over “optimizing” photos.
Here’s the real deal: Most website operators don’t have to worry about it much, or at all, anymore, because their websites take care of this stuff all by themselves.
That’s right, all we have to do is give the website’s Content Management System an image to work from, and the CMS takes it from there.
For-real. Modern websites optimize photos for us
We’ll use WordPress as an example. When we upload a picture to WordPress’s Media Library, WordPress will automatically take the file and use its imaging library to make several versions of the image at stair-stepped sizes (like 1024 PX, 768 PX, 300 PX, and 150 PX). Then, it will serve the smallest image that satisfies the needs of the browser on a visitor’s device. This way, a big image is not served to a tiny little telephone. This is what responsive design is all about.
Make sure your website is using ImageMagick rather than GD to process your JPEG images. ImageMagick preserves the metadata you choose to include on your pictures, thus ensuring that you are a good neighbor and protecting you from potential liability. GD destroys all metadata, with the opposite result. See this post and this one for details on making sure your site is using ImageMagick.
The images your website’s CMS makes for you are all saved according to settings in the CMS. (Which, you can generally change if the defaults don’t suit your needs.)
The image we upload to our website might be served to visitors as the largest responsive option, might only rarely be served to visitors, or might be simply discarded.
All we need to do is figure out what the site needs and set up an action that automatically saves files to that spec and we’re done. Then we’ll be in one-click territory. If we choose our default settings properly, they’ll work virtually all the time. If something does occasionally go wrong, we’ll deal with that on a case-by-case basis.
Set up your actions
In XnView, right-click on any picture and choose “Batch Convert.” (You may also go to “Tools>Batch Convert…” in the main menu, or use the keystroke “CMD/CTL+U”) This will open the Batch Convert dialog, which is a big, wide affair with five tabs.
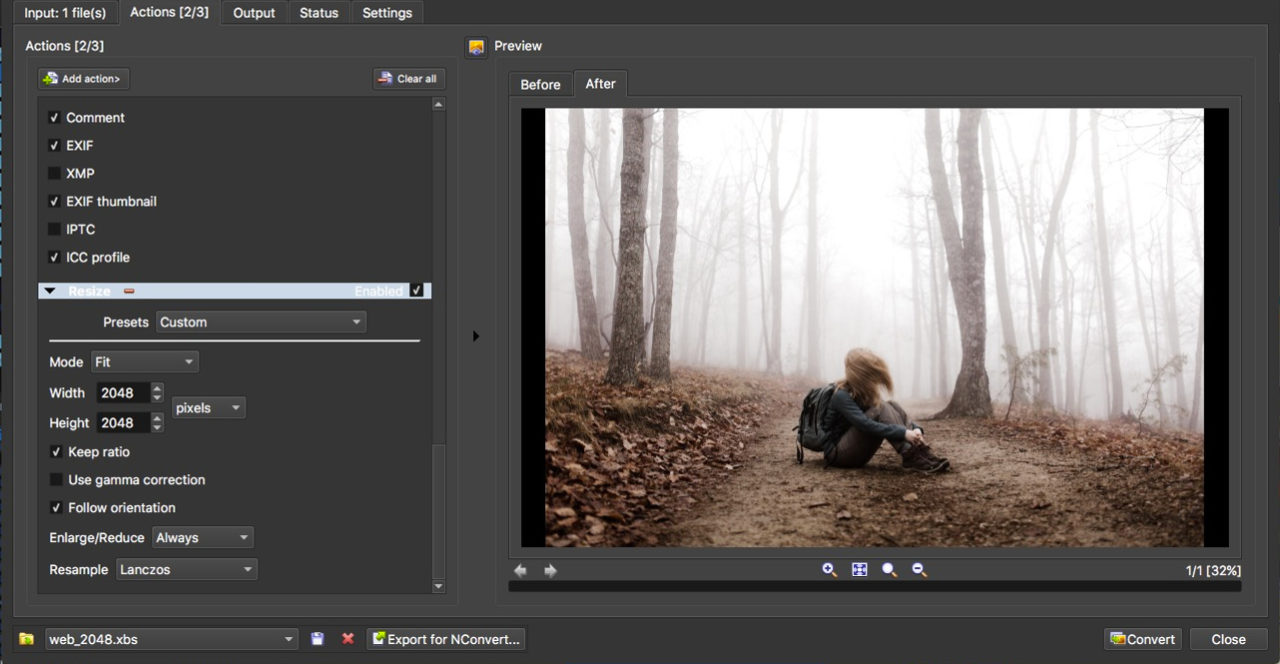
Go to the “Actions” tab. Choose “Add Action”. You have all sorts of choices of things you can have the batch script do for you. Let’s add three that we’ll often need. You may add more later if the need arises. From the flyout, choose “Add action>Image>IPTC-IIM/XMP”. Then choose “Add action>Image>Clean metadata”. And finally, “Add action>Image>Resize”. (Setting an IIC profile, sharpening and contrast adjustment are some more items you might consider.) We’ll be able to turn actions on and off without actually removing them from the list by ticking or clearing the tickbox at the top right of the action item.
You’ll make probably several batch actions to suit photos with different needs.
For our first batch action, clear the “Enabled” tickbox to turn off the metadata action.
In the Clean metadata section, tick the box for “EXIF Thumbnail”. We’ll probably want to rid ourselves of the space-wasting Exif (yes it’s supposed to be mixed case, not all caps) thumbnails most, if not all, of the time. So we’ll add this option to our first batch action.
Family size, or jumbo?
In the Resize section, we need to set a size for our standard web upload. For some systems, we choose a size specified by the developer. For other systems, this will be the largest size used on our pages. For others, it will be the size we want to be served when a visitor clicks on a picture for a larger view, or the size we want to give users who right-click to download a picture.
On my website, I make my default uploads 2,048 pixels wide. On my site, the original uploaded file is only used when people click for a large view. I figure 2,048 pixels wide should do the trick. I know people who use 3,000 pixels. Others do 1,280. If you make special accommodations for high-density displays (Retina), that might mean you need your uploaded images to be bigger still.
In the Resize section, choose a resize mode. “Fit” usually works well. If we chose the same value for width and height, this choice makes the long side of the image fit in a bounding box of that size. “Longest side” accomplishes exactly the same thing.
Be sure to tick “Keep ratio”. We don’t want our pictures to be squashed.
And choose “Follow orientation” to tell XnView to keep images that it has rotated to be right-side-up, right-side-up.
For “Enlarge/Reduce”, you can choose “Always” or “Reduce only”, according to your desires.
“Resample” offers you the choice of several resampling methods. You may experiment until your eyes glaze over, or just take the default, Lanczos.
Now let’s go to the “Output” tab. (Where we get closer to the scary part.)
The scary part is soon
Here, we start out with some logistical details. We can choose whether to save our output files to the same folder that our source files came in (the desktop in my case) or to a specific folder.
Under options, we certainly need to tick “Preserve metadata”, and we probably want to tick “Preserve color profile”.
“Filename” allows us to add variables, text strings and incrementing numbers to the names of our saved files. There is a flyout at the right-hand end of the field that lets us choose variables.
My simplest batch action uses “{Filename}_web” in this field. That’s the “Filename” variable, plus “_web” “.jpg” will be added by XnView. Files named this way are instantly recognizable as upload files and they will sit right next to their parents in the folder. “sunset_web.jpg”, for example.
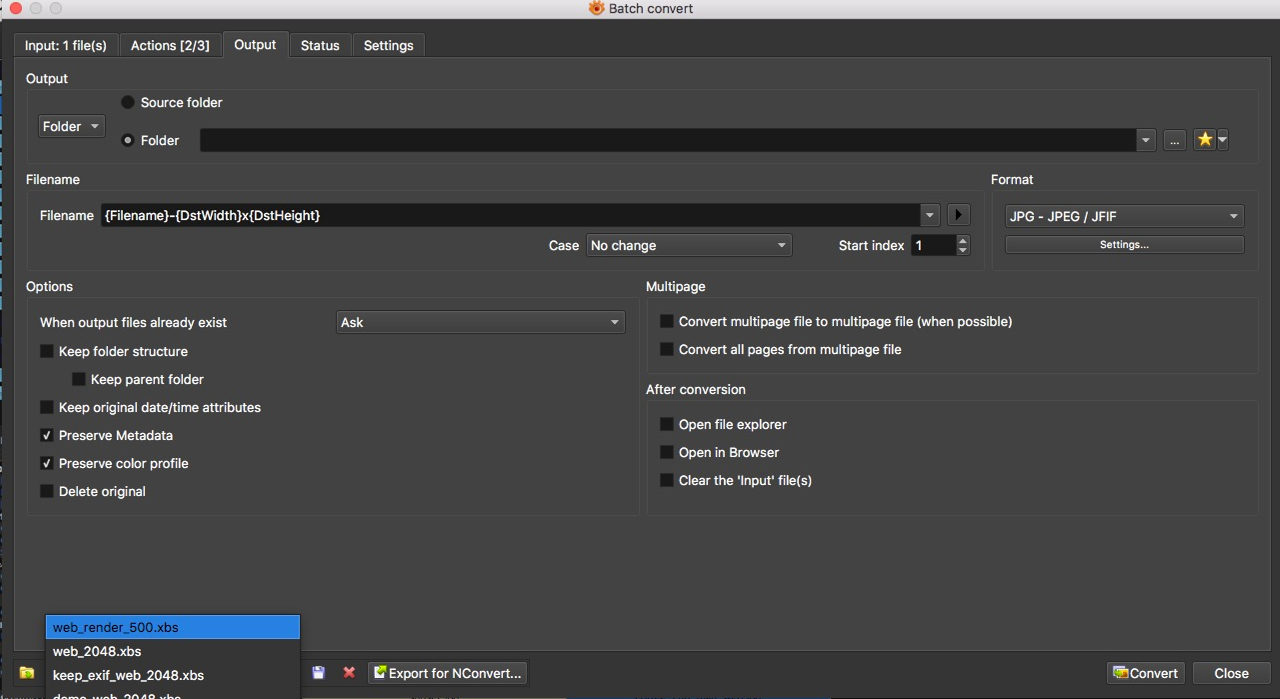
Sometimes, your site will require the size of your image in the filename, like “yourfile-2048×652.jpg”. You can accomplish this with variables, like this example: “{Filename}-{DstWidth}x{DstHeight}” (That’s the filename variable, followed by a dash, followed by the “Saved image > Width” variable, an “x”, and the “Saved image > Height” variable). If you need to follow a convention like this, or if you just want to add dimensions to your filenames for convenience sake, you’ll probably need to experiment a little to arrive at the setting you need to get the result you want.
Now, we get to the scary part
Set “JPG- JPEG/JIFF” under “Format” and click “settings”. Here, we will set the quality level of our compressed output files. Take a breath. This is easier than it looks.
There are three or four settings you can specify for a JPEG encoder to use when it saves your file. XnView allows you to make individual choices for each. (Most programs just give you one big slider and they take it from there.)
The choices we make will interact with each other and with the content of our picture itself, resulting in a certain quality and a certain file size for our finished image. Don’t sweat it if you can’t predict these interactions. Because nobody can.
At this point, we should pause to think about how our uploaded file will be used by our CMS. If the uploaded file is never, or rarely, served, we just want to choose settings that will give the CMS’ imaging library plenty of quality to work with. The only impact the size of our uploaded file will have will be on storage on the server and that won’t be a big deal (within reason). Assuming, that is, that the uploaded file is kept at all, rather than deleted. If it’s to be deleted, we can really err way to the side of having plenty high enough quality and be done with it.
Balancing act
If our uploaded file will regularly be served, we have to balance the need for giving the imaging library good quality to work on with keeping our file size down for the sake of page load time in cases when the original file is served. In this case, we’ll need to start with some sane settings and experiment until we achieve the balance we want.
If we need to thread this needle, it’s cool to end up with different batches to use in different circumstances, according to photos’ subject matter or intended use. But don’t put too fine a point on it. Don’t try to go for the last millisecond of page load time or the last pixel of quality. Our goal here is a one or two-click solution that works 99% of the time. Aim for the big part of the bell curve.
At the top of our Write Settings dialog, we find the big quality slider. Keep in mind that the numbers on this slider don’t necessarily match those used by ImageMagick or any other imaging program. Our first consideration is that we don’t want a setting that’s lower than the one our CMS will use. Once we compress a lossy format like JPEG, there’s no going back. There’s no way quality will get any better down the line, regardless of settings used later in the process. We don’t want to under-shoot here.
By default, WordPress uses a quality setting of 82 when it saves smaller-sized versions of our picture. Thus, if we are working on a WordPress site, we can choose anywhere between 100 and 82 on the big slider. (XnView’s and ImageMagick’s quality numbers are close enough that we’ll be OK.)
When smaller makes bigger
Note that choosing more compression here WILL NOT make files saved by the CMS smaller. They’ll be whatever size that results from the settings in the CMS, never any smaller. In fact, over-compressed images give imaging libraries a harder time. A more compressed, smaller, upload file will usually yield a slighter LARGER file to be served on your site.
I’ll repeat that: Compressing your upload file more WILL NOT make your small rendered files smaller. So there.
Now we tackle the options. Remember that most of the time, we simply err on the side of better quality and don’t worry about it.
You can choose to make your file a progressive JPEG. Progressive JPEGs render in passes in the browser, first as low-res, and then better and better as the page loads. IF your upload file will be served AND IF your CMS is set to make progressives, you will want to tick this box. Making your upload file a progressive will not make the renditions made on your server be progressives. So, we probably don’t tick this box.
“Optimize Huffman table” Tick it. This will make your file significantly smaller with no loss of quality. Back in the day, some programs couldn’t decode Huffman optimized JPEGs. It’s 2018. Fugetaboutit.
“DCT method” Choose “Float (best but slowest)”. With modern computers, we don’t care if it takes some tiny fraction of a second longer to save our file. This option only affects saving the file, not serving it on the web.
Settings and more settings
“Smoothing factor” This is one for JPEG obsessives to experiment with. Personally, I leave it at “0”.
“Subsampling factor” Also known as chroma subsampling. This option can make a difference in both file size and quality. Basically, less of it means higher quality and bigger file sizes.
Chroma subsampling is very subject matter-dependant. Many images are very tolerant of chroma subsampling. For those images, we could use higher subsampling settings and achieve a smaller file size. We could even trade off higher chroma subsampling settings against higher overall JPEG quality settings and see how that might affect file size vs quality.
But images that aren’t tolerant of chroma subsampling (often images with small detail in bright colors, like yellow type on a red background) will fall apart big time if too much is applied.
If your uploaded files will be served to your visitors, (meaning that you want to keep their filesize down) you may want to experiment with “Subsampling factor”. Mine are rarely served, so I choose the “Best quality” option.
“Rebuild embedded EXIF thumbnail” Heavens no. We certainly don’t want that!
“Use estimated quality” Don’t tick it. we’ll set our own quality levels, thanks.
And finally, we want to “Keep” all four metadata options. Earlier in the workflow, we put considerable effort into deciding what metadata we want to keep and what to get rid of. We don’t want our choices evaporated here.

There. Done with that
If you need to make new batch actions with different file saving options, you’ll only be changing one or two options. So, once you’re done with this the first time, it will never again be an intimidating bother.
Now use the buttons at the bottom left of the Batch Actions dialog to save your batch action.
If you deal often with logos or images that require transparency, you’ll probably also want to make some batch actions that save PNG files. But at the time of this writing, most of the time, like 99% of the time, JPEGs will be the choice for web images.
You’ll probably want to make different batch actions to deal with varying metadata situations. In which case, you’ll want to turn on the metadata action(s) in your batch action. You may need to deal with preserving or not preserving GPS data, or Exif thumbnails, or the whole Exif data block. You may want to make an action that adds a generic copyright statement to photos that don’t have their own metadata.
Note that the metadata action skips over empty fields. Fields we leave empty in the action won’t affect any values that might already be in those fields. That’s different from most metadata editors, which will erase a field that’s left empty.
Now we return to our workflow, already in progress
When you’ve identified which image(s) can be processed with a batch action and which ones need extra attention or a kick back to the client, you just choose “Batch convert…”, choose the correct batch action script, and click convert.
Once you have made your upload files, it’s a good idea to take a look at them, particularly if you are compressing fairly aggressively. Just double-click a thumbnail, then click and hold to see the image at 100%. You should be able to see pretty quickly if the quality is good or if something is off.
Now you can simply drag the thumbnails of your finished images from XnView to the upload page of the backend of your website. There. All done.
What if?
What if your website doesn’t make its own down-sized renditions for responsive compatibility? In that case, you’ll need to make batch actions to make each needed size and run them one after another.
In such a case, you’ll probably also need to add pixel dimensions to your filenames in an exact format to meet your site’s requirements. Take care when you build that part of your batch action.
When you run a batch action in XnView, the RESULTING images will be selected in the browser if you are saving your processed images in the source image folder.
If you just run the next batch action on the selected images, you will be making the next size from files that have just been resized and re-compressed. Quality will drop off sharply. So, remember to select the original photo(s) before running each batch.
The way around this bother is to set the batch action to save the output files in a different folder. If you do that, the originals will still be selected in the browser and you can run the sequence of batches in rapid fire – bang-bang-bang. Done in a jiffy. Having all your upload files in their own folder can be handy in your upload process, too.
Remember to carefully check your output files for quality
It would be nice if XnView could run batches in sequence like this on its own. This feature has been requested for future development. Sadly, I don’t know of any application that will do this. Photoshop’s export feature can almost do it. But it destroys metadata, so we would have to paste the metadata back on the saved files. That’s no good. You could do it in a Photoshop action, but then the output filenames would be wonky and we’d have to fix them in an XnView batch, so there’s no fun to be had there. Best to just go ahead and press the button a few times in XnView.
With a little workflow discipline and a good tool, we now have a process for handling pictures for a website that’s probably quicker than what we did before. We have the control and visibility that we want to keep quality up and page load times and the possibility of a terrible copyright event down.
Reading this long post and setting up XnView took a while. But in the future, the payback will be that we can breeze through the chore of getting pictures ready for the web and get better results in the bargain.
Do you know a better way? Share your web workflow and XnView secrets in the comments. Want to do this in Photo Mechanic? Stay tuned for a Photo Mechanic version of this post. Dealing with photos that have no metadata? Watch for a post on fixing that, too.