Photo Mechanic calls their hierarchical keywording function “Structured Keywording”; It rocks
This post is Part 2 of our HOW-TO for keywording in Photo Mechanic. (See Part 1 here.) In this installment, we explore hierarchical keywording, or “Structured Keywording” as Photo Mechanic calls it. Hierarchical keywording allows us to add all the keywords along a hierarchical path by double-clicking on a single keyword, which we will find in a, yes, hierarchical organization.
Not only does hierarchical/Structured keywording allow us to quickly apply keywords, it also allows those of us who need giant keyword vocabularies to manage big keyword lists without any major loss of sanity.
Let’s take this thing for a test drive
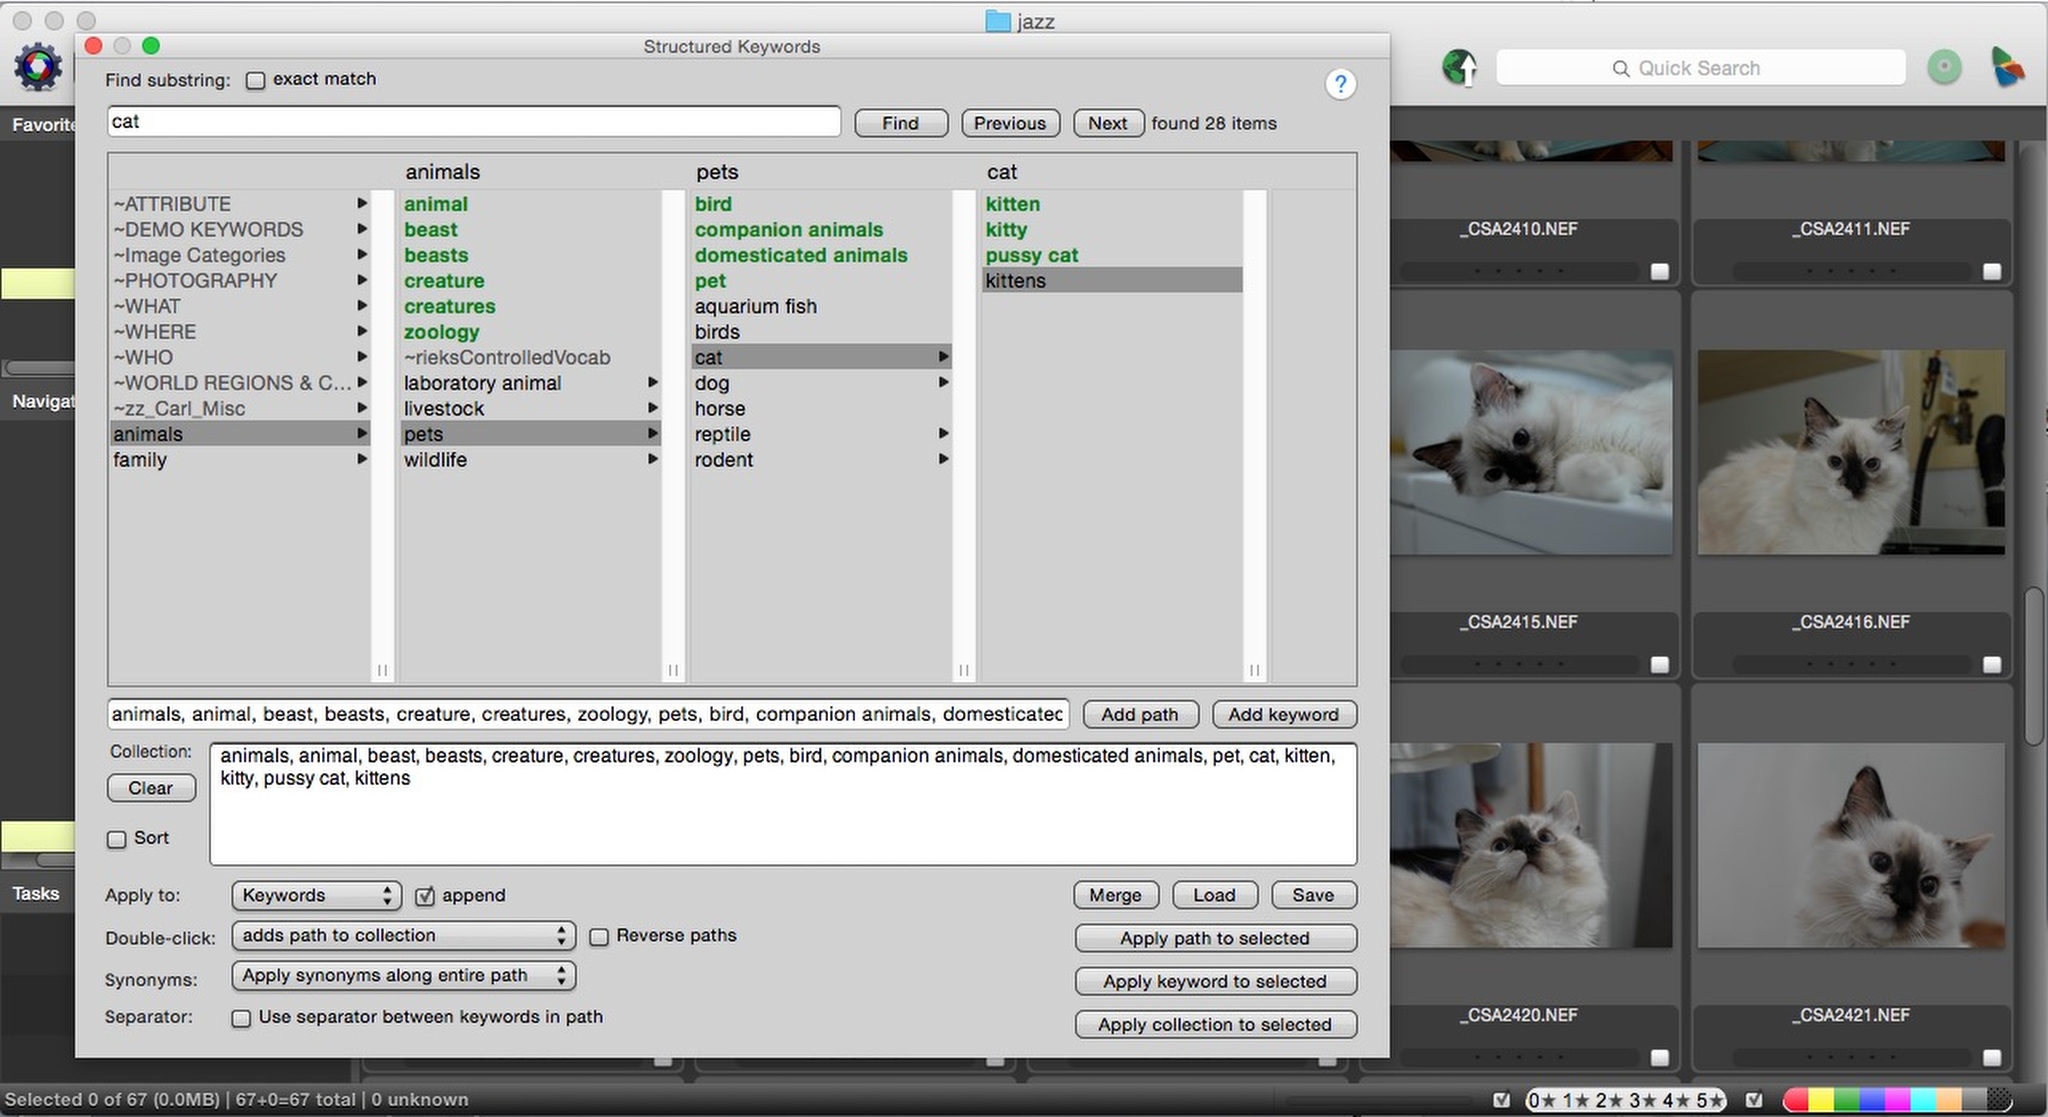
In Photo Mechanic, go to the Image pulldown in the main menu and choose “Structured Keywords Panel…”, or press CMD/CTL+Option/ALT+K on the keyboard. This will open the Structured Keywords dialog.
At the top of the dialog, make sure that “Exact Match” is unchecked and enter “tort” in the search bar. Press enter or click on the ‘Find’ button.
Watch the video version of this post
Photo Mechanic 5 ships with a controlled vocabulary of animal keywords from ControlledVocabulary.com. “Tort” should return a pop-up dialog offering several choices of tortoises. I chose the “texas tortoise” for the illustration, but one turtle is about as good as the next for our purposes here.

The Structured Keywords dialog will now display a bunch of keywords in a hierarchy much like the way a file manager would display folders and files. Just now as I write this, it occurs to me how much the dialog looks like the multi-column view of Finder, the Macintosh OS’s file manager.
One (double) click
If we click on our “texas tortoise” keyword and apply it, we’ll get a lengthy path of keywords, starting with “animal”, on down through to the turtle in question. The keywords in green in the hierarchical display are synonyms. If we so choose in our settings, we get those, too.
If we wanted, we could click on another keyword, like “Texas” in this case and add another path full of keywords, like “North America”, “United States”, and “Texas”, if we had a controlled vocabulary of places installed. (That’s just an example. Refer back to my post on keywording considerations for more on putting location information into the keywords field instead of /in addition to putting that information where it really belongs.)
So that’s what we’re after. We can find a keyword in an awkwardly large keyword vocabulary, apply it to a batch of photos with a whole slew of taxonomical antecedents, with an extra helping of synonyms thrown in for good measure, and do all this in a matter of a few seconds. I keyword rather sparingly, but I’ve got to admit. This is pretty impressive.
Let’s look closer at working in this dialog
At the top, we have the Find function. We’ve already seen that we can search for a partial string instead of a complete keyword. Or, if we get unwanted behavior, we can require complete words with the “Exact Match” tickbox.
We can navigate around in the multi-column view of the keyword vocabulary, just like we can in a file manager or in Photo Mechanic’s Navigator pane.
Keywords in green are synonyms. Greyed out keywords are Categories, or labels. These help with organization in the vocabulary, but are not applied to our metadata.
Below the multi-column keyword management pane is a bar-like field where the chosen path appears.
Collect some keywords
Below that is a field called the ‘Collection’. In this field, we amass the, well, collection of keywords that we will apply to our pictures. Above the Collection field, to the right of the path field, we find two buttons. One adds the selected keyword and everything to its left (above in it the hierarchical path) to the collection. The other adds only the selected keyword.
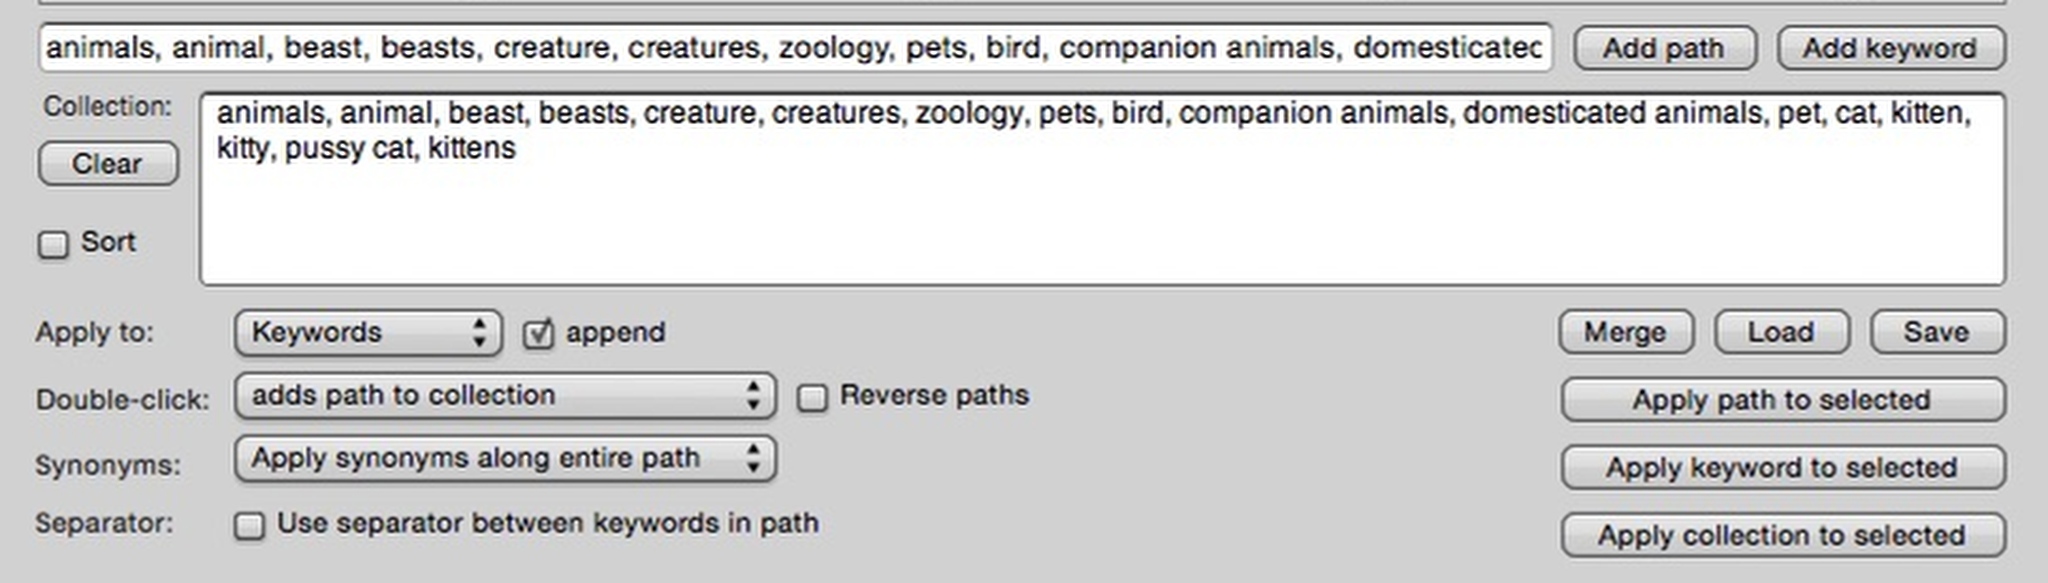
You can type in both the path field of the Collection field. But you know how I feel about that: We should choose keywords, rather than type them, if at all possible.
To the left of the Collection field is a ‘Clear’ button. I sometimes find myself forgetting to clear the Collection and I end up applying the keywords and I want, as well as the collection from the last batch of pictures. Be forewarned. The ‘Clear’ button is your friend.
If you add two paths of keywords that contain duplicate keywords to the Collection, Photo Mechanic has got you covered: It will zap the dupes, so you’ll have a tidy little flock of keywords. If tidy is a really big thing for you, the ‘Sort’ tickbox does just that. It sorts. Alphabetically.
Setting up
At the bottom of the dialog on the left are some settings.
‘Apply to:’ has a pulldown that allows you to apply your keywords to either the Keywords field or the Caption. This is a real thing. There are workflows where you want to append keywords to the Caption field. I know this because I worked in a situation where that was often the case.
Next to the ‘Keywords – Caption’ pulldown is the ‘Append’ tickbox. Most of the time, you will indeed want to append your keywords to whatever may already be in the Keywords field (or Caption) Sometimes, you want to overwrite. The important thing is to be aware of whether or hot Append is set. Glance at this tickbox often.
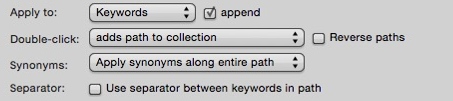
The ‘Double-click:’ pulldown allows you to choose what a double-click on a keyword will accomplish. I like it to add the whole path to the Collection, but it’s a matter of taste.
The next pulldown chooses how synonyms will behave. Generally “Apply synonyms along entire path” will be your default, but here you can control which synonyms will be applied, or turn them off altogether.
The ‘Separator’ tickbox is a little confusing. It does not mean commas. You’ll get your commas between keywords with it turned off. It is about pipes. You may specify pipes between your hierarchical keywords. For the life of me, I can’t imagine why you would want that. But it must be important to somebody or else it wouldn’t be here.
Apply yourself
The lower right corner of the dialog is taken up by a set of buttons that will apply the selected keyword, the current path, or the accumulated keywords in the Collection, to however many pictures you have selected in your Photo Mechanic contact sheet. Click. Done. Very cool.
Just above the ‘Apply’ buttons we find buttons that Merge, Load and Save keywords lists. ‘Save’ exports your structured keywords as a formatted text file. ‘Load’ removes the currently loaded list and replaces it with a new one. (You are going to put some considerable work in your controlled vocabulary. Save out backups often and keep them in a safe place.)

The ‘Merge’ function allows you to add new keywords to the currently loaded list. This is a great thing. If you update your list outside of Photo Mechanic, or you download an updated controlled vocabulary from the interwebs, you can merge it into your existing list. More on using ‘Merge’ in a minute.
Controlling your controlled vocabulary
How do you edit, manage and update your keyword vocabulary?
You can edit your keywords inside the graphical interface of the Structured Keywords dialog, or outside of Photo Mechanic by editing a text file. Real-world, you’ll probably do both, depending on the circumstances.
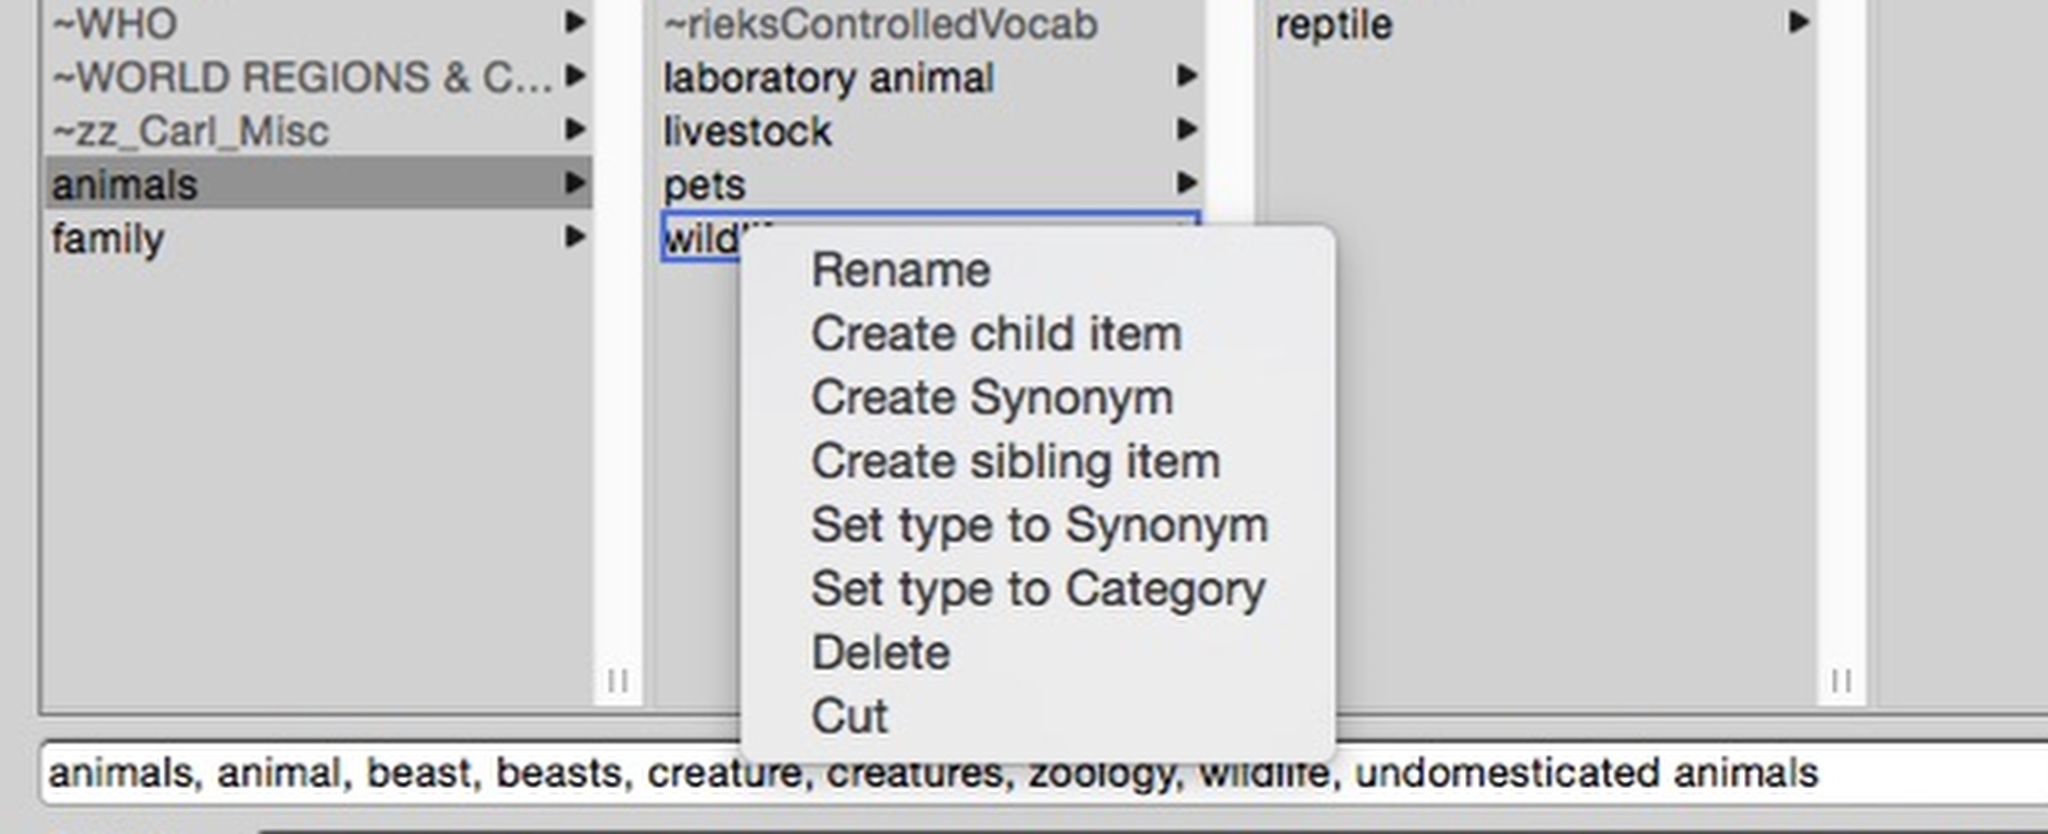
In the Structured Keywords dialog, if you right-click on a keyword, you’ll see a flyout menu that allows you to create a sibling item (a keyword on the same hierarchical level as the selected one) or a child item (A keyword one level down from the selected one). You can also change the selected keyword into a synonym or a category (label), as well as delete it. (Note that synonyms appear one level down from their parents.)
You can also click in an empty space in a column to add a keyword, and customize it from there.
If you need to make piecemeal edits or add one or two keywords, editing in the Structured Keywords dialog is the convenient way to go. You can easily see what you are doing, and you’re probably already there in the dialog.
File that
On the other hand, you can edit a text file and load or merge it into your keyword vocabulary.
The Photo Mechanic format for structured keywords is a simple list of keywords, one to a line, in a text file. Keywords to appear in the left hand, topmost level are at the beginning of a line. Keywords to appear on the next level down are tabbed in one tab. A keyword that appears one level down from that one will be preceded by two tabs. And so forth.
Synonyms are one level down (the next line and one tab to the right) of their parents and are enclosed in curly brackets.
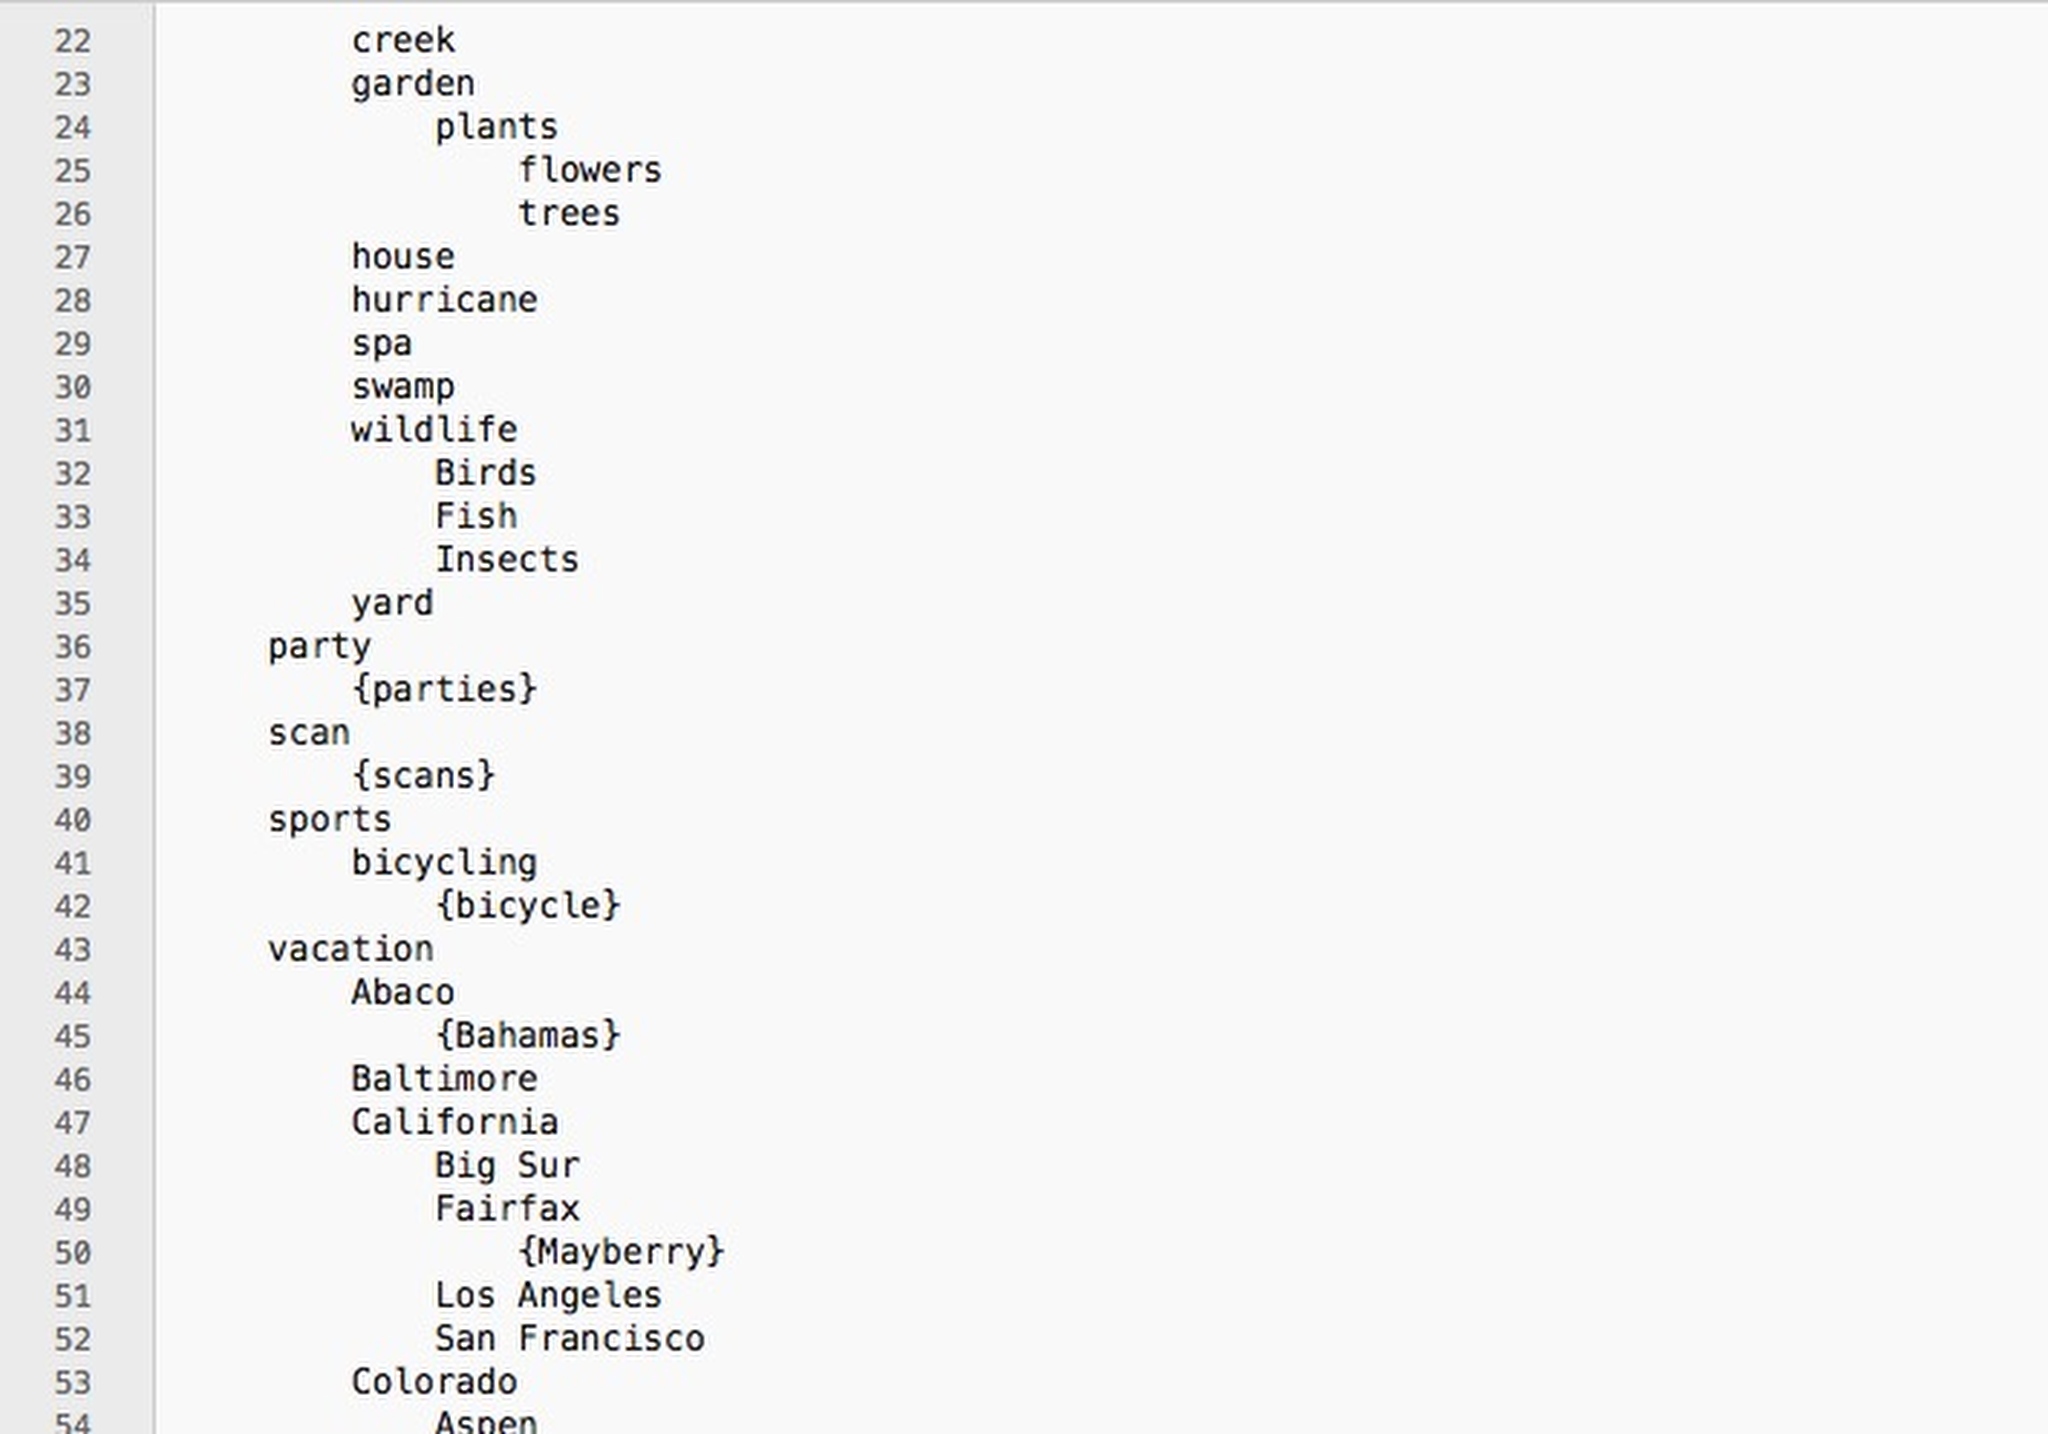
Categories (labels) are enclosed in regular straight brackets. I like to add a tilde to labels so it’s more obvious in the dialog that they are indeed labels. But the tildes you see in my illustrations don’t do anything. They just “label the labels”.
If you’ve started building your controlled vocabulary as a flat text file, it’s a pretty simple matter to make a copy of it and go through it arranging keywords into levels with tabs and adding synonyms or changing keywords into synonyms. Add labels as needed and you’re done.
Always backup first
Then make a backup copy of your existing keywords with the ‘Save’ button. Load your keywords list and see how you did. If something’s not as you intended, just go back and have another go. It is seriously not brain surgery. (Remember too, that your keyword list, especially at first, shouldn’t be more than a couple hundred keywords long. (Or maybe much shorter.) So this isn’t going to take hours.
In the video version of this post, I take a flat keyword list from the Edit Keywords dialog and merge it into the hierarchy of my structured keywords. The only tricky part was making sure that the items above where I wanted the new bit to go in the hierarchy were keystroke-for-keystroke identical with what was already there. Otherwise, Photo Mechanic wouldn’t have known where to put the new hierarchy. It’s easier to see than to read. Check out the video.
Most professional librarians will say that you shouldn’t go more than three, or maybe four, levels deep with your hierarchy. (Real levels. Labels don’t count.) There are specific cases where taxonomies need to go deeper than that. But, in general, we should follow good advice when it’s given.
In the stationery pad!
You can call a different version of the Structured Keywords panel from the IPTC editor, on either a picture in a contact sheet or on the Stationery Pad. This version is the same as the bigger one we’ve been talking about, except that it doesn’t have the ‘Apply to selected’ buttons, just an ‘Apply’ button. That makes sense, as in those places, you can only act on one object at a time.
But the big news here is that you can apply structured keywords to the Stationery Pad and from there do anything you can do with the Stationery Pad, or even add structured keywords to templates.
In the video version of this post, I talk about using the Stationery Pad and the Find and Replace dialog to fix keywording mistakes – in the event that you one day make some.
A Lightroom glitch
Many people are using Photo Mechanic ahead of Adobe Lightroom in their workflow. Presumably, keywording would be done in Photo Mechanic. But if your workflow should happen to include any Photo Mechanic – Lightroom – Photo Mechanic round trips and you apply hierarchical keywords in Lightroom, there is a quirk you should know about.
Lightroom has a feature whereby hierarchical keywords remain hierarchical even after they’ve been committed to images. Why this might be desirable is open to debate.

Adobe implemented this by creating a proprietary field in the XMP data block that holds each hierarchical node as a separate keyword in that field. So animal > cat > tabby looks like: “animal, animal | cat, animal | cat | tabby”. Lightroom also saves “animal”, “cat”, and “tabby” as normal keywords in the regular keyword field. Any keyword that is applied as a hierarchical keyword in Lightroom gets this treatment. Flat keywords from Lightroom are written as normal, flat keywords.
(The keywords field is saved in duplicate in your file, once in the IIM data block and once in the XMP data block. I won’t belabor this, because it doesn’t mean anything in the context of this post, but I mention it because having it in mind make this Adobe craziness a little easier to grasp.)
UPDATE: Correspondence with a reader – thank you Jed! – has reminded me that if you export images that have Lightroom hierarchical keywords from Lightroom, you can choose in the Export dialog to not export the special Lightroom hierarchical keywords field, thus leaving the exported file with only flat, industry-standard keywords. So, if you go that way, this can be a non-issue for exported images.
Photo Mechanic’s dilemma
Photo Mechanic’s developers had to then figure out how they would deal the extra field full of information. While it’s probably just redundant, there might be something precious there. So, Photo Mechanic reads the content of the proprietary Adobe field and displays it in the keyword field in Photo Mechanic’s interface.
If you commit an edit to the metadata of such a picture in Photo Mechanic (any field, not necessarily Keywords), Photo Mechanic will then write all the untidy verbosity to the keywords field. Our cat example would look like: “animal, cat, tabby, animal | cat, animal | cat | tabby”. That’s ugly, but the main thing is that – as far as I know anyway – it’s harmless. Keywords are just helper search terms that return a picture to a search that doesn’t hit in the caption. It doesn’t matter that “animal” appears three times.

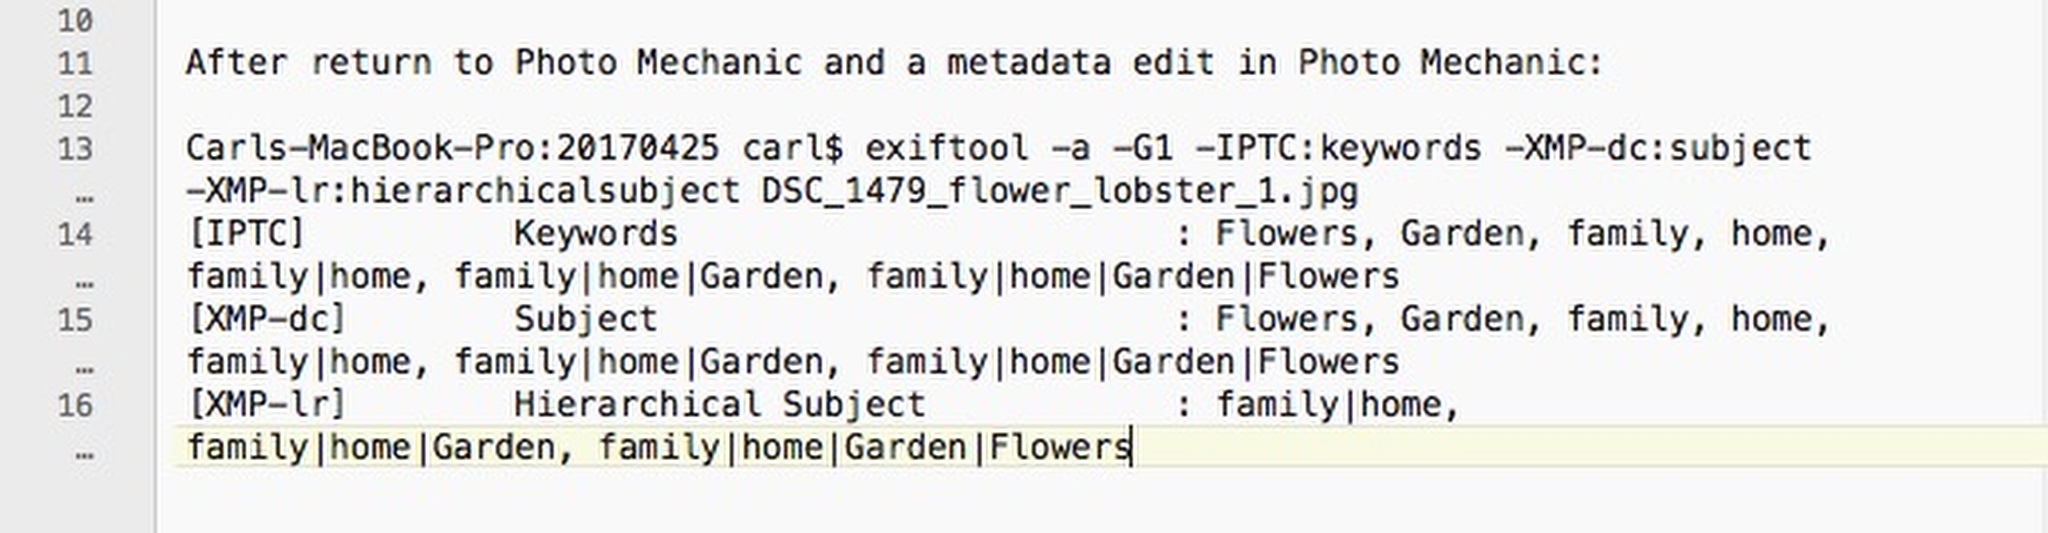
Photo Mechanic filters out duplicate keywords, so if a photo that has hierarchical keywords from Lightroom goes back to Lightroom and then around through Photo Mechanic again, it won’t gain additional copies of the Lightroom-ish keywords. Photo Mechanic’s anti-duplicate functionality will step in. So again, ugly, but harmless.
There you have it. The trilogy is complete. For Photo Mechanic users anyhow. We’ve considered how to plan an effective keywording strategy and we’ve learned how to use Photo Mechanic’s powerful keywording features to actually get keywording done.
A few posts down the road, I’ll come back with a HOW-TO for keywording in Lightroom.
How are you doing with keywording? Have these posts helped? Do you have tips or insights to share? Let us know in the comments.
Hi Carl,
I am really enjoying all of your information for using Photo Mechanic. I’ve started by using PM 6 on my new machine this year.
I am keyboarding a LOT of photos. I have structured keywords for family members. Is there a way to keep the structured keyword dialog box open? At present after I hit apple (or command A), the box disappears. I would love for it to remain open so I can use it for the next photo.
Thanks for doing all of your hard work. Your information is my “go to”!
Maripat
Hi, This has come up a couple of times and it always leaves me in a quandary. On my copy on PM6+, the dialog stays open until I close it. When I read your comment, I thought “Ah, maybe entering the contents of the collection with the keystroke instead of the mouse like I do is the issue.” But no, I just tried it that way and it still works fine. So, maybe you should make sure your copy of Photo Mechanic is at the latest version, close it and restart, maybe even restart your machine, and after all that see if the problem persists. If it does, pop over to the Camera Bits forums and post. Camera Bits’ forums are terrific. The actual developers are there and more often than not the person who responds is lead developer Kirk Baker himself. Please let me know when you get this figured out!
On a side note, the keystroke [keystroke] opens (and closes) the structured keywords dialog. I realize that’s not responsive to your issue, but it is still good to know.
I suspect that Maripat is using the version of Structured Keywords panel that is called from the Metadata Info panel applicable to a single image. This is dismissed on pressing enter because it only affects the single selected image. Calling it from the main menu bar or pressing [keystroke] produces the main Structured Keywords panel which should be persistent, the contents being separately applied to the selected images using one of the three alternative Apply to…. buttons at the bottom right of the panel. The version called from the Metada Info panel dropdown button does not have these Apply to… buttons because the contents are automatically applied when Enter is pressed. You can see which version you are using from the nature of the buttons at the bottom right of the panel.
Hope that helps.
Graham
BINGO! Give that man a cigar! That’s it! – Maripat and others who land here from Google, Graham has the answer. The one-at-a-time version of the Structured Keywords panel only affects a single image. Thus, it closes when you apply, just like the Metadata Editor panel. Using the “main” version of the panel solves the problem.
Graham – I’m waiting a moment to post your Lightroom keywords cleaning tip until I’ve tested it. It looks exactly on-target to me. I’ll have to build some test samples in Lightroom and go from there. It’ll take a couple of days. (I have gotten away from Lightroom’s catalog – by using ON1 🙂 So. I’m not in Lightroom much anymore.) When I approve the comment, I’ll put an update in the blog post itself, pointing to the comment.
A tip for tidying up the keywords duplicated by Lightroom. You need to get rid of the duplicates, which Photo Mechanic does for you if you replace the spacer bar in Lightroom’s output with a comma (or semi-colon if this is your keyword separator). You can easily do this with Find and Replace using Grep.
I have all my non-exporting Lightroom categories enclosed in square brackets.
If you use Find and Replace, with “Grep” and “Treat repeating fields as a single string” both checked, you can tidy up the keywords immediately. The Find box string is ([\|]{1})|(\[(.*?)\]) The Replace box should contain a single comma. Make sure that only Keywords are selected in the list of metadata to be affected.
Running Find and Replace, which can be on as many images as you care to select at once, with differing keywords if you wish, will delete all text within square brackets (including the brackets themselves) and replace all separators with commas. The result is that the keywords are duplicated, but Photo Mechanic automatically deletes the duplicates, leaving you with a single complete set of keywords for each image, comma separated, without the additional messy hierarchical strings introduced by Lightroom.
Note that this means you now have a single set of flat keywords, but Photo Mechanic does not not add these back into its Structured Keywords panel. Your structured keywords in Photo Mechanic are therefore untainted by the output from Lightroom. If you later update the metadata for the image(s) in Lightroom, the keywords will show up in Lightroom’s catalogue as additional flat keywords. This kind of forces you to commit to one or the other for maintaining your DAM, as it now gets messy in Lightroom, but PM seems to me to be better for keywords. You unfortunately cannot get away from Lightroom’s catalogue for retaining Lightroom’s edits, but you do not have to use it for keywords.
Graham
I have made a sidebar to this post, just about dealing with Lightroom-induced keyword weirdness. You can read it here: https://www.carlseibert.com/clean-up-lightroom-keywords-in-photo-mechanic/
I tried to add an update to this post with a link to the new sidebar. But sadly, I’m experiencing some instability on my site, particularly on this post. Basically, if I try to edit this particular post, I crash my site. I’m limited to what I can say in this comment.
You can also check out Graham’s comments here. I tested his methods and they work. Do be sure to have backups in hand, though, as always! If you haven’t used the non-exporting-keywords-as-category-labels hack in Lightroom, Graham’s basic plan can be executed in an even simpler way. If all you need to do is unpack those ugly pipe-separated Lightroom node strings, it’s likely that you can just do a simple Find and Replace without even having to use Grep. Find “space-pipe”, replace with a comma. Or, simpler yet, just leave them. They’re ugly, but not harmful!
On the other hand, if you are afflicted with non-exporting keywords giving you unexpected search results, well then, the method in Graham’s two comments will fix your situation right up.
I’m not able at the moment to predict whether Graham’s comments will appear above or below this one. Please accept my apologies and scroll until you find him.
Thanks Graham!
Thanks for the response – sadly, I don’t smoke! 🙂
The keywords cleaning up tip should work. My grep string relies on there being an opening and closing square bracket for non-exporting categories inherited from Lightroom that I want to strip out. I see from the examples given in your article that your categories commence with a tilde, but have no standard terminating character.
The revised grep string ([\|]{1})|(~(.*?)\,) works for your system, so far as I can see from a few test keywords I have created in your format. This looks for a string commencing with a tilde (~) and ending with a comma. The only caveat is that if (somehow) you had a category as a final keyword, PM would strip out the final comma and Find and Replace using this grep string would not remove that final category. This should be entirely theoretical, however, since Lightroom should not be including a top level keyword with no child keyword, meaning that in real life the string commencing with a tilde would always terminate with a comma.
There are other ways of achieving the same thing. If you use Find and Replace in PM, you have then to open the image after applying Find and Replace to see the effect, and whether you like it or not, the changes have been saved. An alternative is to use a clipboard manager to achieve the same thing, while working with the metadata itself (per image) in the Metadata (IPTC) Info panel. I use the excellent ClipboardFusion from Binary Fortress (free, or very reasonable licence fee).
I have created for ClipboardFusion both a trigger (which can run on selected text copied to the clipboard) and a macro, either of which will apply the grep string to the selected keywords and copy the result to the clipboard. Select the keywords, copy to clipboard, run the trigger or macro and paste the result back into the keywords field in the Metadata (IPTC) Info panel. You will then see exactly how the grep command has affected your keywords (which will be duplicated) with the Metadata (IPTC) Info panel still open, so that you can accept and save if you are happy with the result, or reject the changes if you are not. Once the changes have been saved, PM will automatically delete the duplicates and any surplus commas and spaces. This is quite a good way of testing the concept on individual files to build up confidence that it always works, before using the grep command via PM’s built-in Find and Replace on a large selection of images for which there is no immediate Undo available. Triggers for ClipboardFusion can operate as simple text replacement (with the grep string as the “Match” string, a comma as the “replace” string, and set to “Regular Expression” mode). If anyone would like my very simple ClipboardFusion macro which does the same thing, I can happily supply this.
Hi Carl,
thanks for the great & helpful article on keywording with Photo Mechanic. I’ve got a question: When I update my structured keyword list with synonyms (for example translations in different languages) is there an easy opportunity to update the existing keyword collection of an image with all the new synonyms in one or two clicks? Or do I have to update the pathes to the new synonyms individually?
Thanks a lot, Kilian
One approach I can think of would be to re-keyword the image with the Structured Keywords tool. If your hierarchical string was something like “ships > sailing > corvette”, and now you have synonyms that are the Spanish and Ukrainian translations of those keywords, double-clicking on “corvette” should fill the keyword collection field with those three keywords and six more translated synonyms. Make sure that the “Append” tickbox is selected to protect any keywords you added to the image manually, and apply. When Photo Mechanic applies the new keywords, you’ll have three duplicates. But Photo Mechanic automatically skips duplicate keywords, so your keywords will be nice and tidy. Actually, duplicate keywords don’t do any harm at all. But since PM does tidy them up, that’s a good thing.
So, how many clicks is that? One double-click once you have found the deepest keyword, which seems like a bit of work.
A way to do it in batches would be to use Find and Replace. In the corvette example, you could gather up your corvette pictures by whatever means you have available (In Photo Mechnic Plus, if the images are already cataloged, you could just search. On a Mac, you could use the Spotlight feature in Photo Mechanic, or if the corvette pictures were in a certain folder, you could just let Find and Replace find them.) Then, specifying the keywords field, replace the string “ships, sailing, corvette” with something like “ships, sailng, corvette, buques, navegar, corbeta, корвет, плавання, кораблі” and you can update a bunch of images in one go. It’s a little trickier to do in real life, so be sure to make a backup and practice on a few sacrificial copies to make sure you have all the syntax right.
Yet another way would be to use the Template Editor to append the new keywords into selected images. (Be careful to use the “Append” tickmark, lest you accidentally delete your existing keywords!)
I hope that helps.
-Carl