Solutions for content marketers and PR practitioners
Author: Carl Seibert
The principal of Carl Seibert Solutions and the owner of this site, Carl Seibert has become a metadata crusader. From clients who need to bring order to their assets collections, to website owners, to Creative Commons activists, the digital world needs to take advantage of better metadata. Carl has made it a mission to spread the [meta]word.
WordPress uses an imaging library to make variously-sized versions of a photo to accommodate different view port sizes. But which imaging library is used determines whether metadata is preserved or destroyed.
Enable ImageMagick on your server and your WordPress site will be metadata-friendly
The good news: WordPress, by far the most popular content management system on the web, supports embedded metadata. The bad news: Well, not always. But we can fix that.
ImageMagick is, well, powerful. Illustration courtesy ImageMagick Studio LLC
If you import a photo into WordPress that has a caption, WordPress, by default, will read that caption from the photo and place it in the picture’s caption field in the Media Library. From there, when the photo is placed on a page or in a post, voila! the caption appears under the picture, formatted by your theme and ready to go. After a little touch-up editing, perhaps, but ready-to-go and I-didn’t-have-to-type-it have got to be pretty great. ¹
But what about the photo itself? Will it be served with its embedded metadata intact, or will be it be doomed to wandering the internet without its copyright information or caption? That’s where things get a little tricky.
ImageMagick
WordPress, by default, prefers an image-processing library called ImageMagick. If ImageMagick
Is available to WordPress, everything is awesome, and your picture will go forth into the world in possession of all the vital information it needs to be relevant for (hopefully) decades to come. Well, all the vital information that was in the metadata when you uploaded it, anyway.
(Also, by many accounts, ImageMagick produces better visual quality at smaller file sizes than its competitor.)
There are two sticking points.
ImageMagick, which has been an industry standard for many years and is the image processor for many, many, server-based systems, is either on your web host’s server, or it’s not. There’s no requirement that
Enable ImageMagick and your WordPress site is good to go. Karma will be on your side and you won’t have to worry about being sued for removing Copyright Management Information from images.
hosts provide it. Many –or even most – do. But some don’t.
And, if ImageMagick is available on your server, you will generally need to enable it in order for WordPress to be able to use it.
If ImageMagick isn’t available on your server, WordPress falls back to an imaging library called GD. GD is bundled with PHP, upon which WordPress depends in order to function at all. So GD is a sure thing. It’s guaranteed to be there.
Making resized images
When you upload an image to WordPress’s Media Library, it makes copies of your image in various sizes, from Baby Bear little to Poppa Bear big. Four new files are created by default, plus the original, yielding five size choices to fit browser windows on devices ranging from itty bitty phones to great big desktop monitors. There may be more sizes created. You might add more sizes, or plugin software might require more sizes.
The biggest instance of your picture is the original file you uploaded. It’s untouched. If it’s the file that is served, say to a visitor with a really big monitor, you’ll serve exactly the same file that you uploaded. So, if you uploaded a file that has proper metadata, that’s what goes out on the internet. If you set clicking on your photos to open the media file (so that a large view of the photo is shown to the visitor – that’s usually expected behavior) then such a click will cause the original file to be served. If someone is, ahem, obtaining your picture, it’s likely that they will grab the largest version, and they’ll get a file with caption and copyright information. So that’s good-ish.
Here’s the rub
If ImageMagick made the smaller-sized versions of your picture, great. They’ll all have their metadata, too. That’s great.
But GD doesn’t do metadata. (It can, a little, but doesn’t by default) If your WordPress installation is relying on GD, you’ll strip metadata from all your images except the biggest, full-sized versions. Naked. Bereft. Raw statistical probability says that at least four out of five times you’ll serve a stripped image. That’s not good.
So, by now, the picture is clear. (sorry about the pun) ImageMagick = good. You want it. Now what?
Available? Make sure your host provides ImageMagick. If you’re shopping for a hosting provider, you may have to ask. Sometimes if you Google “your-would-be-host ImageMagick” you’ll get an answer in the form of
some sort of knowledge base article. Hosts rarely mention ImageMagick on their benefits page. (Are you listening out there, hosting providers?)
Obviously, if you are shopping for a new provider, you want your ImageMagick. If you’re staying with your current host, ask and cross your fingers.
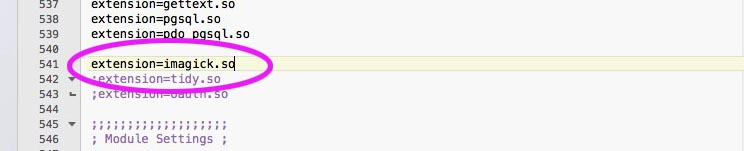
And enabled. Once you have confirmed that ImageMagick is available, enable it so WordPress to access it. Enabling ImageMagick usually involves un-commenting a line in a PHP configuration file (doing so enables a PHP extension, either IMagick or MagickWand, that talks to ImageMagick, ) and perhaps adding a path statement somewhere.
Enabling the IMagick extension in php.ini
Check with your host’s customer service department. The whole process only takes a minute or two. If your provider has good customer service, the rep will probably enable ImageMagick for you, while you’re still on the phone or chat. Or maybe they’ll provide you with instructions, or have documentation on their support site. Remember to backup any configuration files before you change them!
You don’t have to do anything on the WordPress side. WordPress will, all by itself, use ImageMagick henceforth.
I checked some hosting companies
I called some hosting providers while preparing this post. ImageMagick support wasn’t exactly on the tip of most providers’ tongues, but I got the impression that most good providers do provide the service. You might have to be a little bit persistent, though.
Liquid Web
At Liquid Web, Imagine Magick is installed and already enabled by default. “We make sure that ImageMgaick is already there,” says Managed WordPress Product Manager AJ Morris, “On the WordPress side, we take care of all that for you.”
There is a catch, though. Liquid Web is developing an in-house image optimization tool. Morris says that tool will be metadata-friendly. But in the interim, they have temporarily provided their customers with an image optimization plugin. That plugin eats metadata. So, for the moment, Liquid Web customers who want to preserve their metadata will need to work around that issue. They can either disable the plugin, and just make sure they’ve prepared their images properly before upload, or they can keep the plugin active and use a workaround for a little while. Or even possibly substitute their own plugin. (I’ve tested some optimization plugins that are metadata-friendly if the underlying server is using ImageMagick. I’ll post some reviews soon.) But remember, it will only be a short while until the proprietary tool is up and running.
Flywheel
A Flywheel rep told me that ImageMagick was enabled by default on their servers.
Bluehost
At Bluehost, a rep told me, “Our servers do supply MagickWand [a PHP extension that enables ImageMagick] 100%, but that would be something the customers would have to do themselves.” My call was the first time anyone had asked that particular rep about ImageMagick. But their ImageMagick knowledge base page says it has been viewed 68,000 times.
SiteGround
At SiteGround, enabling ImageMagick on my test site only required adding a configuration file to my web root and adding a path statement in my .htaccess file. SiteGround’s spokesman said, “We fully support the ImageMagick extension – with all of our packages. It is not enabled by default. However, our support teams can enable for you in a matter of a few minutes only.” Which is exactly what happened when they did it for me. It wasn’t done quite while I was still on chat, but they came pretty close.
(The server that hosts this site won’t be so simple, by the way. But we’ll get there.)
If your host doesn’t provide ImageMagick
But what if ImageMagick just plain isn’t available on your server and, for whatever reason, you don’t want to change hosts? There is a workaround that works OK in many cases. It’s a bit of effort, but it’s not too bad. I’ll explain in next week’s post.
That’s it. Enable ImageMagick and your WordPress site is good to go. Karma will be on your side and you won’t have to worry about being sued for removing Copyright Management Information from images.
How was your experience when you asked your hosting provider about enabling ImageMagick? Post in the comments and I’ll include your input in an upcoming post that will feature a list of hosts who support ImageMagick.
Footnotes
¹ You’ll notice in Media Library that there’s a field called “Description” underneath the Caption and Alt text fields. That’s confusing because the IPTC “Caption” field is also called the “Description” field. So what’s WordPress’s “Description”?
Well, every media object in WordPress has it’s own “Attachment page”. The attachment page displays your image with your header and footer, a headline, caption and a text block. That text block is the “Description” field you see in Media Library.
In Media Library, you can see the attachment page by clicking on an image’s permalink. You can link from an image to its attachment page instead of the media file when you place an image into a post or page, if you so desire. It’s kind of cool, but frankly, I’ve yet to find a use for this feature. It might be a nice way to display an infographic, I guess.
You can’t edit the attachment page in the editor. The headline is mapped from the Title field in Media Library. The caption is mapped to Caption, and Description becomes the text block. The only way you can edit any of that on the attachment page is in Media Library, which means that edits to the Caption field will then show up when you place that image on a post or page. That’s kind of inconvenient.²
And the footnote has a footnote:
² Note that editing a caption in Media Library or on a page does not affect metadata in a photo’s file. WordPress does not write edits into a file’s metadata. This conforms to normal conventions. Best practice assumes that where ever it may go, an image is expected to have the original metadata it was published with. You can probably live your whole life without ever having to worry about this, but it’s always better to know how things work. If something is outrageously wrong on a photo’s caption, correct it before you upload the photo to WordPress.
It’s a quick task to set up your desktop WordPress server to run ImageMagick
Recent versions of the local desktop WordPress server MAMP come with ImageMagick already installed. If you want to check out ImageMagick on a locally-hosted test site, enabling ImageMagick on MAMP is a one-keystroke process. (Granted, you will make some clicks before and after the keystroke. Just go with me here, folks. How often can you do anything in one-ish keystroke? We’re on course to the quickest How-To ever.)
We’re going to enable the IMagick PHP extension that talks to ImageMagick, by uncommenting a line in PHP’s configuration file.
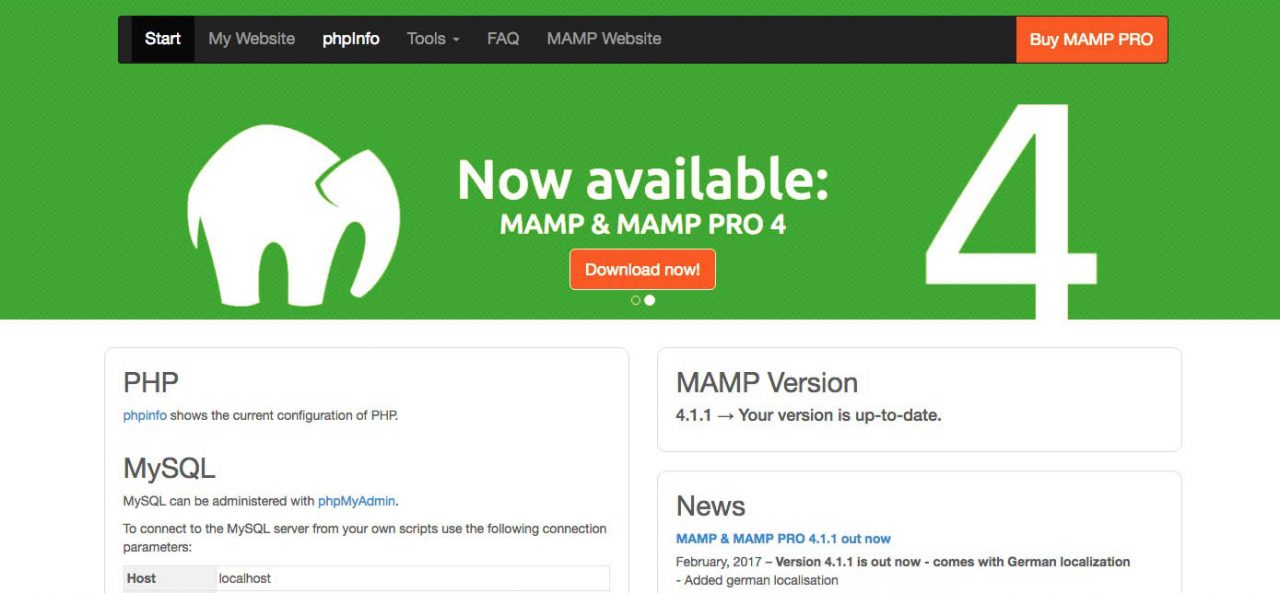
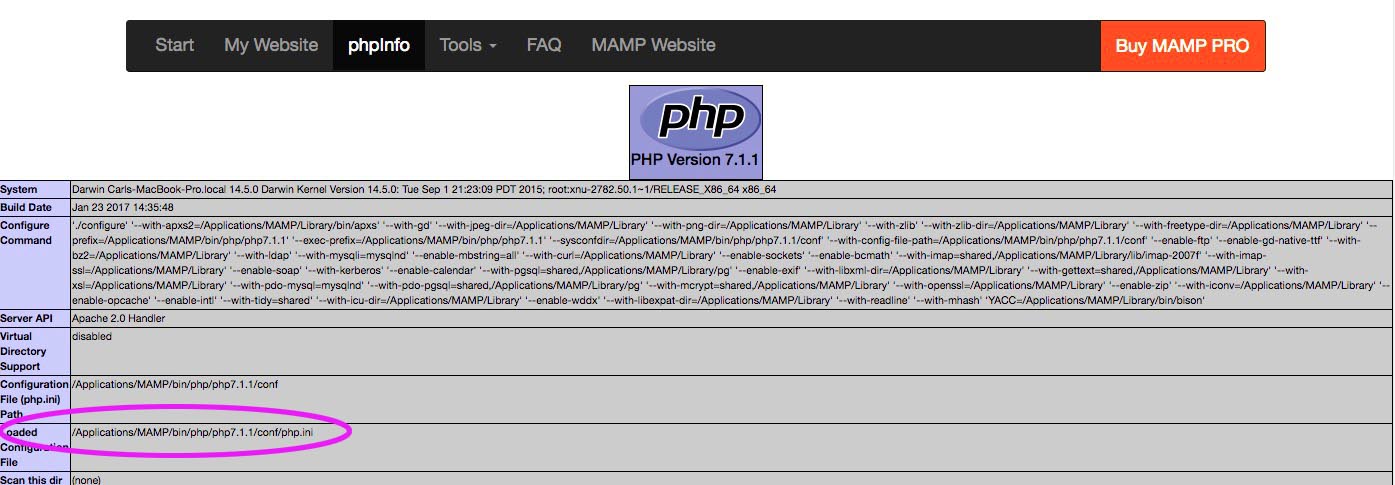
Go to the MAMP webstart page. (Usually http://localhost:8888/MAMP/ There’s a link in the MAMP interface.)
On the MAMP webstart page, click on “phpinfo” at the top of the page.
Click on “phpinfo” in the header of the webstart page.
On the phpinfo page, look at “Loaded Configuration file”. It’s about the seventh item down from the top. There, you see the path to the currently loaded instance of php.ini. For me, it’s “/Applications/MAMP/bin/php/php7.1.1/conf/php.ini”.
In php.ini, look for the loaded php.ini
In Finder, navigate to the folder shown. Find php.ini and open it in your favorite text editor (TextWrangler or Text Edit or whatever you like). Make sure you are in the correct folder, looking at the correct php.ini. There are multiple directories with php.ini’s in MAMP. (By my count, you should be at 11 clicks, no keystrokes, at this point)
Navigate to the correct php.ini file
In php.ini, scroll down to the line that says:
;extension=imagick.so
It’s about line 540 or so in my php.ini. You might think of just searching for “imagick”, but hold on there. Nobody authorized the expenditure of extra keystrokes!
Uncomment the line by deleting the semicolon (Plunk. There’s your keystroke!) The line will look like so:
extension=imagick.so
In php.ini, scroll to the IMagick extension line and uncomment it.
Save the file. (From the menu! No keystroke!)
Restart the MAMP servers and you’re done! (15 clicks, counting the one double-click as two. One keystroke.)
Now see if it works; metadata should be preserved
To check to see if it’s working, you can call phpinfo again and scroll down past the table part to the part of the page that’s divided into alphabetically-arranged sections. There should now be a section for IMagick. That tells you that the IMagick extension loaded.
The real, for sure, way to see that ImageMagick is working, is to find a test image that has metadata and upload it to your test site’s Media Library. Then place one of the resized versions of your test image in a post. Then, download the picture from a Preview. Now, look at the downloaded file it in an application that reads metadata. If your metadata is still there, then all is good and ImageMagick is working.
(Note: When you right-click and download your file, you should see dimensions in the filename, like “test_image-300×150.jpg”. The original image won’t have dimensions appended to its filename. The original image hasn’t been touched, so it will still have its metadata, ImageMagick or not.)
Another way to see that metadata is being preserved is to simply point your metadata-reading image browser (Photo Mechanic, Bridge, XnView, at al) at your uploads folder and look at the files. The path on my machine is /Applications/MAMP/htdocs/the_name_of_your_test_site/wp-content/uploads/some_year/some_month/
Not too different on a real server
The procedure to enable ImageMagick isn’t terribly different on a real ImageMagick/IMagick-equipped web server. Consult your hosting provider’s documentation.
Switch off and on
Once you have ImageMagick working, you can turn it off again by commenting that line in php.ini. Just put the semicolon back.
Experiment with image quality
With your on-and-off switchable ImageMagick installation working, you can experiment with how ImageMagick handles compression of your images, compared to GD. Every image responds somewhat differently to the JPEG process, so this is your-mileage-may-vary territory, but many people report both better image quality and smaller files with ImageMagick.
I’ll do a future post listing hosting providers that support ImageMagick. If you have a good or bad ImageMagick hosting experience, please let me know!
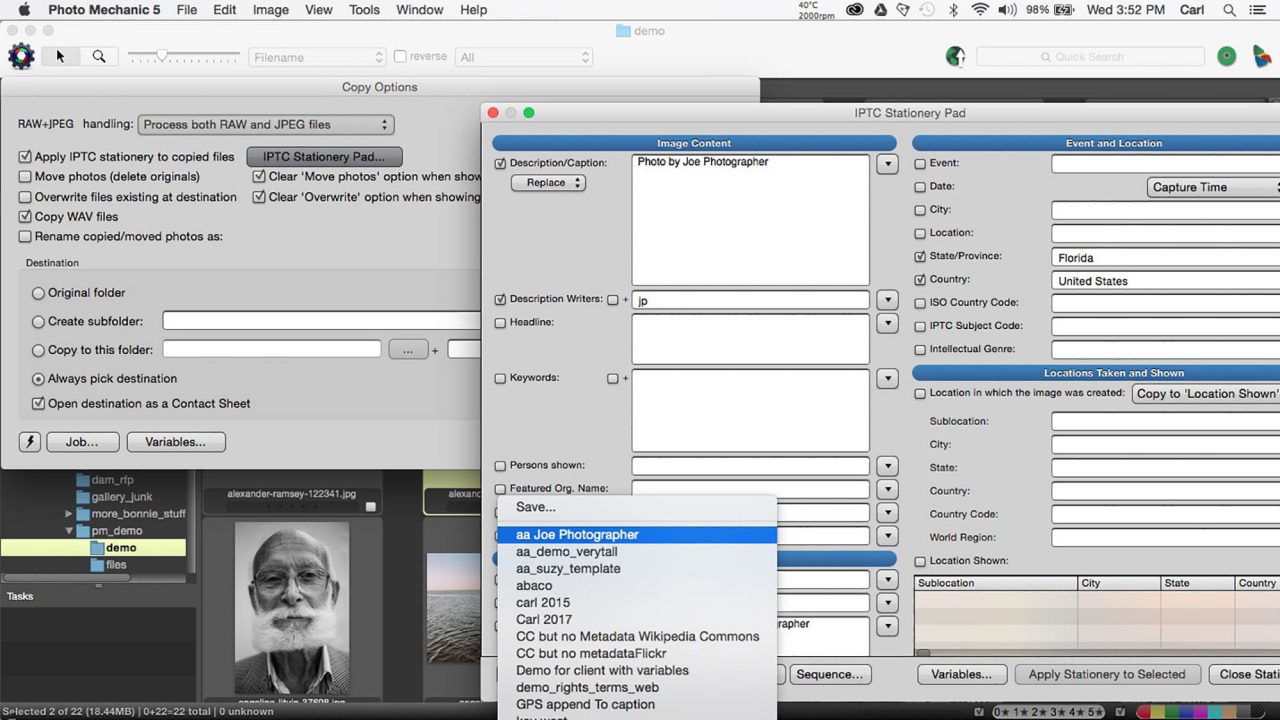
Photo Mechanic’s Copy Options dialog includes the option to add metadata as files are being copied.
Photo Mechanic is a powerful metadata editing tool
Photo Mechanic is the high-power tool of metadata editing and photo selection. If you’re a woodworker, it would be the Festool track saw. If you’re a photographer, the Nikon D5 or Canon EOS 1D would pop to mind. While it’s not expensive for what you get, it does cost some money. What you get for your money is a program that does what professionals need it to do, is stable, and gets its part of the job done with the minimum expenditure of sweat from your brow. This thing is the real deal.
Photo Mechanic makes quick work of dealing with metadata. It does a lot with metadata. And it does a whole lot of other stuff, too. I could write three-thousand-word posts every week for a month or two to cover everything this program can do.
In this post, we’ll look only at its metadata functionality and assume that you already know how to edit photos with the program. We’ll also leave customizing Photo Mechanic and using it for optimizing images for the web (and maybe more) for future posts.
We’re going to look at the basic metadata functions in Photo Mechanic first. Then we’ll use what we’ve learned to build an efficient workflow. Finally, we’ll tour some really advanced metadata functionality.
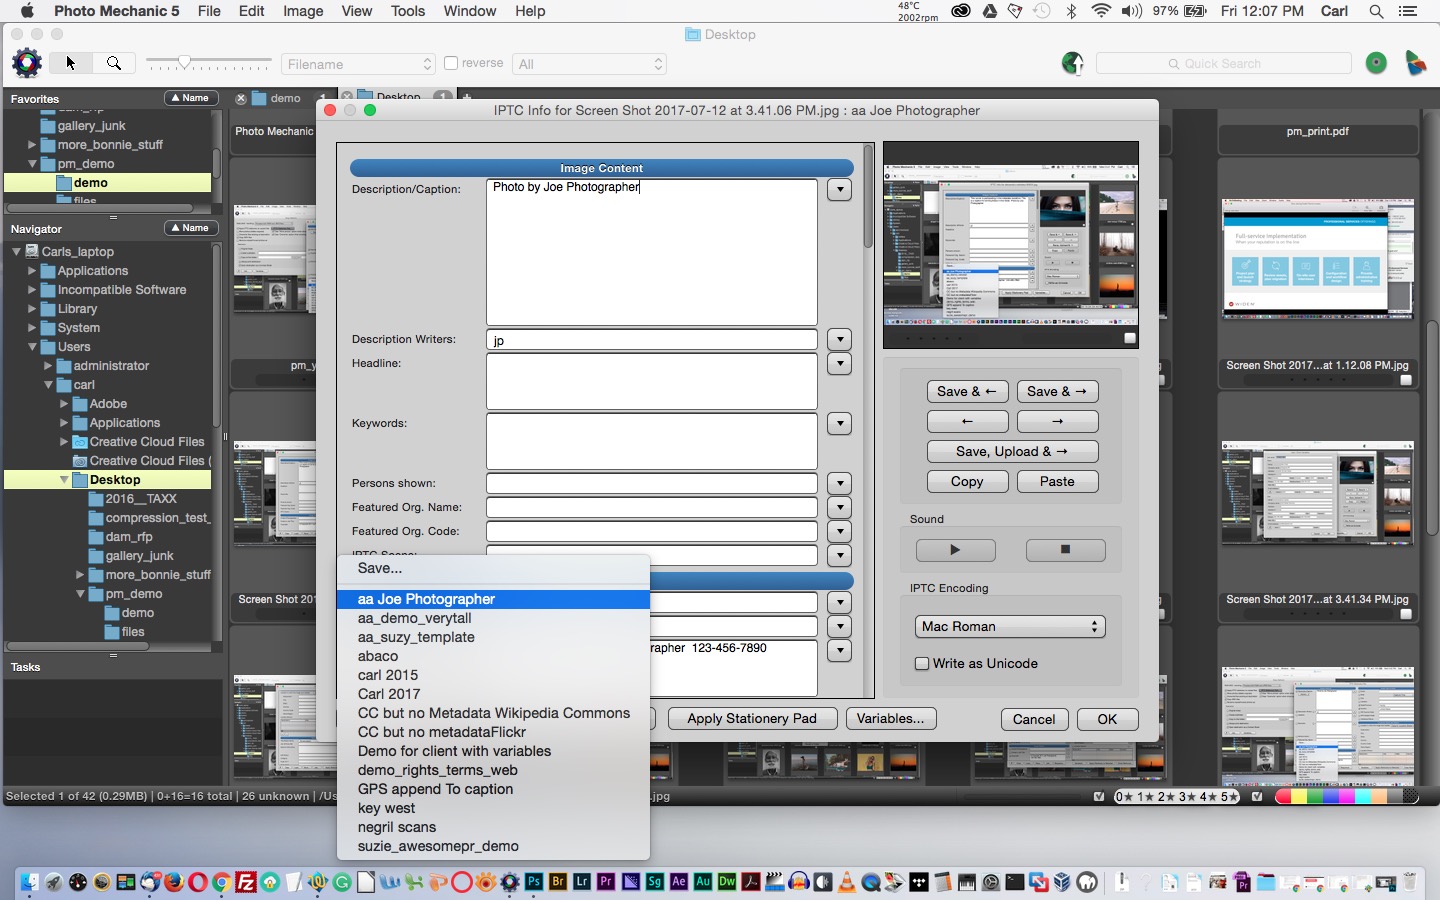
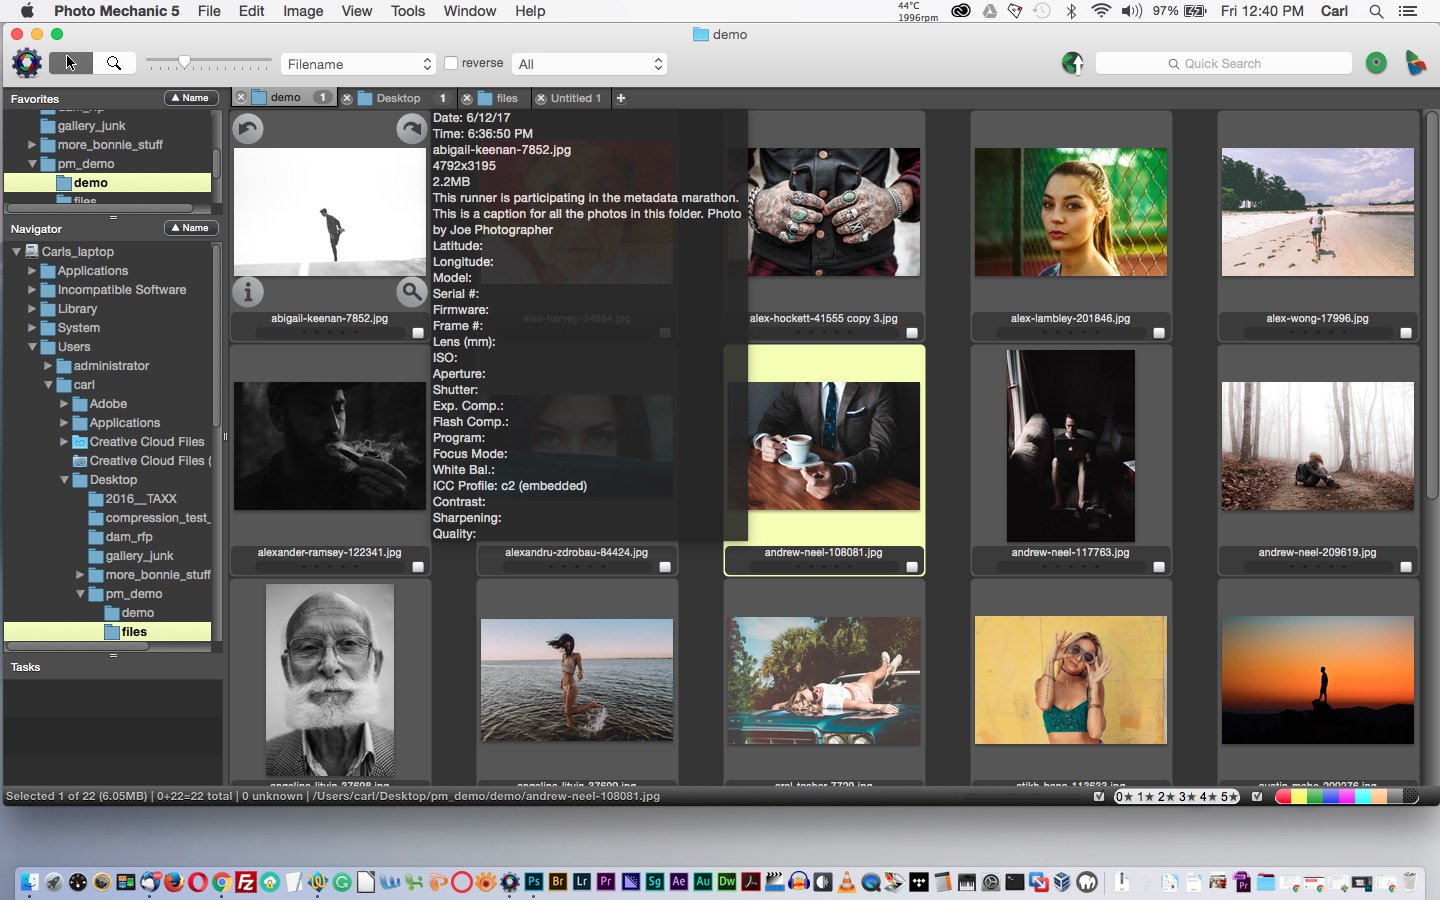
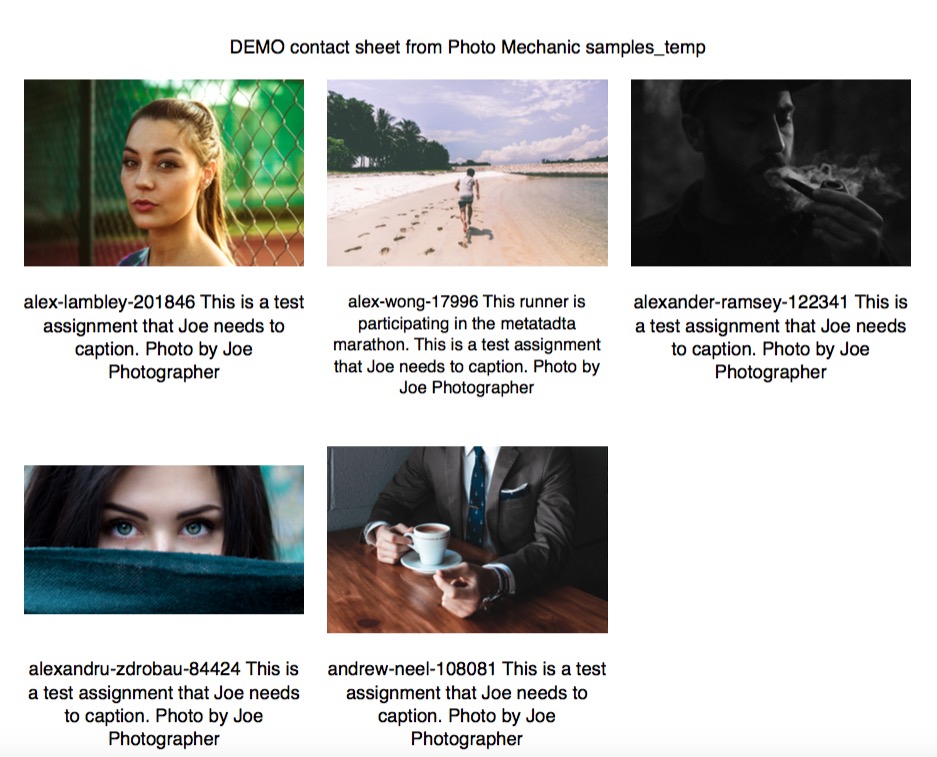
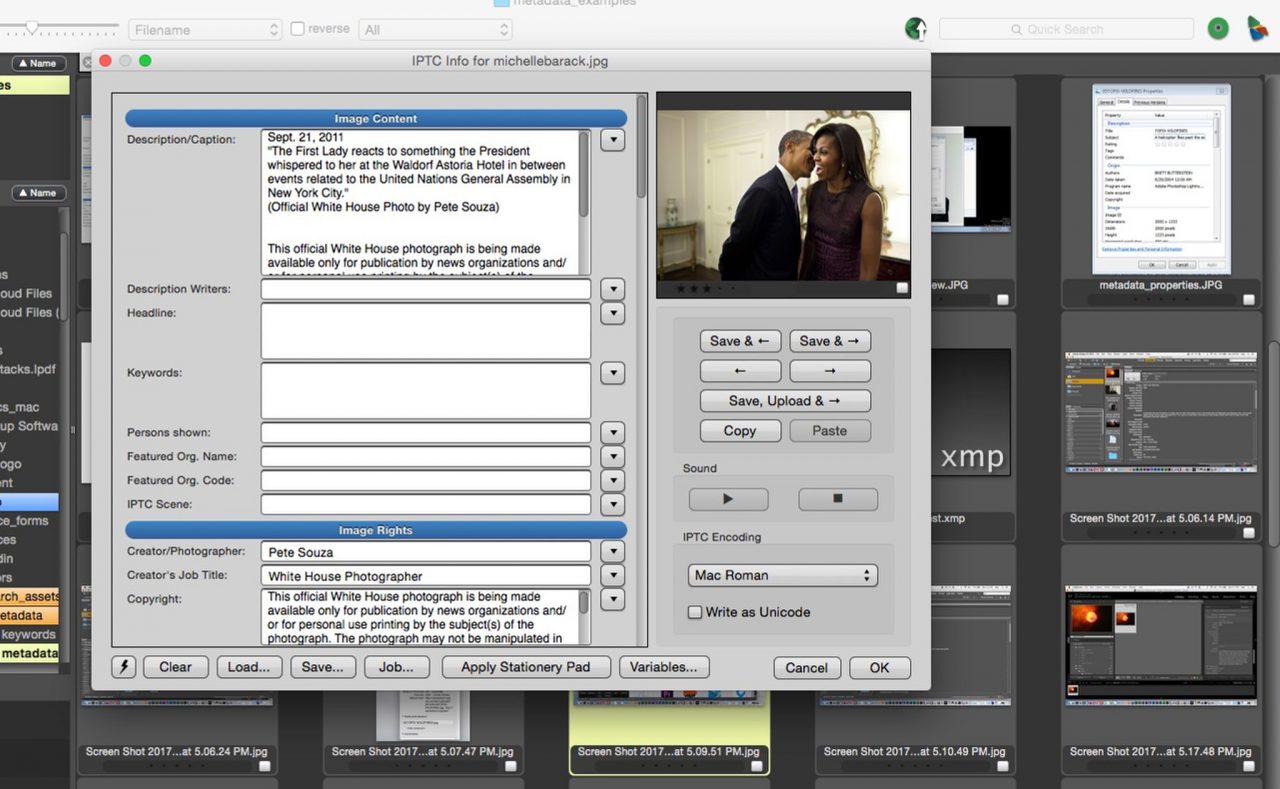
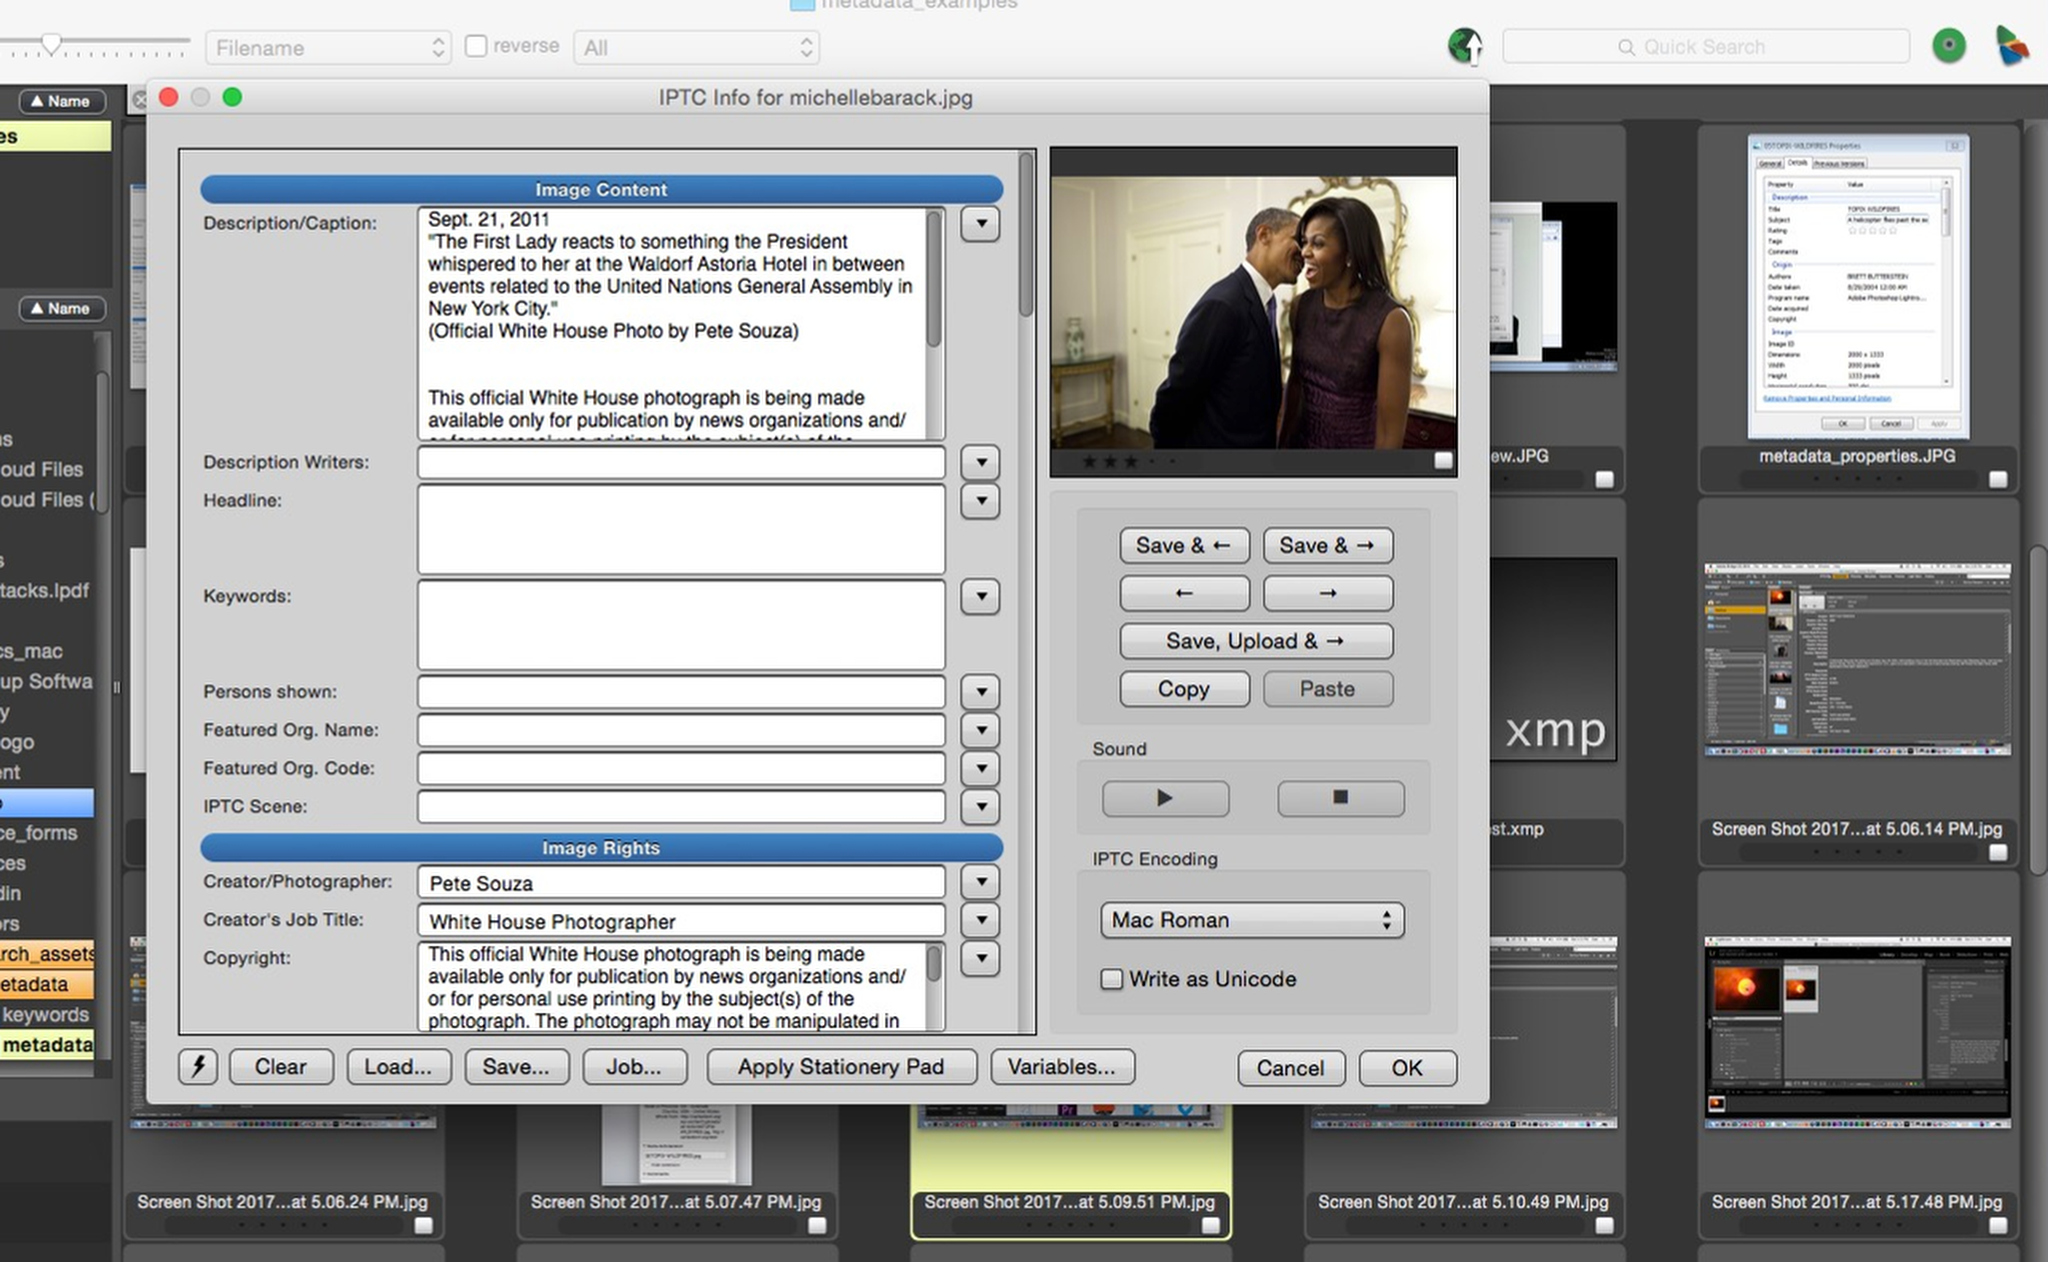
If you open a folder of photos in a “Contact Sheet”, which is Photo Mechanic-speak for a thumbnail browser, you’ll see an ‘i’ button at the lower left of each photo’s slide mount. Click it (or press the ‘I’ key) and the IPTC Info dialog opens. The IPTC Info dialog is Photo Mechanic’s one-at-a-time metadata editing tool. It’s what you would use to read metadata from a photo or add metadata to a single photo.
The IPTC Info dialog is Photo Mechanic’s one-at-a-time metadata editing interface.
At its most basic, this dialog has fields for metadata. You fill them in and click ‘OK’ to apply them to the selected photo. Metadata is applied losslessly. The image is not disturbed when metadata is edited.
But we don’t want to just fill out the fields by hand. Ever. We should always start with a template that contains all our standing information. We don’t want to type all that stuff in because, for one thing, we don’t want to type all that stuff in. The more important reason is that we need for standing metadata to be consistent across thousands or hundreds of thousands of files. If we type it by hand every time it won’t be. Trust me on this.
Working with templates
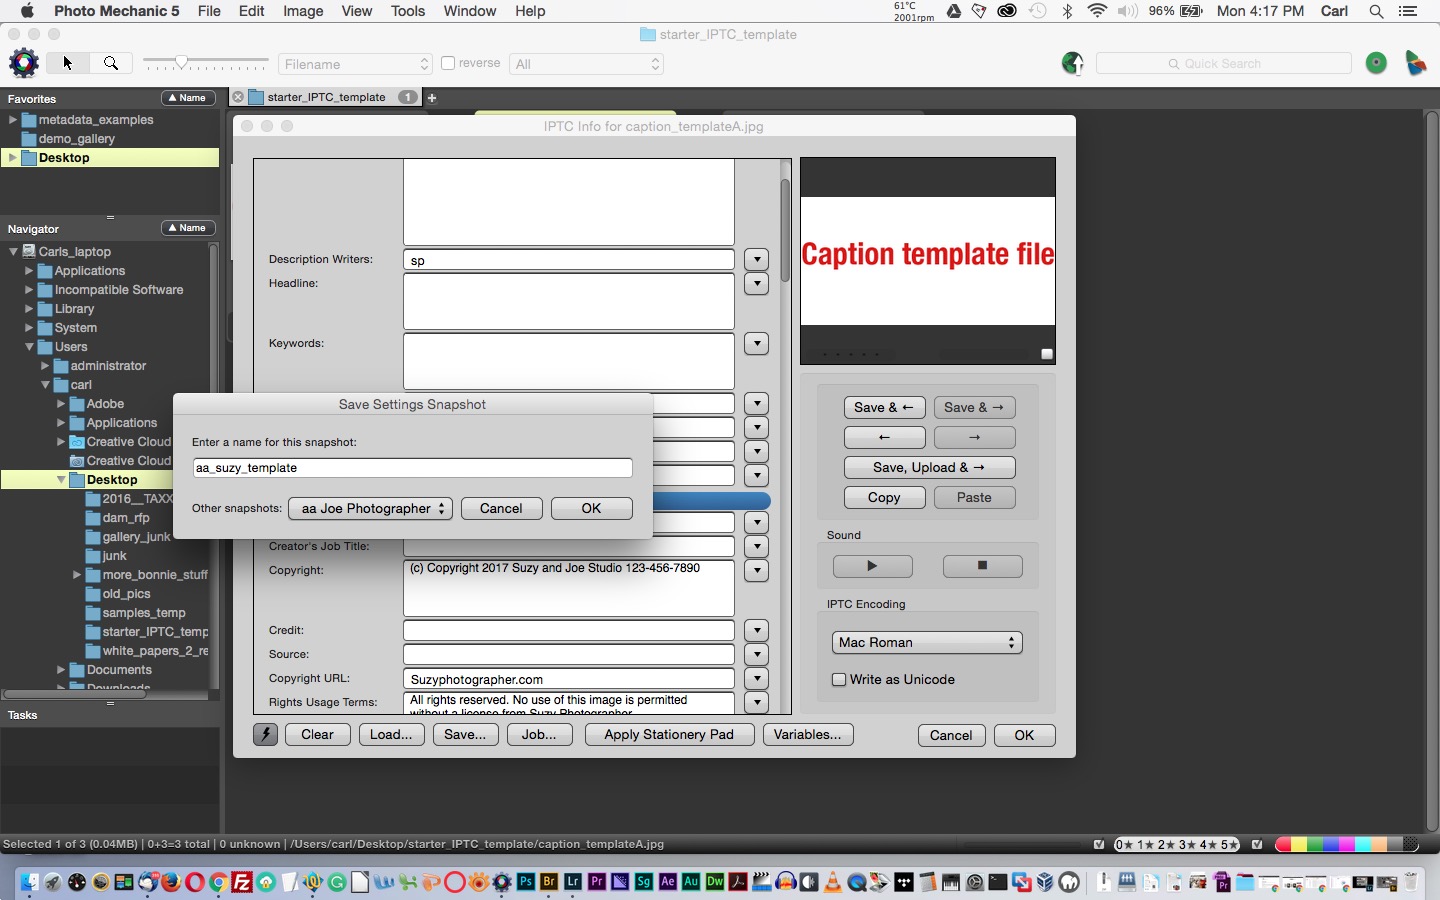
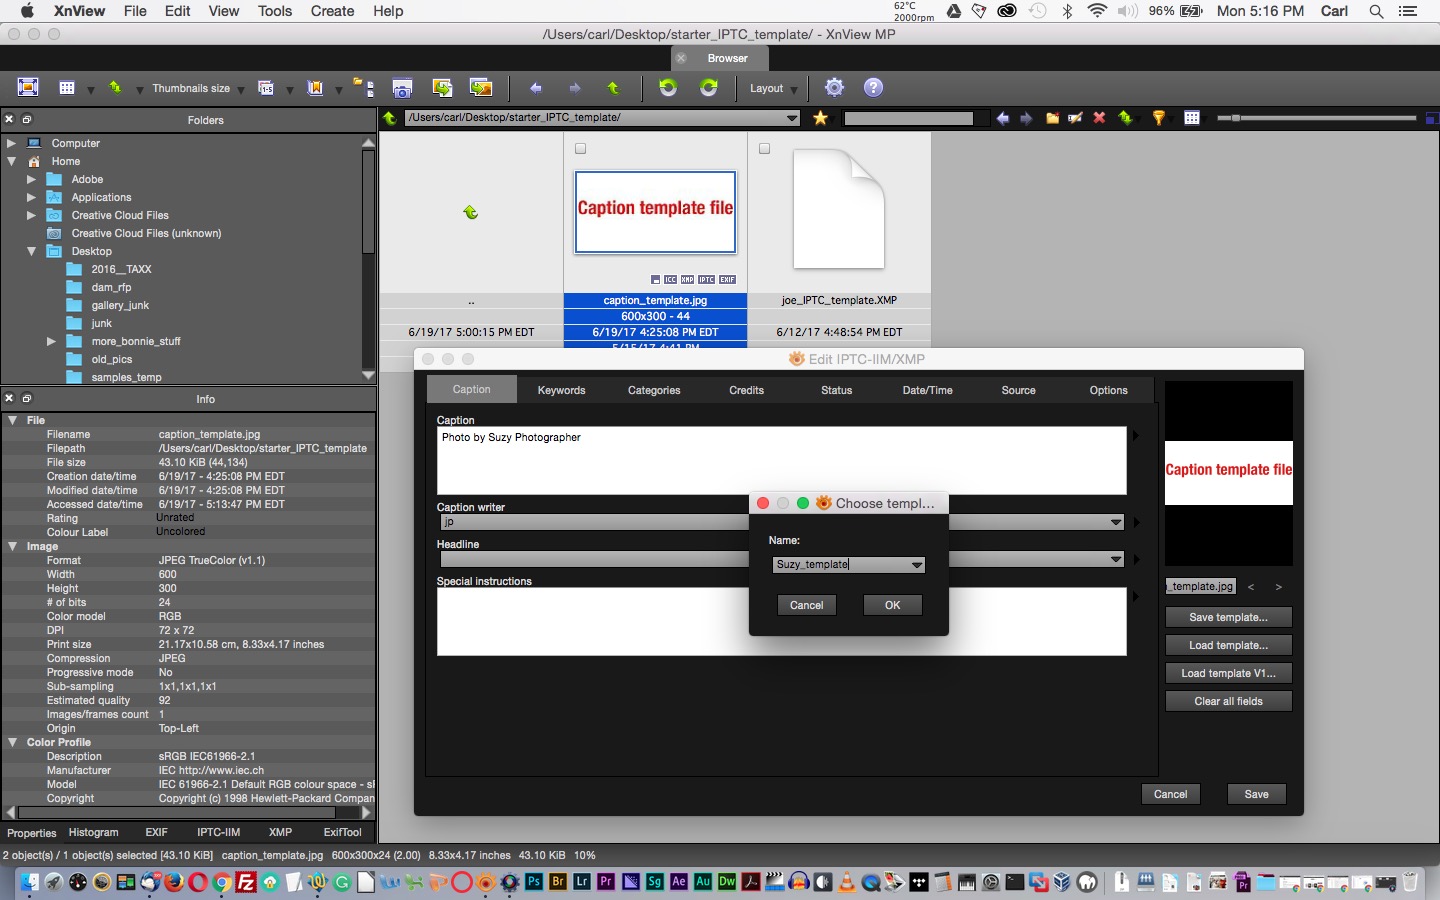
We need to use a template. To make a metadata template in Photo Mechanic, we can carefully fill in the relevant fields in the IPTC Info dialog and make what Photo Mechanic calls a Snapshot. There is a button with a lightning bolt icon at the lower left in most Photo Mechanic dialogs.
Use the Stationery Pad to apply baseline metadata to photos coming into our workflow. Then use the Stationery Pad again to apply information common to all photos in a batch. And finally, use the IPTC Info dialog to apply specific metadata to individual photos.
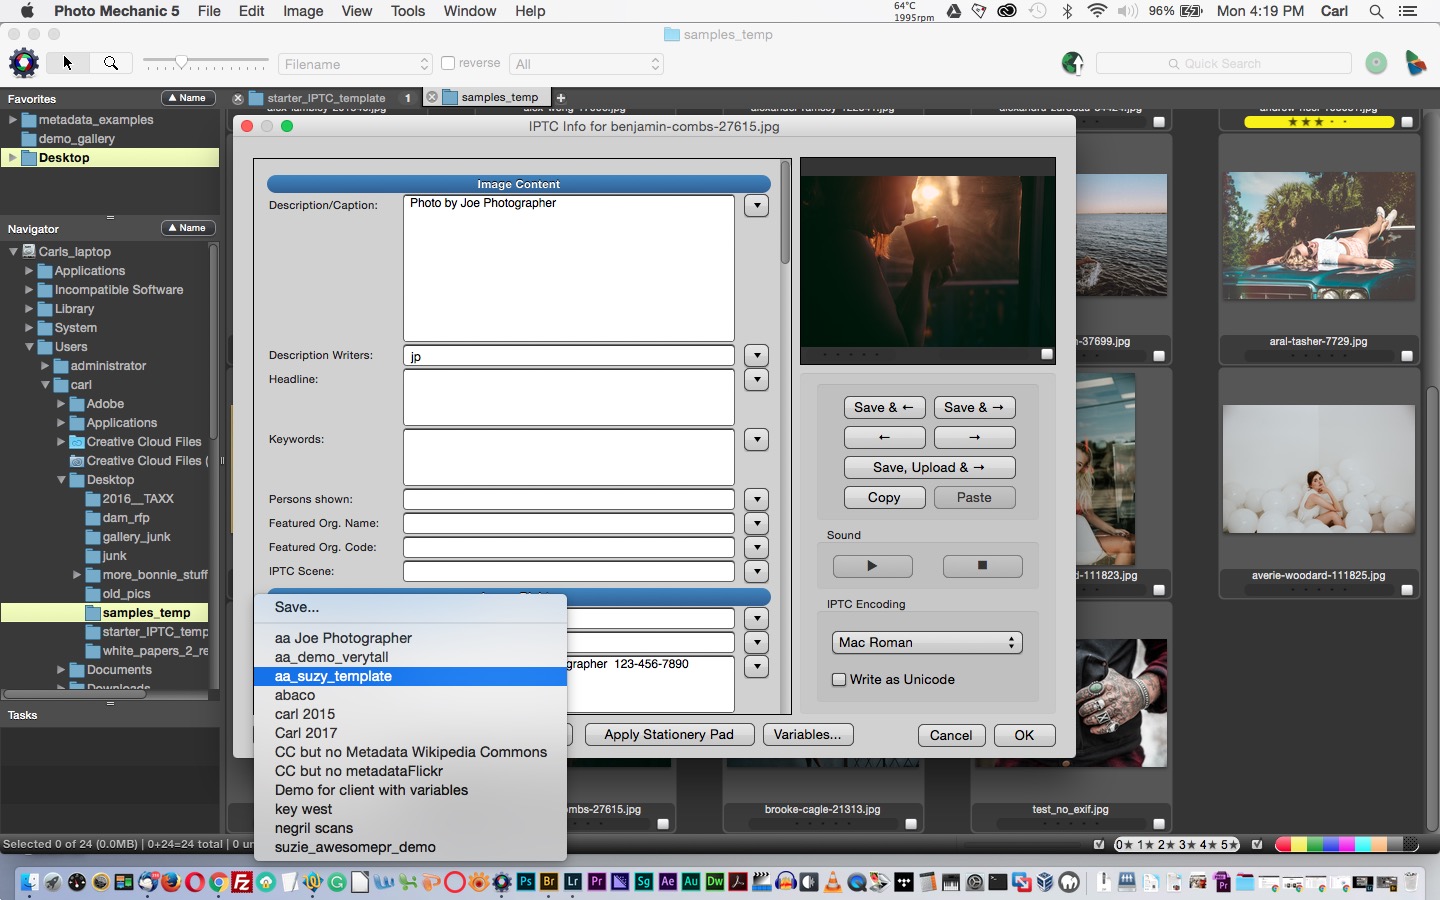
That’s the Snapshot button. Click it and a flyout appears. It lists available Snapshots (Templates, in this case). To save a new Snapshot, choose ‘Save’ and name your template. To call a template, choose one from the Snapshot flyout and the template loads into the dialog.
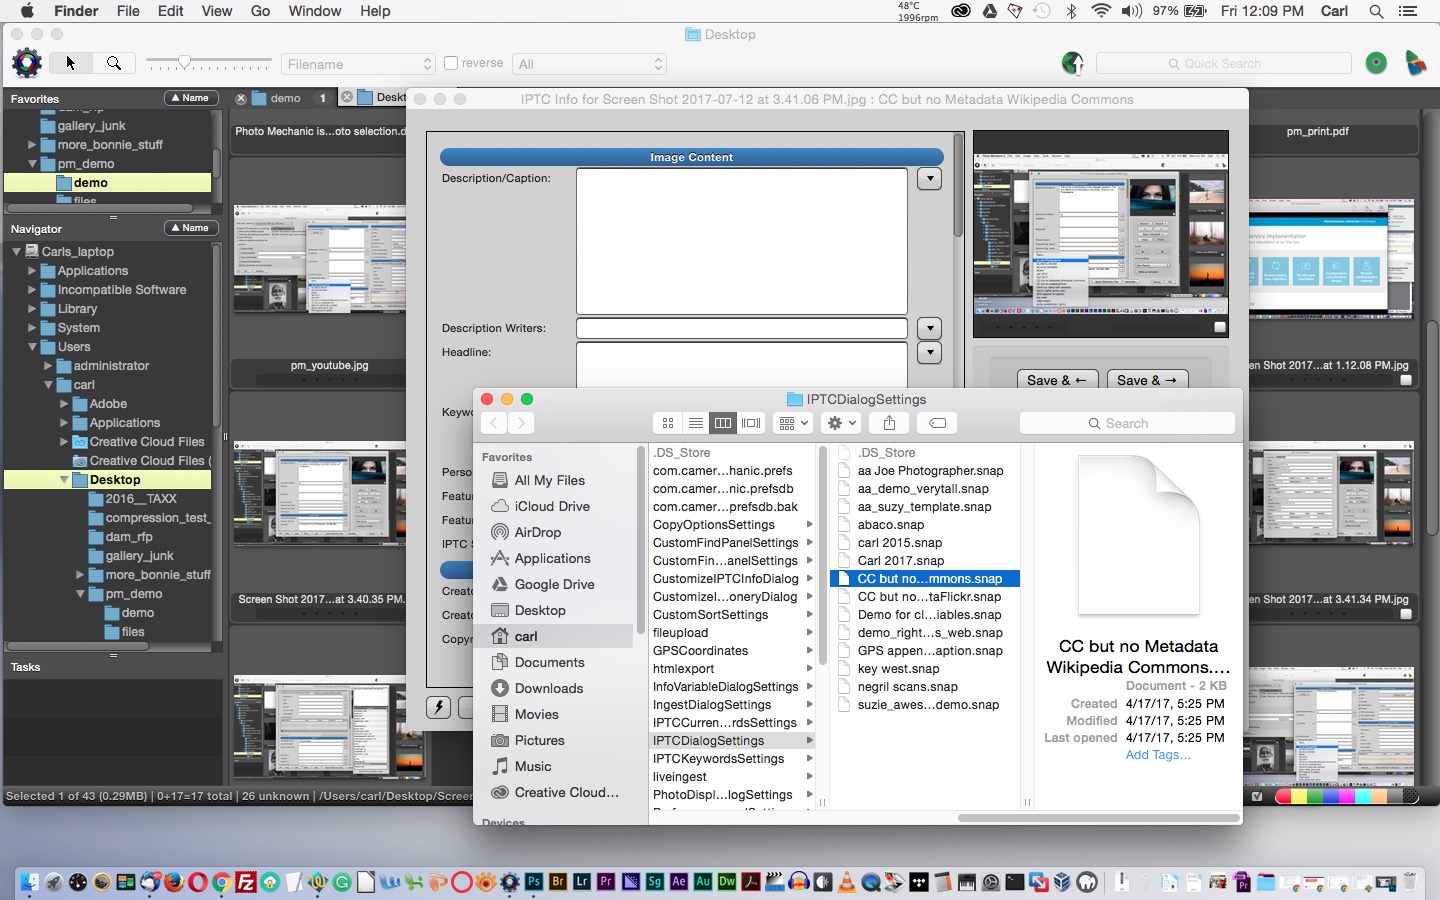
You can delete a Snapshot/template by holding down the Option key (on a Mac) or Shift key (On a PC) while clicking a Snapshot in the flyout, and an operating system file manager window opens. From there, you can delete a Snapshot, or copy it to share it with another Photo Mechanic user.
(Note: Photo Mechanic allows you to export and import complete sets of preferences so that you can synchronize installations across multiple computers. Snapshots can be exported with all the other prefs in one combined file. That’s a big feature for studios or companies with many users.)
Another way to make a template is to import the template as an XMP file. There are buttons on the IPTC Info dialog that allow you to load or save XMP template files, which can be exchanged with other programs that understand .XMP files, like Adobe Bridge and Photoshop. You can also exchange templates with programs that can’t understand .XMP files, like Adobe Lightroom and XnView, by exporting and importing metadata on JPEG files. See this post for detailed instructions.
Option-clicking on a Snapshot opens an operating system file manager window from which you can delete or copy Snapshot files.
You can navigate from photo to photo in the IPTC Info dialog.
In the IPTC Info dialog, when you are ready to apply metadata to a photo, you could click ‘OK’ and close the dialog, or you could use the navigation buttons under the thumbnail at the upper right in the dialog. These allow you to save metadata to a picture and move forward or back to the next picture, or simply to move without saving. In this set of buttons, there are copy and paste buttons that allow you to copy metadata from one picture to another. You can save metadata to a picture and go straight to the File Uploader dialog from another button in this group.
The escape key closes the dialog. (And most others in Photo Mechanic.)
There are a few more buttons, but we’ll talk about them as we look at IPTC Info’s big brother, the IPTC Stationery Pad, because they’re common to both dialogs.
Some workflows are one photo at a time, but in most cases, the IPTC Info dialog would be used in a second or third pass through the pictures, to add final per-photo information to just a couple of fields.
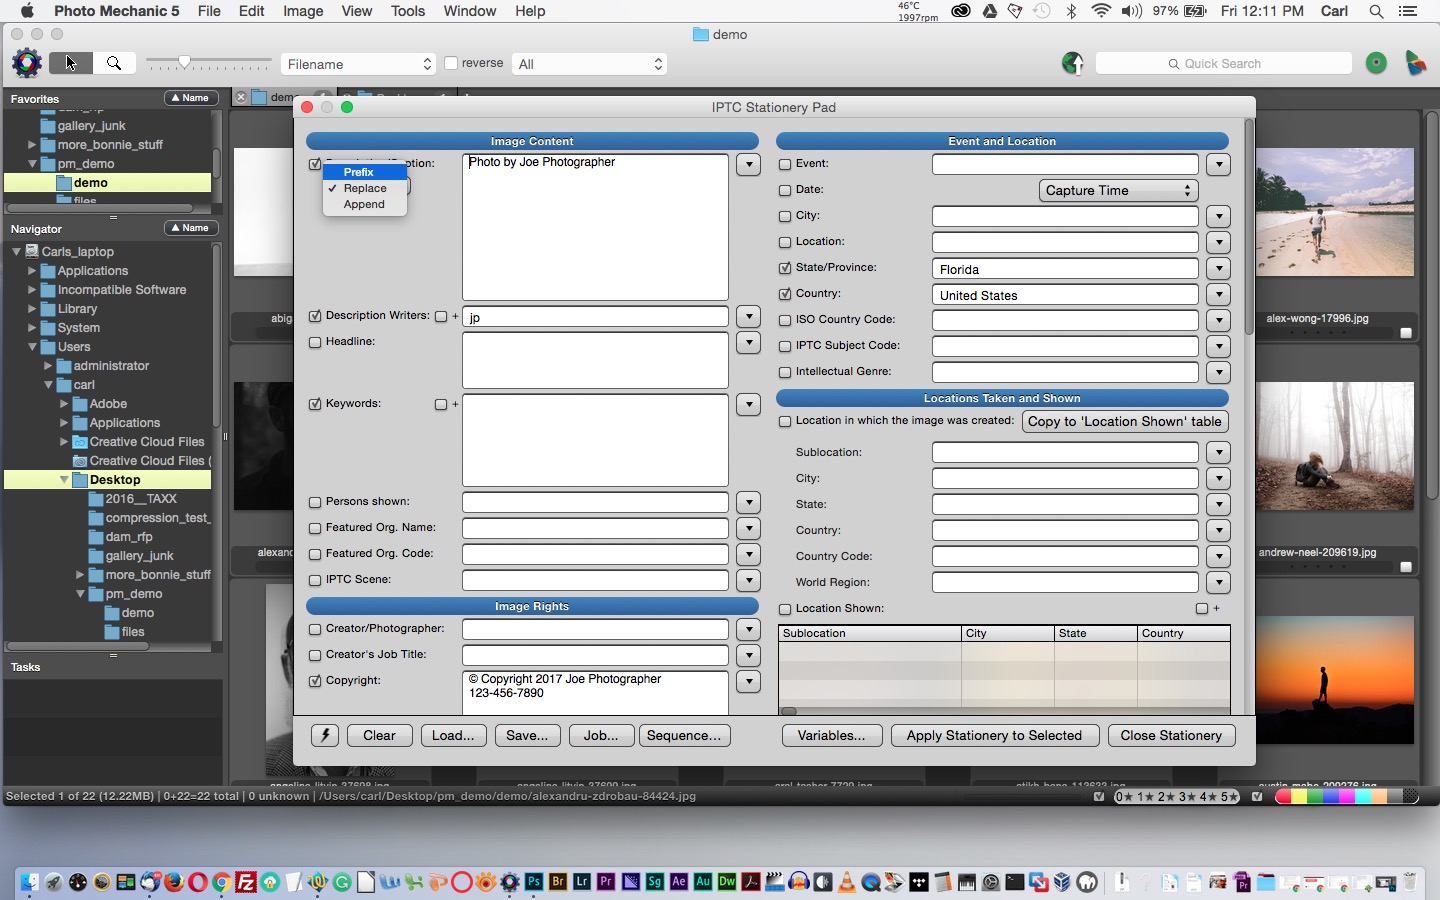
IPTC Stationery Pad
From anywhere in Photo Mechanic you call the IPTC Stationery Pad with Cmd/CTL+I, or from the Image pulldown in the main menu.
IPTC Stationery Pad is Photo Mechanic’s tool for applying metadata, or changing metadata, in bulk. Like the IPTC Info dialog, the Stationery Pad has the various metadata fields, in which you can enter or edit
metadata. The StationeryPad broadcasts metadata to groups of photos. Fill in the fields and press the ‘Apply stationery to Selected’ button and your metadata will be applied to any selected photos. Or you could close the stationery pad and select photos, right-click on one of them, and choose ‘Apply IPTC stationery’ from the context menu to apply the stationery. The Stationery Pad doesn’t need to be open to work. As long as it’s loaded with metadata it’s active and ready to go.
You’ll notice that each field in the Stationery Pad has a tickbox next to it. The tickbox is checked automatically if there is a value in the corresponding field. Fields with a selected tickbox are active and will overwrite any metadata that might exist in those fields on a target photo. A ‘ticked’ but blank field will erase the contents of that field on a target photo.
Add additional metadata to the caption
Now notice that the Caption field has a flyout menu with choices for ‘Replace’, ‘Prefix’ and ‘Append’. Depending on what you choose in this flyout, the Stationery Pad will prepend, overwrite, or append data in the Caption field of target photos. The Caption Writer and Keywords fields have ‘+’ tickboxes. Those allow the contents of those fields to be appended to corresponding fields on target photos.
In the IPTC Stationery Pad, you can add information to an existing caption.
Typically, we use appending or prepending on our second pass through our photos. First, we broadcast baseline metadata to all the photos in a given batch. Then, we add caption information and keywords that may be common to all the photos in the batch by clearing the Stationery Pad, adding the new information, choosing to prepend or append as appropriate, and applying the Stationery Pad.
The Stationery Pad has a Snapshot button and from it, we can choose and save templates. Templates are interchangeable between the stationery pad and the IPTC Info dialog, as are XMP template files.
Variables in Photo Mechanic
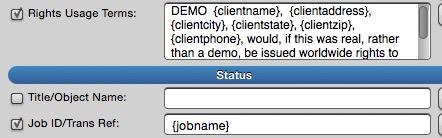
On the bottom of the Stationery Pad, there is a ‘Variables…’ button. Variables are codes that can be replaced with values that you define. If you put a variable for GPS Latitude in, say, a picture’s caption, Photo Mechanic will find the Latitude for that picture and write it where the variable was.
If you click the ‘Variables…’ button, a menu will appear with variables available in Photo Mechanic. Place your cursor where you want the variable to appear, go back to the menu and double-click a variable and that variable will be inserted. You can also simply type or copy and paste. Once you apply your metadata to a picture, any variables will be replaced with the appropriate values. You can build whole sentences peppered with variables. It’s like the mail merge feature in an office program.
These variables in a template will be replaced when the metadata is applied.Variables in a template have been replaced by contact information in this Rights Usage Terms field.
Variables work the same way in IPTC Info and, indeed, several other dialogs in Photo Mechanic.
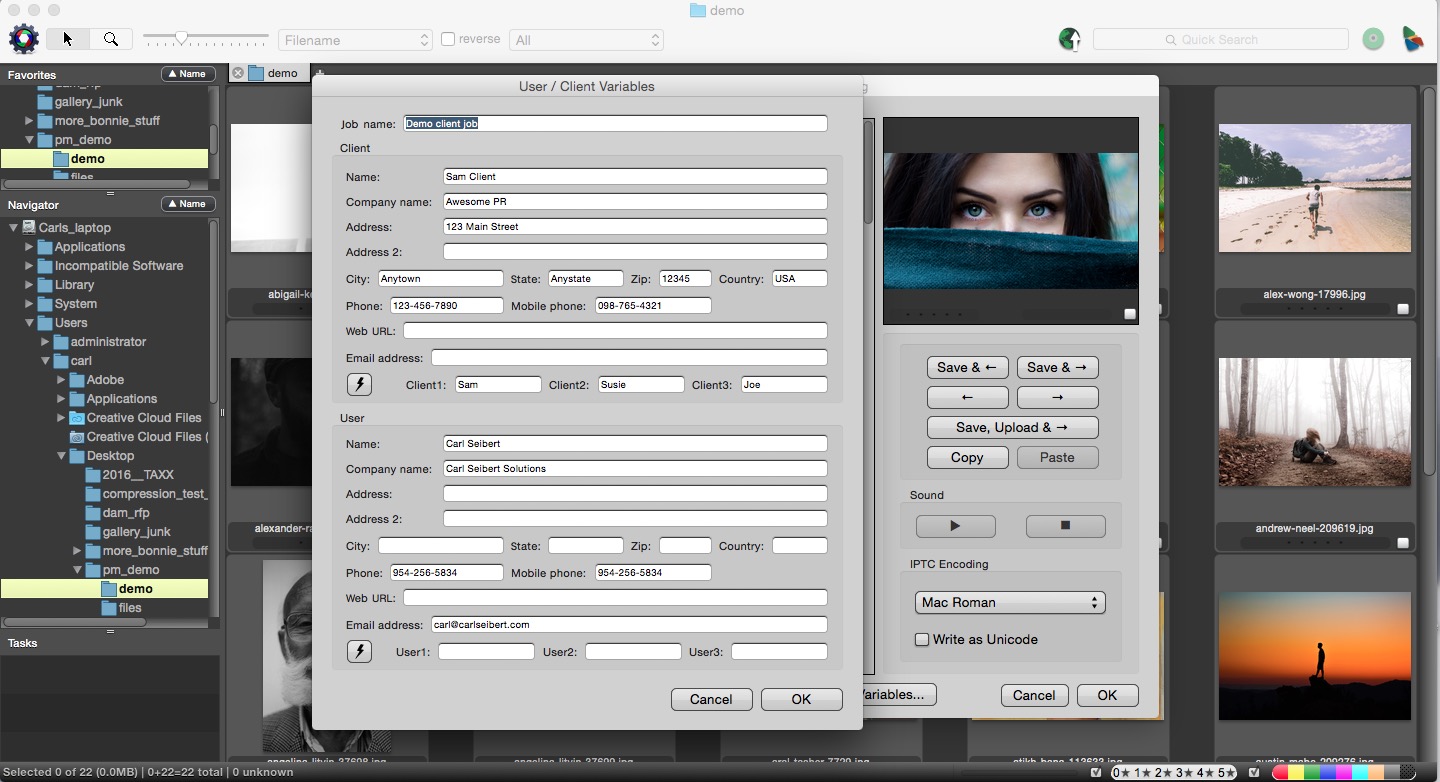
Another button found in both the IPTC Info dialog and the Stationery Pad is the ‘Job…’ button. ‘Job…’ Opens a dialog where you can enter contact information for clients and photographers (although you could enter this information for anybody.) Snapshots in this dialog allow you to build an address book. Each field in the ‘Job…’ the dialog is associated with a variable. If you load a certain client’s, or photographer’s info in the Job dialog, then the corresponding variables can be placed to apply that information anywhere you choose. You could easily build a template that would create, for example, a customized Rights Usage Terms statement granting a license to whatever client you select in Jobs.
In the Job dialog, you can enter information about people – clients, photographers and others – which can be used with variables to automatically insert names and contact information into metadata.
The ‘Sequence…’ button allows you set the starting number for the sequence variable. The sequence variable is often used to rename files with incrementing numbers in the file name, like “01wedding.jpg; 02wedding.jpg; 03wedddng.jpg”. But it can be used anywhere you want a number that increments from picture to picture, “…photo {sequence} of 17”, in the captions of a seventeen-picture gallery, for example.
How do we apply baseline metadata to many photos?
Most workflows start with photos on a camera memory card. The first order of business is to copy either all your photos or a select edit of photos from the card to your computer. In Photo Mechanic, you’ll either do that by copying or ingesting.
Copying
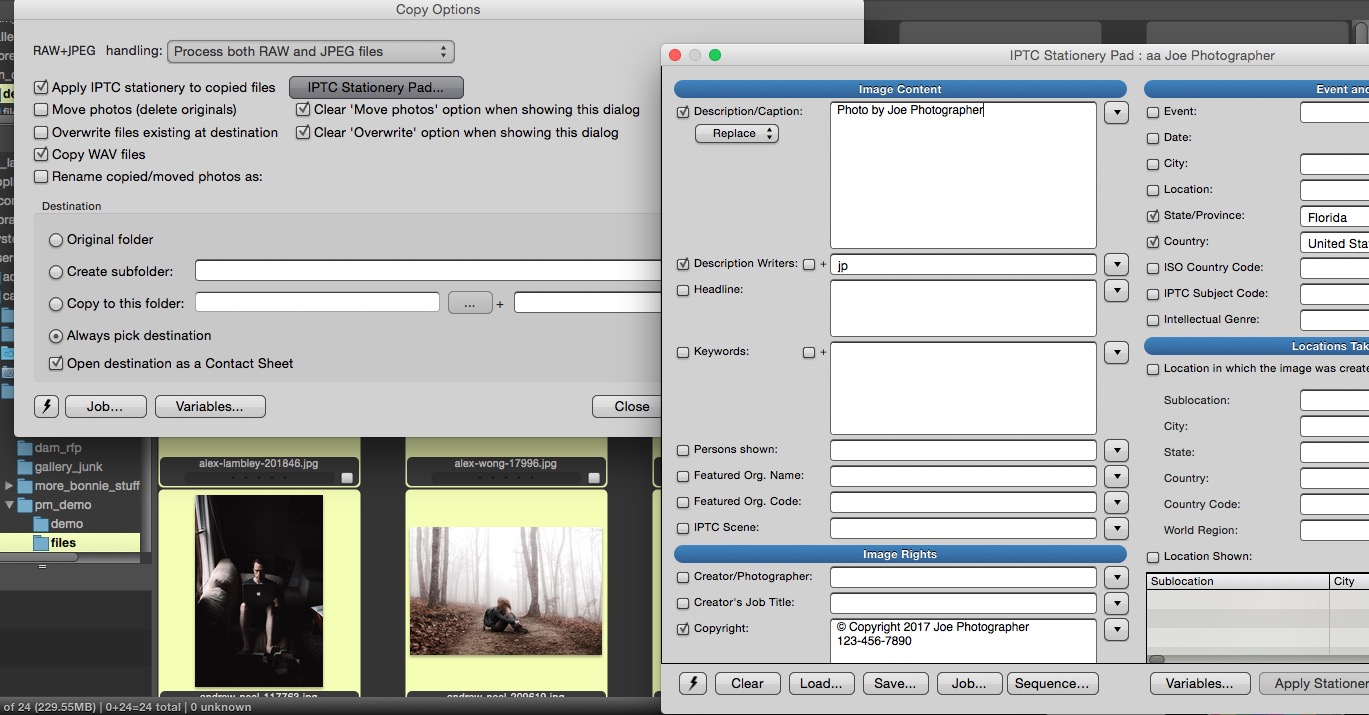
If you copy, you’ll start with thumbnails of the pictures on your card open in a Photo Mechanic Contact Sheet, or thumbnail browser tab. You’ll select the photos you want to copy to your computer and press ‘CMD/CTL+Y’ (or select ‘Copy To’ from the File menu) to open the copy dialog. Right near the top of the copy dialog, there
Adding template metadata while copying files.
is a tickbox that allows you to ‘Apply IPTC Stationery to copied photos’. Tick this and we can apply baseline metadata to photos even as we copy them to our computer. There is a button that opens the IPTC Stationery Pad.
From the Stationery Pad’s Snapshot flyout, choose a Snapshot (template) and it will load into the Stationery Pad. We can now close the Stationery Pad. It’s loaded with the metadata from the template we just chose. Now we choose our other copy options and click ‘Copy’. While our photos are being copied, our metadata template is being applied. Photo Mechanic will embed metadata in files that accept embedded metadata and it will make sidecar files for file formats that don’t work with embedded metadata. (Many RAW files, for example.)
Ingesting
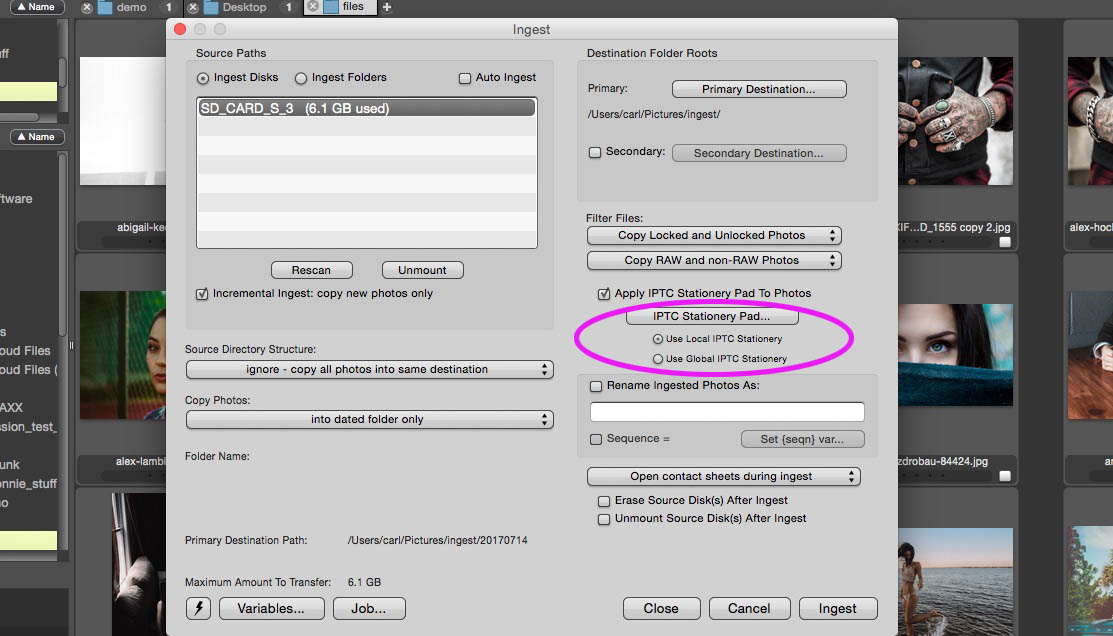
The other method for copying files from a camera card to your computer is called “Ingest”. Go to ‘File > Ingest’ to open the ingest dialog. Ingesting copies all the photos on a card, or newly added ones, from the card – or “disk”, if you’re old school by digital standards, and learned when camera cards were actually miniature spinning hard drives. In the Ingest dialog, we have another ‘Apply-IPTC-stationery’ tickbox.
In the Ingest dialog, specific sets of metadata can be saved and applied during ingest through use of the ‘Local Stationery Pad’ option.
This time, we have radio buttons that allow us to choose between “Local” and “Global” IPTC stationery. “Global” IPTC stationery means whatever metadata we have loaded into our Stationery Pad, just like when we copied pictures from the card to the computer.
“Local” IPTC stationery means IPTC stationery that was loaded on the pad when a Snapshot of the Ingest dialog was made. The Snapshot button in the lower left corner of the Ingest dialog will make such a Snapshot.
Snapshots are like presets. They record the condition of the entire dialog. Thus, by using this “Local” feature, we can make Ingest Snapshots that include specific metadata. We can assign different sets of metadata to different batches of photos in just one click, without having to even open the Stationery Pad. Use this feature for batches of photos from different photographers, or for different clients, for example.
IPTC Snapshot
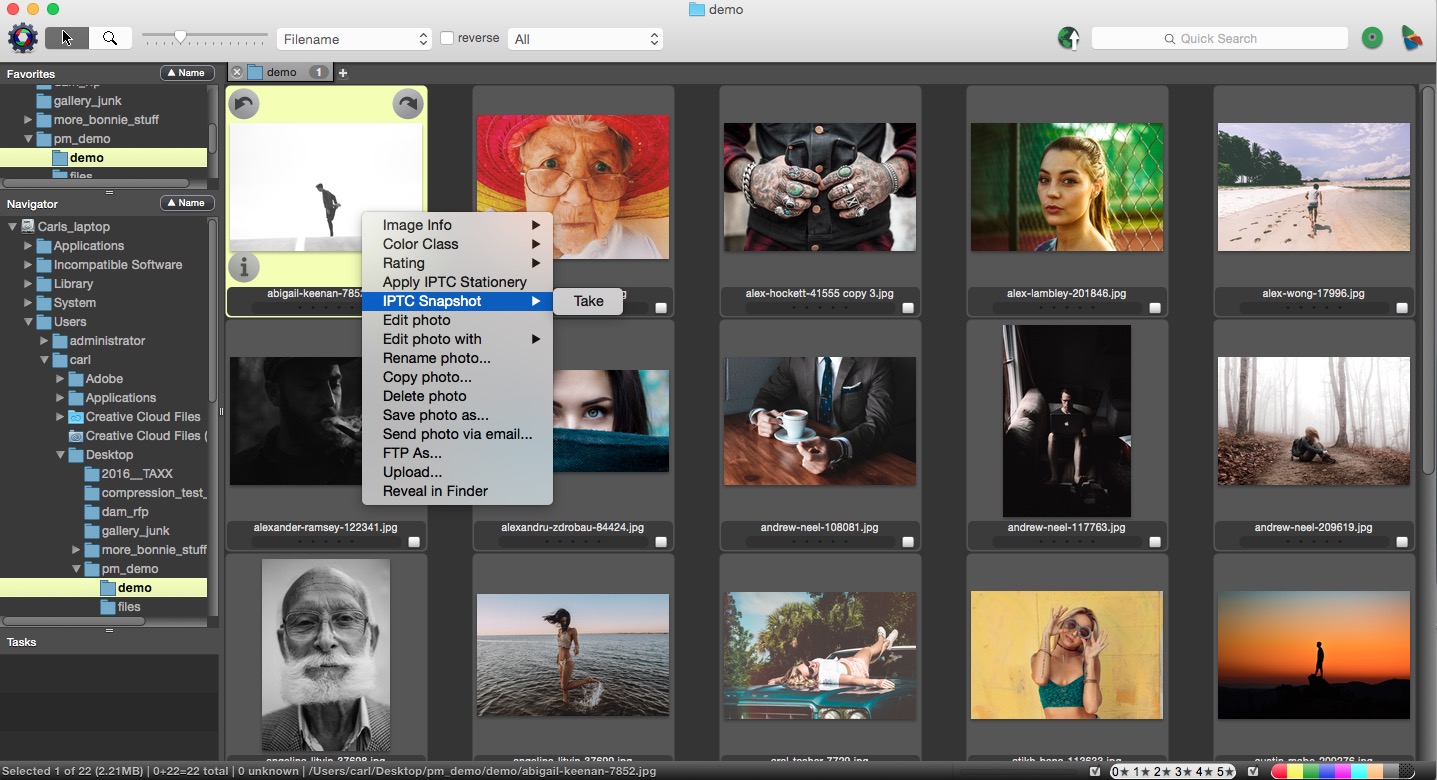
Another way to copy metadata to one or many photos is IPTC Snapshot. Right-click on a photo. You’ll see ‘IPTC Snapshot’, with a flyout arrow that allows you to ‘Take’ or ‘Paste’. IPTC Snapshot one photo and paste its metadata to as many selected pictures as you want.
Take an IPTC Snapshot from the context menu.
You might not want to add baseline metadata to every photo. There are perfectly logical reasons why this might be. In this case, simply copy photos to your computer, sans metadata, then select the ones you want to add metadata to, and use the Stationery Pad.
Generally, in the Copy and Ingest dialogs, we would use the Stationery Pad to apply baseline metadata to photos coming into our workflow. Then we would use the Stationery Pad again to apply information common to all photos in a batch. And finally, we would use the IPTC Info dialog to apply specific metadata to individual photos.
Save Photos As…
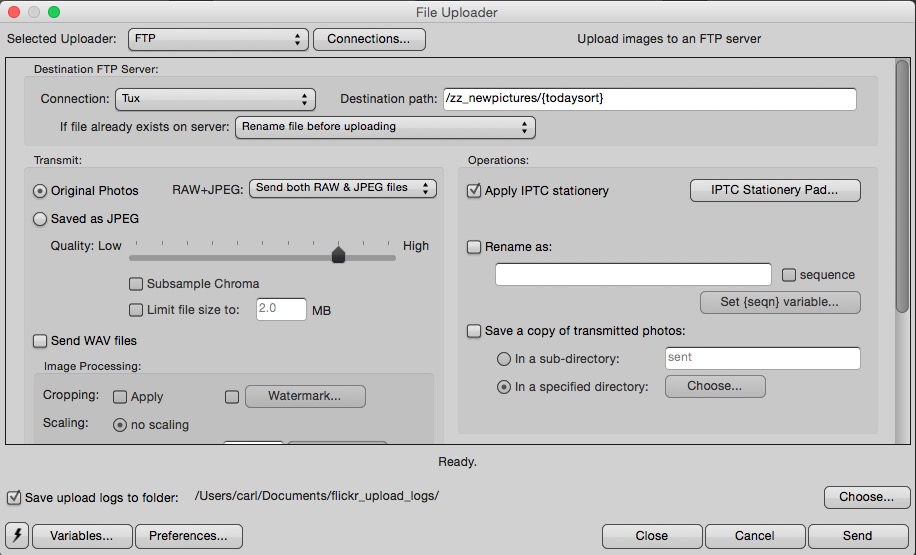
If you look in the right-click context menu from any photo in Photo Mechanic, you see ‘FTP as…’ and ‘Save Photos as…’ items.
‘The Save Photos As’ and ‘FTP As’ dialogs both feature the ability to apply metadata from the Stationery Pad.
‘Save Photos as…’ opens a dialog where we can save copies of our photos transformed in a variety of ways. They can be resized, have crops applied, be compressed, or renamed, among other things. This dialog also has an ‘Apply stationery’ feature, with a button to open the Stationery Pad. Like the copy dialog, in this one, we can only use the active data that’s currently loaded on the Stationery Pad.
FTP As…
‘FTP as..’ is equipped the same way. (‘FTP as’ is a bit of a misnomer, by the way. From this dialog, you can send photos to a number of specialized destinations, like PhotoShelter and Zenfolio, that are not ordinary FTP servers.)
In these output dialogs, we would normally by using the Stationery Pad to apply tweaks, like licenses, or embargoes, to existing metadata.
More metadata functions in Photo Mechanic
The Tools main menu pulldown includes several metadata functions. From this pulldown, you can do housekeeping tasks to your metadata such as choosing its text encoding or synchronizing IPTC metadata in the IPTC IIM Area of your file and the XMP area of your file.
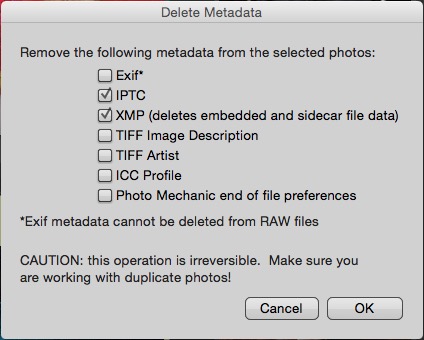
Delete metadata
From the Tools pulldown, you can choose ‘Delete Metadata’. You would use this dialog if you were working on copies of photos from which you need to redact metadata for one reason or another. See this post for a discussion on when stripping metadata from a photo might be appropriate.
Classes of metadata can be individually deleted in the Delete Metadata dialog.
In this dialogue, choose categories of metadata that will be removed from your photo. Often, you would leave untouched the IPTC and XMP metadata (where the most often used copy of the IPTC information lives) and remove everything else. Notice the warning that cautions that this operation is permanent and should be used only on duplicate photos, never on originals that you want to keep. Good advice. Heed it
Adjust Capture Dates and Times
Another powerful dialog that is available from the Tools menu is ‘Adjust Capture Dates and Times’. This dialogue allows you to adjust the capture time of a photo and write the new information to Exif metadata, IPTC metadata, or to files’ own modification dates and times.
This dialogue is usually used to synchronize time data between different cameras. Photos of a running clock such as the game clock at a sports event or even your watch can be used with this dialogue to precisely synchronize capture times of photos. Most often this is used to order the photos in chronological order in the contact sheet view. It can also be used to correct if the camera’s clock is just plain wrong.
The inline information button in this dialogue is extremely helpful. (Most of Photo Mechanic’s Help documentation is excellent, by the way.)
From the Settings flyout of the Edit menu, you can access the settings for several text and variable-related functions. Of particular interest to metadata users are the ‘Code Replacements’ item and the ‘Auto-Complete’ item.
Code Relacements
Code Replacements allow you to define codes what you can type in your metadata and then that code will be replaced with any text you desire.
When I type the closing “\”, a long and difficult to type string will instantly replace this Code Replacements character string.
If your workflow requires you to repeatedly use phrases that are difficult to type or difficult to spell this feature can be a significant timesaver. For example, if you often need to type “Governor Arnold Schwarzenegger (Republican), California,” you might quickly learn to love this feature. Program Photo Mechanic to replace “\guv\” with that phrase.
Code Replacements instantly substitutes this phrase when I type a five-character code.
The use of code replacements is explained in detail in the Camera Bits Wiki.
Auto Complete
‘Auto Complete’ is exactly that. Photo Mechanic allows you to set your own type-ahead auto-complete values. This could be helpful for example if your company’s CEO has a particularly difficult to spell or type name.
Set Info Text
The Properties tooltip can be configured in ‘Set Text Info’ to show the metadata of your choosing.
The ‘Set Info Text’ dialogue allows you to configure what information from the metadata is shown in the one-up preview in Photo Mechanic and in tooltips (View > ‘Show Info Tooltips’, or Shift+CMD/CTL+T, or from the right-click context menu) For example, you could add file dimensions to the display, as I did, or you could show the caption or other IPTC fields. By default, Exif data is shown, but you can choose variables to show any metadata.
Printing metadata
Let’s say you need to reveal metadata to users who do not have a metadata reading
Photo Mechanic can produce printouts with legends containing metadata of your choice.
application installed on their computer. There are two functions in photo mechanic that allow you to do this elegantly.
Photo Mechanic’s print dialogue allows you to use variables to include metadata fields as legends under pictures printed either one up or as a contact sheet. You may, of course, print such a contact sheet either to paper or to a PDF.
Export text files of metadata
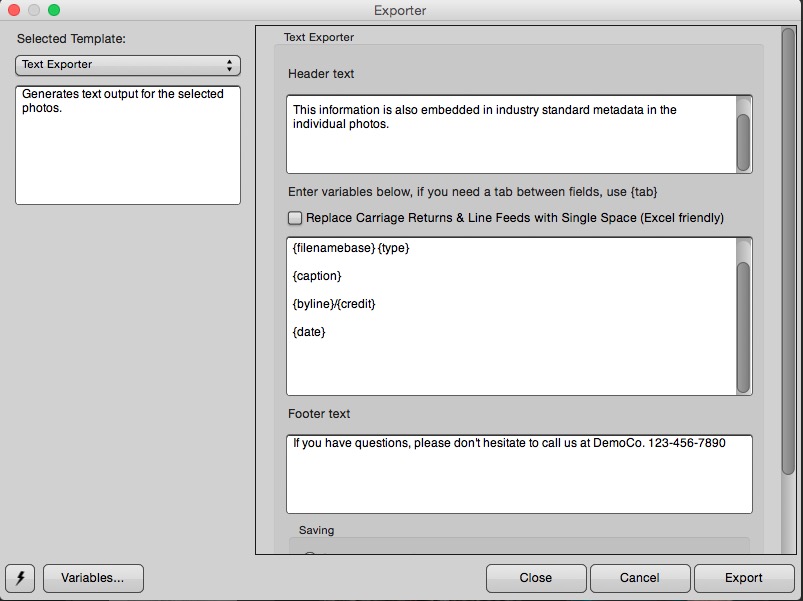
From the File menu, choose ‘Export’ to open the Exporter dialog. Then from the flyout menu on the left side of the dialogue choose ‘Text Exporter’. This function allows you to export text from any metadata field into a text file. You can add header and footer text and simple ASCII formatting. You can even make tab delimited output for use in spreadsheets or print publishing programs.
The Text Exporter creates lists of metadata from selected images. Experimentation is the best way to learn to use this feature.
This function can make readme files containing caption information. You could post them with photos in file sharing environments such as Dropbox, Google Drive or an FTP share.
The best way to learn to use this function is to simply select a group of photos and experiment in the Text Exporter dialogue until you’re satisfied with the way your exported text file looks.
Ratings and labels
Photo Mechanic’s star ratings and color labels are, strictly speaking, metadata. They can be shared between Photo Mechanic and the Adobe Creative Cloud applications, and XnView.
Stars are automatically shareable. Star ratings in any of the programs will appear in any of the others.
Color labels can be synchronized between Photo Mechanic, Adobe Bridge, Adobe Lightroom, and XnView. In order to do so, you will have to modify preferences in Photo Mechanic. In a separate post, I will explain the process in detail.
There’s a lot of power in Photo Mechanic. And a lot of detail. And a long post. In the coming weeks, after my typing fingers recover, I’ll round out our tour of application How-Tos with a post on using XnView to work with metadata. Future How-To posts will include optimizing photos for use on the web (especially for WordPress) in Photo Mechanic, XnView, and Lightroom.
In the meantime, please help me correct any errors I have made by posting in the comments.
A mini-glossary post.......Labels. Most definitions of metadata start by saying that "'metadata' literally means 'data about data." In a technical, database-y kind of way, that's exactly true. But for us it's labels. We're talking about behind-the-scenes labels attached to digital content assets.
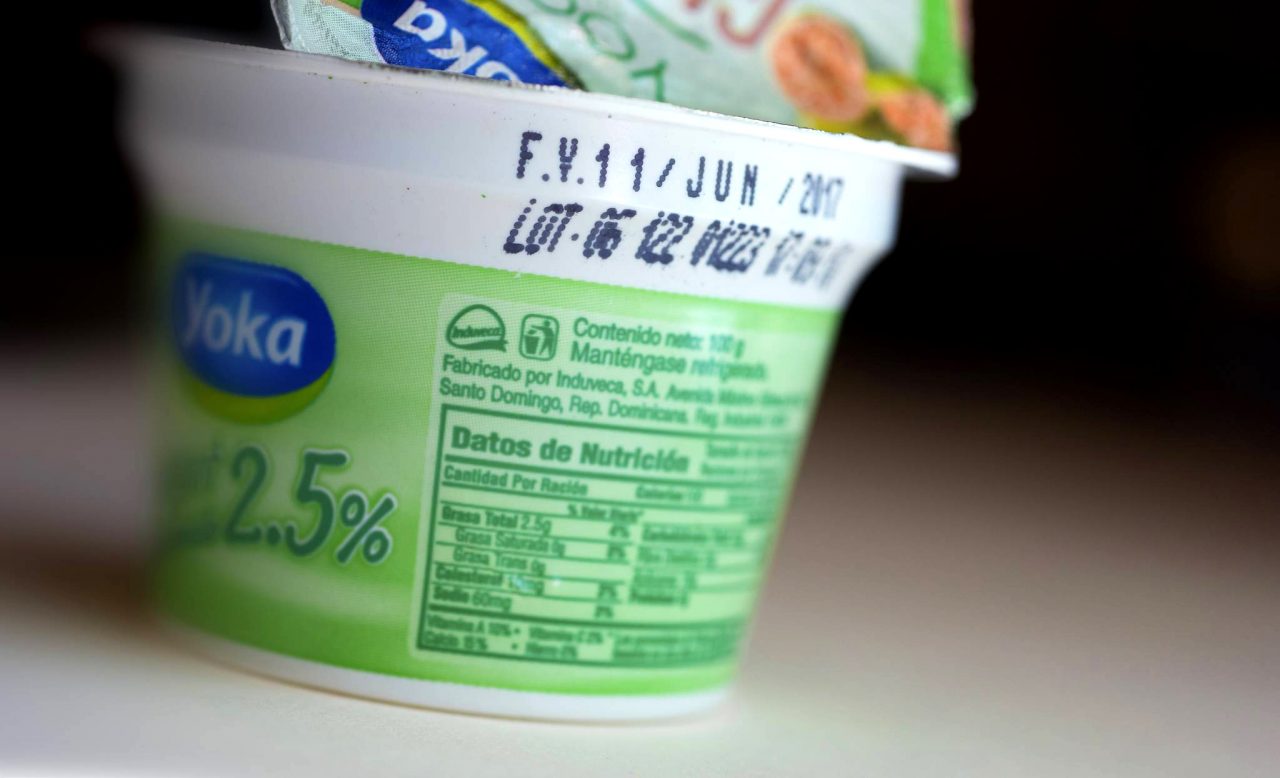
Last week’s release of new French president Emmanuel Macron’s official portrait, by photographer Soazig de la Moissonnière, caused a stir on Twitter. Metadata on the version of the photo released on the government’s website revealed that somebody had the picture open in Photoshop for some fifteen hours. But vital information was left off the photo.
It's about labels. Labeling digital assets, particularly pictures. Digital image files have places to put labels - labels about what's shown in the image, who owns the image, who made the image, what you can do with the image, that sort of thing. In the old days, people put this kind of stuff on the backs of prints with a rubber stamp and pencil.
Never fear. It’s easy to move metadata templates from application to application.
Move metadata templates between Photo Mechanic, Adobe Lightroom, Adobe Photoshop, Adobe Bridge, and XnView
In this post, we’ll learn how to import, export and exchange metadata templates between Photo Mechanic, Adobe Lightroom, Adobe Bridge, Adobe Photoshop, and XnView.
We can easily import and export metadata templates to and from our image/metadata editing applications. We can send and receive templates from clients, for example, and we can standardize templates between different applications or different computers in our own environments.
Photo Mechanic can import and export .XMP template files.
Save your template as a Snapshot in Photo Mechanic. (Click the image for a larger view.)
We can import or export templates in either Photo Mechanic’s IPTC Stationery dialog (CMD or CTL + I) or its per-image IPTC Info metadata editor. (Just the I-key, or the ‘I’ button on a slidemount in the contact sheet view.) Templates and Snapshots are interchangeable between the two tools. For this tutorial, we’re going to use the IPTC Info editor.
Find any old JPEG image in a contact sheet. One that doesn’t have any metadata you care about would be good, but any JPEG will work.
Open the IPTC Info dialog. (‘I’ key, or ‘I’ button on the slidemount).
Click the ‘Clear’ Button to clear the editor.
Click the ‘Load…’ button and navigate to your .XMP template. Click ‘Open’ and the editor will load with the values from the template.
Edit the template to suit your own needs.
Click the Snapshot button (Lower left corner of the dialog. It has a lightning bolt icon) and save a Snapshot of your new template with a descriptive name.
Now you’re good to go. You can call your template from the IPTC Info editor or the IPTC Stationery Pad by clicking on the Snapshot button and choosing it from the flyout list.
Call your template from the Snapshots list in Photo Mechanic. (Click the image for a larger view.)
To save your new template as a new .XMP file, simply click ‘Save…’ in either the IPTC Info or IPTC Stationery Pad dialogs and choose a filename.
To save your new template as a JPEG template, choose a suitable JPEG file. (It’s probably a good idea to make an image of the words “Template File”, or something to that effect, but a bathroom mirror selfie, or whatever, will do.) Use the IPTC Info dialog to apply your template metadata to that file. You’re done.
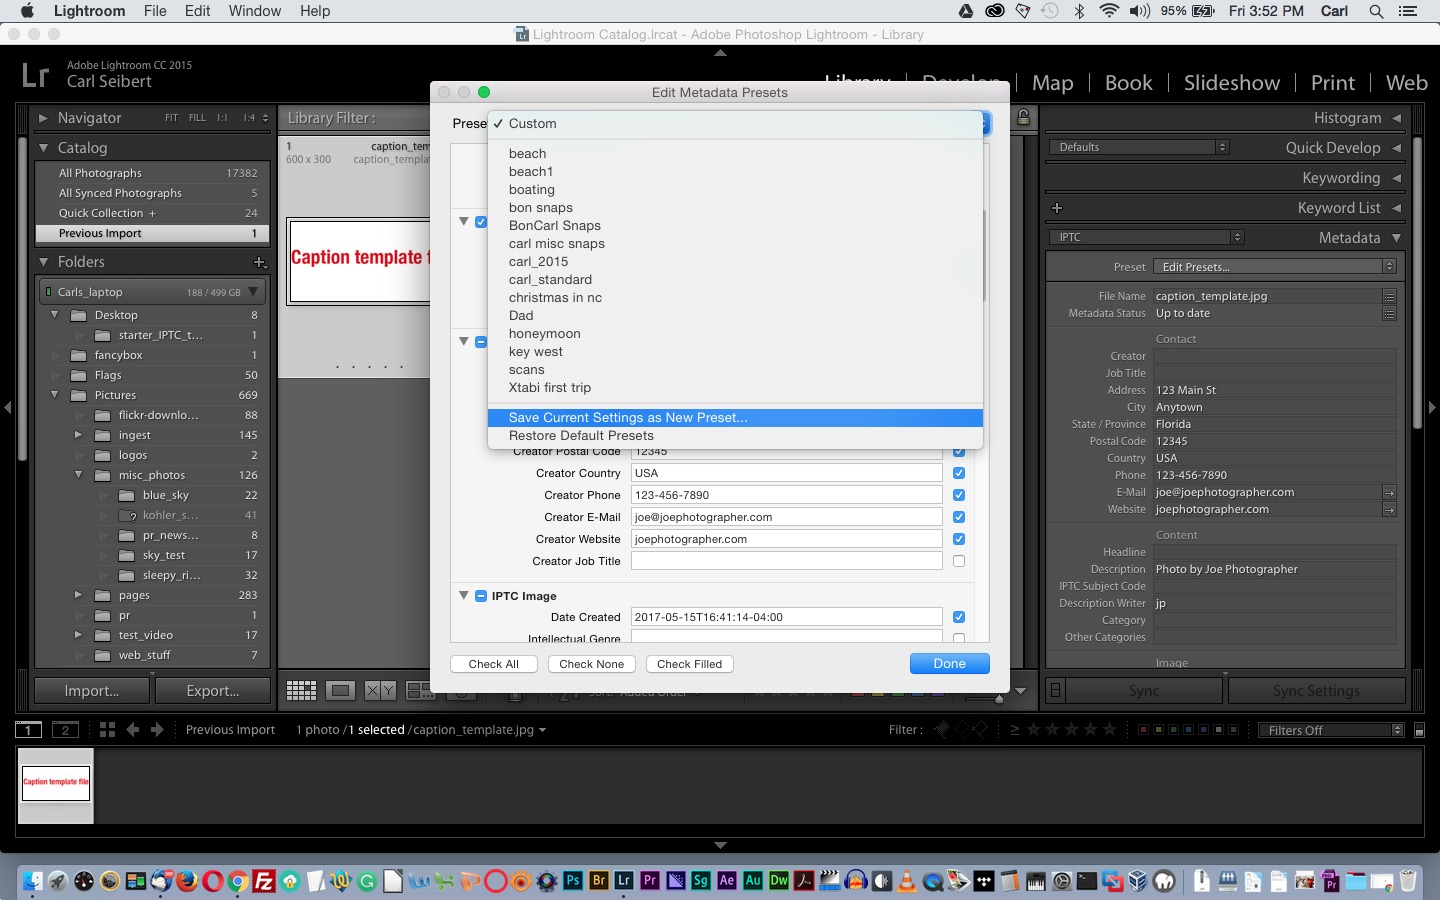
In Adobe Lightroom
Lightroom cannot work with .XMP files, so we’ll use a JPEG metadata template.
Import a JPEG with template data embedded. (There’s a sample in my download.)
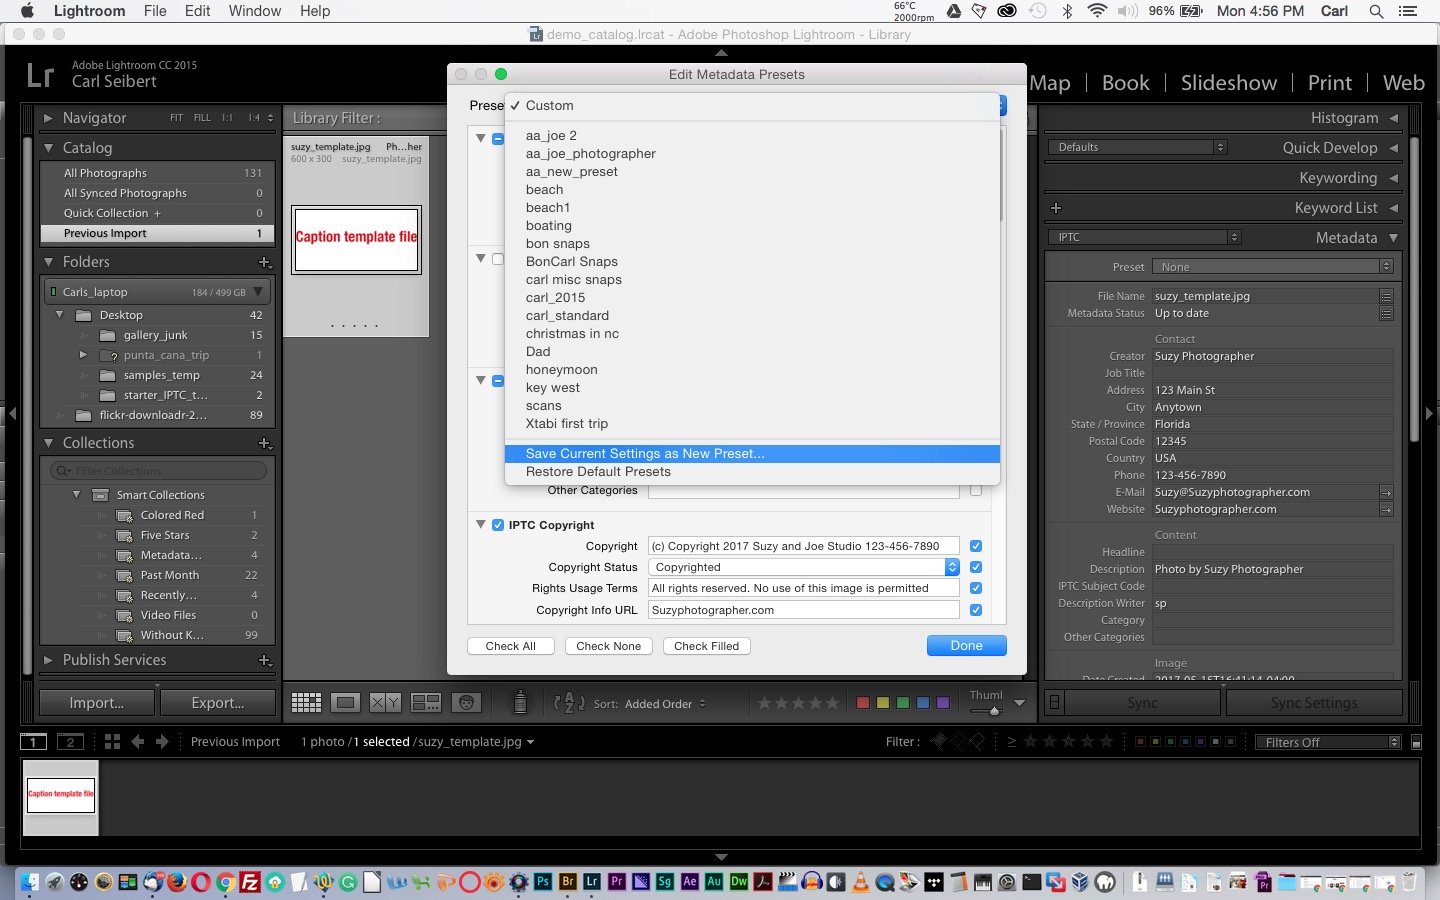
Choose ‘Save current settings as new preset’ to create a template in Lightroom. (Click the image for a larger view.)
From the Metadata panel on the right rail in Library view, click on the ‘Presets’ flyout and, from the bottom, choose ‘Edit Presets’. Or, you can choose ‘Edit Metadata Presets…’ from the ‘Metadata’ pulldown in the main menu.
The Edit Presets dialog should populate with the values from your imported template. Edit to suit your needs.
From the ‘Preset:’ flyout at the top of the dialog, choose ‘Save current settings as preset’ from the bottom of the list.
Choose a suitable name and save.
You’re done. Now your new preset (template) will be available in the ‘Presets’ flyout in the metadata panel and anywhere else in Lightroom where you might need it, like the Import dialog.
To save your preset back to another JPEG file to share it with another Lightroom user or move it to another program, find or import a JPEG, and apply your template to it.
With the file selected, go to the ‘Metadata’ pulldown in the main menu and choose ‘Save Metadata to File’ to write your metadata to the file. That’s it. You’re done. That file is now usable as a metadata template file.
In Adobe Bridge
Adobe Bridge can import and export .XMP template files.
If you don’t need to edit the template you are importing, you can simply drag in the template file.
Bridge’s File Info dialog allows importing or exporting .XMP templates. (Click the image for a larger view.)
Select any image file in the browser, and choose ‘File Info’ from the ‘File’ pulldown on them main menu.
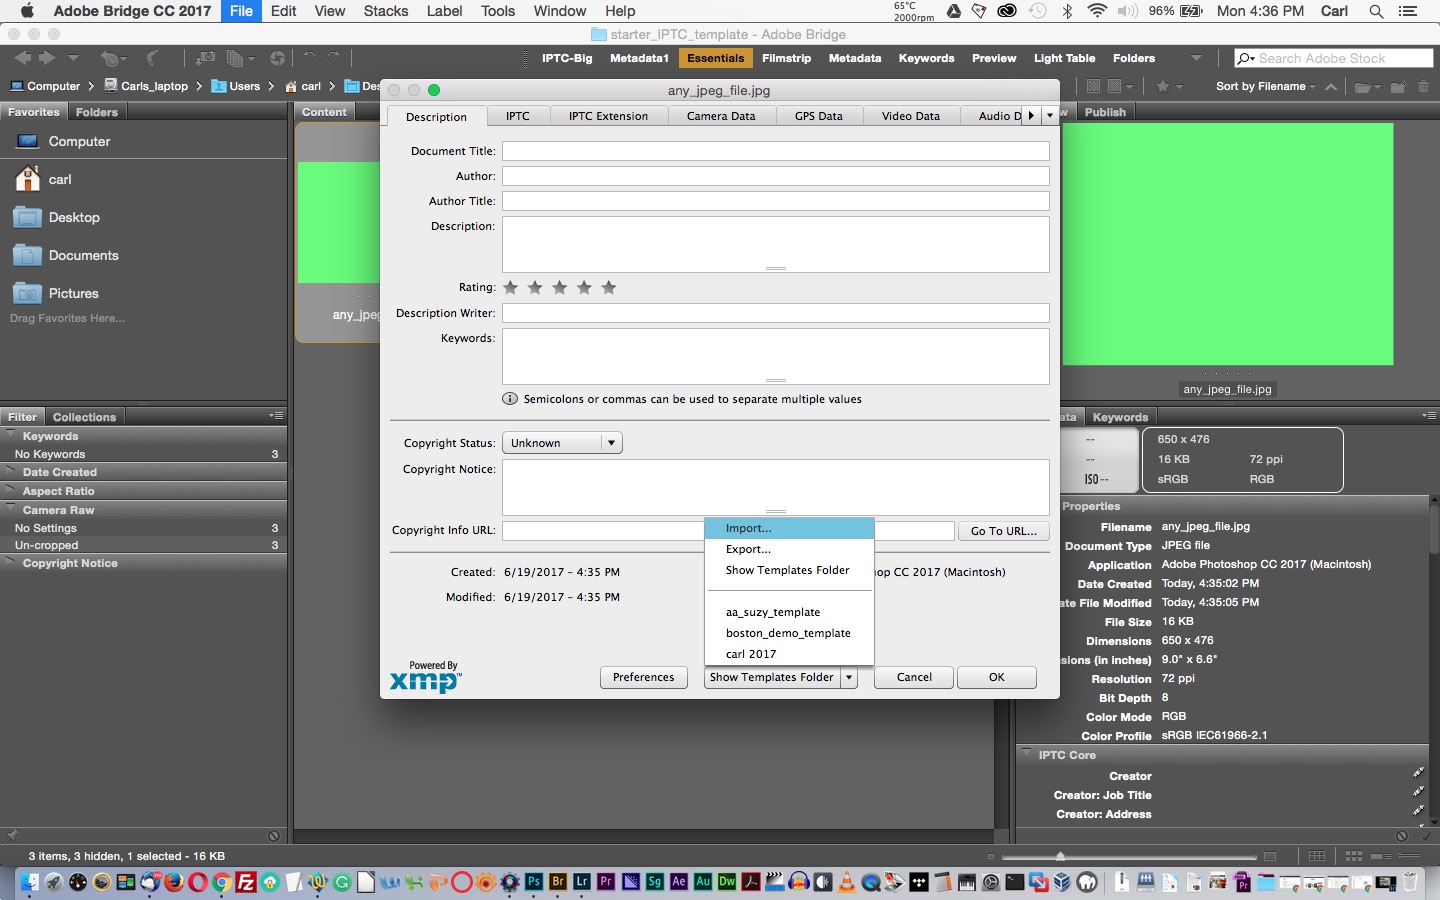
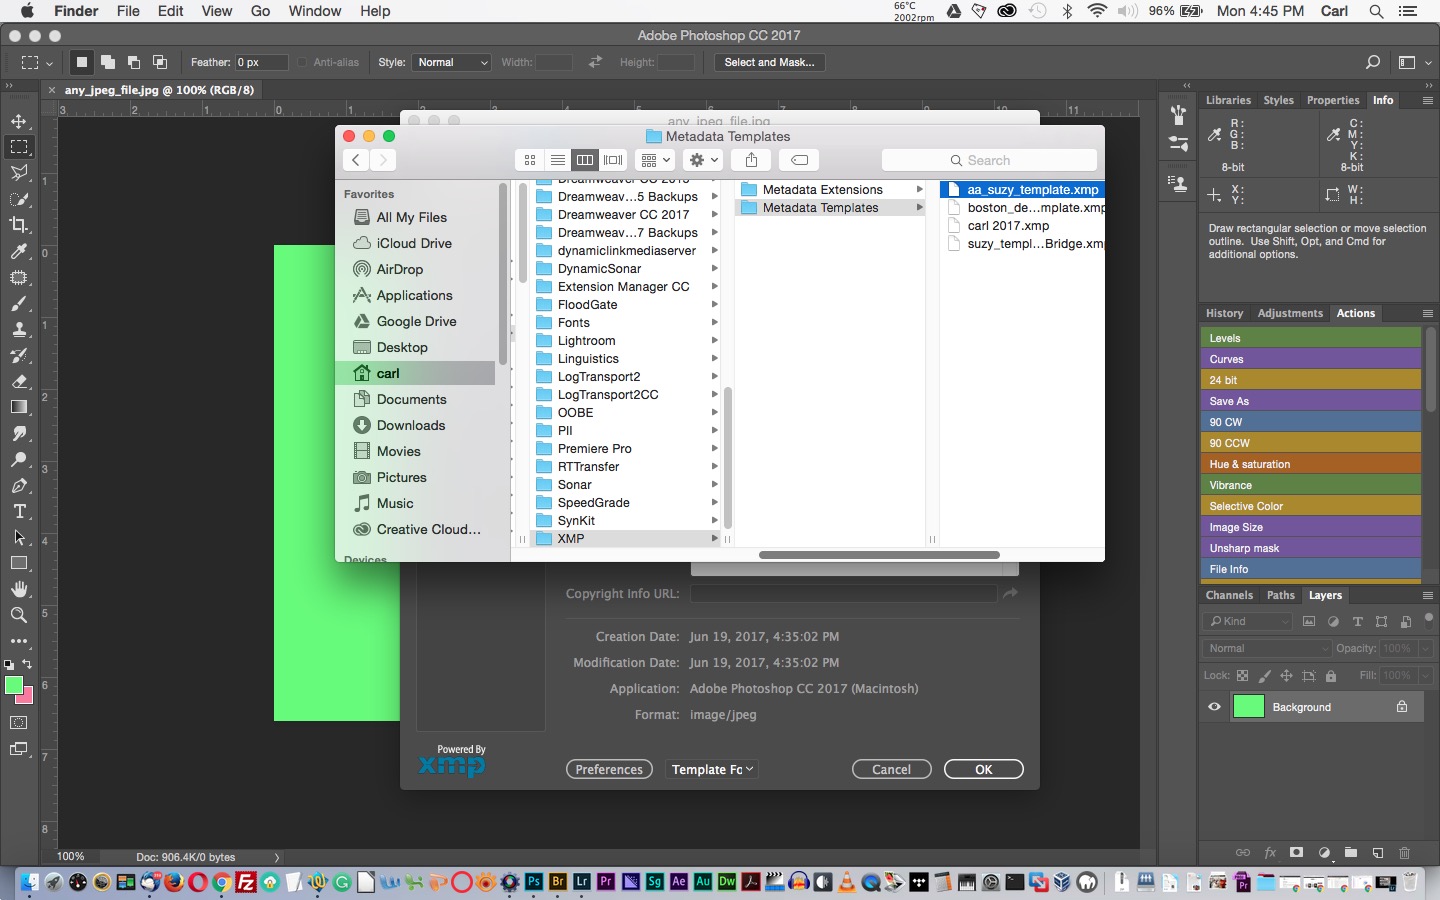
In the File Info dialog, click on the presets flyout in the middle of the bottom of the dialog, and choose ‘Show Templates Folder’. An operating system file manager window showing your templates folder will open.
Drag your .XMP template file into the folder.
You’re done. The template will now appear in the ‘Append Metadata’ or ‘Replace Metadata’ submenus under the ‘Tools’ main menu pulldown, or in the Edit Presets dialog.
If you do need to edit your template, click ‘Import’ instead of ‘Show Templates Folder’ from the File Info dialog.
Choose ‘Clear existing properties…’ from the ensuing dialog.
Navigate to your .XMP template file, select it and click ‘Load’.
The File Info dialog will be populated with your template values. Edit them to suit.
When you’re satisfied with your edits, choose ‘Export’ from the Presets flyout, and save your new .XMP template file.
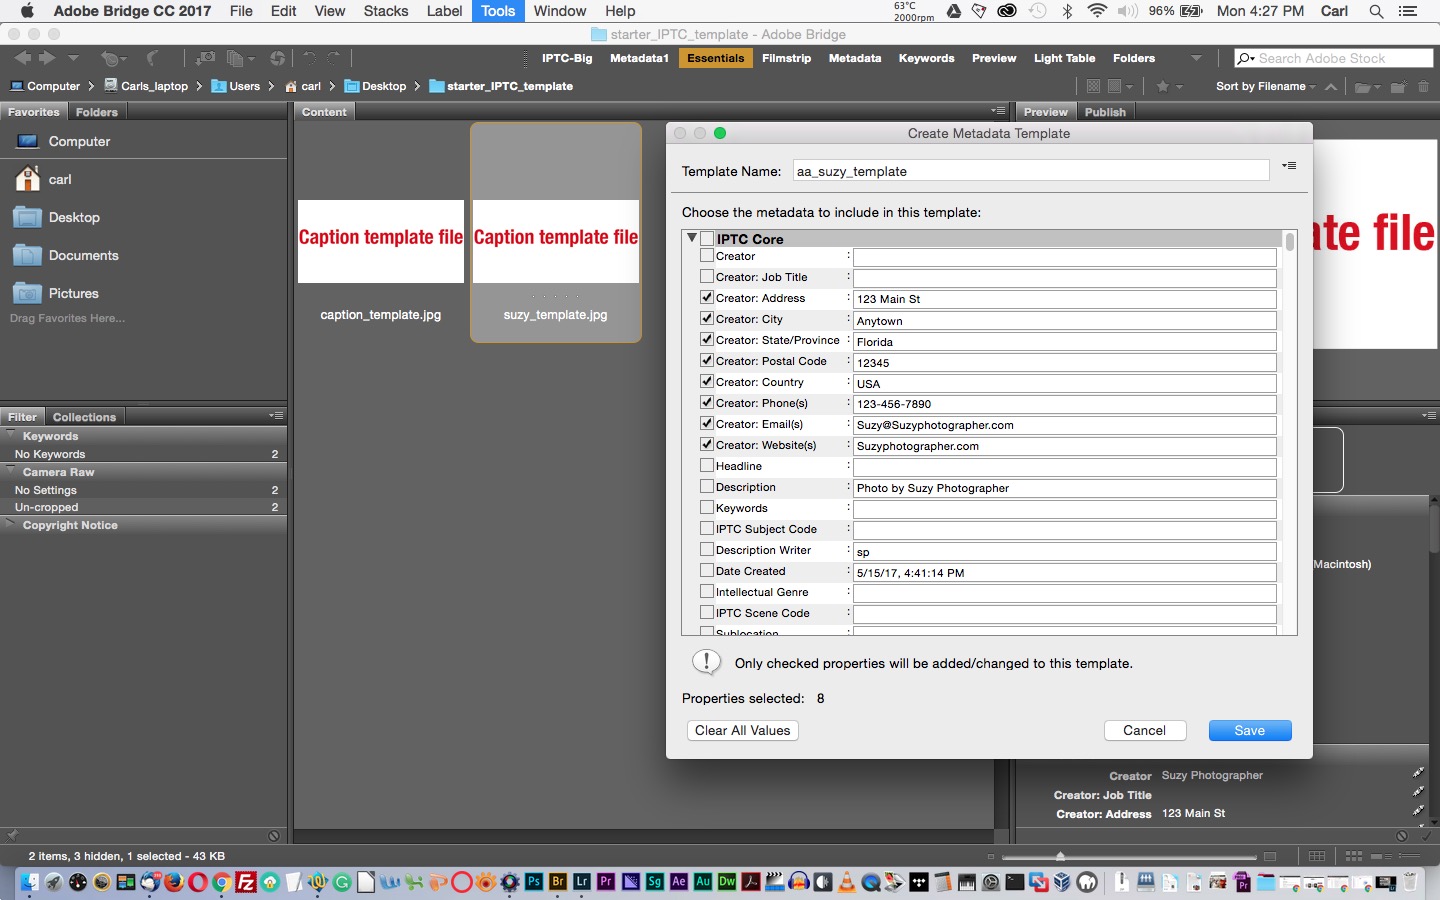
If you are working with a JPEG template file (from Lightroom, for example), select your template JPEG file in the browser and go to the ‘Tools’ pulldown in the main menu and choose ‘Create Metadata Template’.
The Create Metadata Template editor appears, with values from your template filled in. Edit to suit your needs.
In Adobe Bridge, the ‘Create Metadata Template’ dialog can be used when working from a JPEG template. (Click the image for a larger view.)
On the left side of the Create Metadata Template dialog, there are tickboxes, on for each field. Tick the tickboxes for every field that you want to be active in your template. Usually, that will be all of them that have values filled in except ‘Date Created’, which varies from picture to picture and is thus useless in a template.
Fill in a name for your template, click ‘Save’ and you’re done.
To save a new JPEG template file, make a JPEG file as described in the Photo Mechanic section above, and apply your template to it.
In Adobe Photoshop
Photoshop won’t likely be your go-to metadata authoring application, but it’s handy to have your templates available in Photoshop.
In Photoshop, open or use CMD/CTL+N to create an image file.
From the ‘File’ Pulldown on the main menu, choose ‘File Info’.
You can drag a template directly into the templates folder in Photoshop. (Click the image for a larger view.)
The File Info dialog in Photoshop looks different from the Bridge version, but for templates purposes, it works the same way. Follow the instructions for importing and exporting .XMP template files in the Bridge section above.
To export a JPEG template file, simply make a new document with CMD/CTL+N, decorate it to taste, apply your metadata template information to it, and save it as a JPEG.
In XnView
XnView is a low-cost image browser program that can edit metadata. It’s actually my favorite for removing metadata, but it does a decent job of writing it, too. (With some limitations)
Metadata aside, everybody should have a copy in XnView because it does a great job of opening mysterious or damaged image files. It can handle over 500 file types. XnView is free for personal use and costs only about €30 for commercial use.
XnView is free for personal use and costs only about €30 for commercial use.
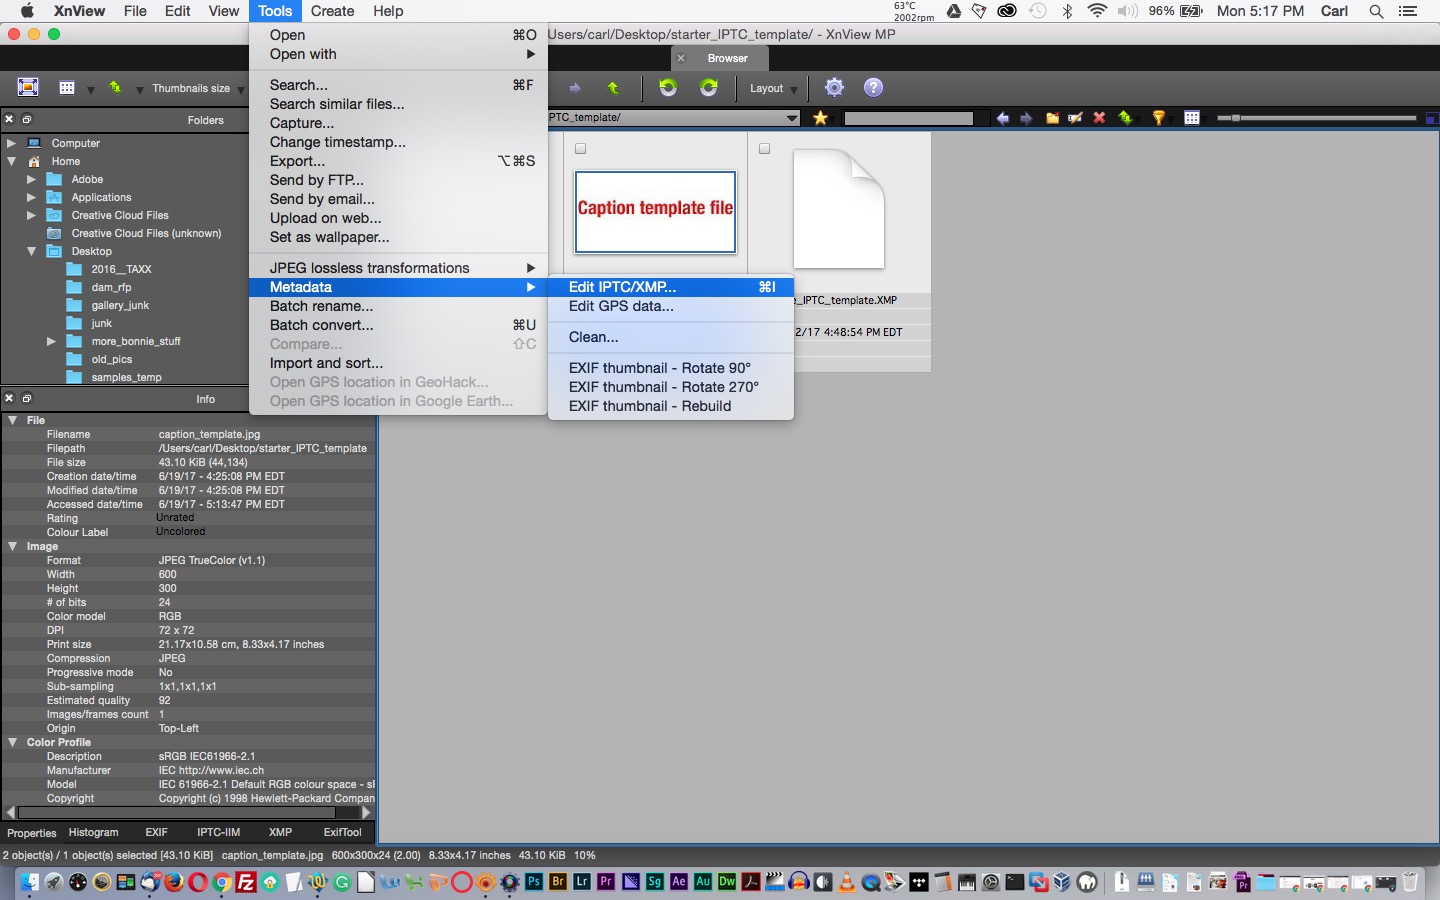
XnView cannot import and export .XMP templates. So, we’ll use a JPEG template. (And yes, if you skipped to this section, there is one in my starter kit. A download link appears close to the top of this post.)
Open the folder containing your JPEG template file in the XnView browser and select the file.
Call the IPTC editor in XnView either with CMD/CTL+I or this command from the Tools menu. (Click the image for a larger view.)
The IPTC editor will open filled with the values from your template, displayed in various tabs.
Edit your template values to suit.
Click the ‘Save template…’ button on the right side of the dialog. A ‘Choose Template’ dialog appears, with the space for a name highlighted.
Simply type a name for your template in the space provided, and click ‘OK’.
You’re done.
You can call your template with the ‘Load template’ button right under the one you used to save it.
To make a JPEG template file, in XnView, the procedure is the same as it is in Bridge. Make a JPEG, apply your template to it and that’s it.
Note that you can overwrite the name of a template in the choose template dialog. That’s a little bit dangerous, but it can also be very handy if you want to make a temporary template and change its values repeatedly. In this way, you can more or less replicate the functionality of the ‘IPTC Snapshot’ function in Photo Mechanic, or the ‘Sync’ function in Lightroom.
I mentioned that XnView can work with IPTC metadata “with some limitations”. Here’s the rub: XnView can only write core IPTC metadata.
In XnView, you can save or call a template from the Choose Template dialog. (Click the image for a larger view.)
It can’t write any of the extended IPTC fields that are stored only in the XMP data. That includes the contact fields, right fields, and Rights/Usage Information. That’s not as bad a handicap as it might seem because legacy applications can’t read the extended fields anyway.
That’s not as bad a handicap as it might seem because legacy applications can’t read the extended fields anyway.
We already plan for that and we design our metadata accordingly, not just if we are working with XnView, but always. So this isn’t a show-stopper. (As long as your contact information appears in the Copyright field, and your caption contains any information that’s really vital, you should be OK.)
XnView DOES write a copy of the core IPTC metadata in the XMP data, as expected by modern programs. And it can read the extended fields. A file written by XnView should be compatible with future programs that might not be able to read the old IPTC/IIM data, and you shouldn’t have to worry about it making files where the two instances of the IPTC data are out of sync.
Comments? Questions? Requests? Comment below.
Look for How-Tos on working with metadata in Bridge, XnView, and Photoshop right here in the coming weeks.
Adobe Lightroom is a great platform for managing and organizing your photos. It has fine metadata functionality, too!
Lightoom has powerful metadata authoring features
Adobe Lightroom is one of the most popular photo editing applications on the market. Lightroom differs from some of the other applications we’re going to talk about both in scope and function. Lightroom is a big, sprawling program. It is used to edit photos, to archive your collections, tone photos, build photo books, and as they say, much much more. Lightroom is a good metadata authoring tool, too. That’s good news!
If you don’t already use Lightroom, you probably don’t want to use it as your metadata authoring program. There are simpler ways. If you are a Lightroom user, read on. We’re going to assume here that you already know who to use Lightroom. In this post, we’ll only concentrate on Lightroom’s metadata functionality.
Lightroom is different
Lightroom is database driven. In Lightroom, your original photos always remain untouched. Well, the image part does anyway. When you edit a photo in Lightroom, everything you do to the photo, or maybe I should say “intend to do” is written to Lightroom’s database (as, yes, metadata), and when you export a photo, all the stuff that you “did” actually is done to a new file just before it’s written to disk by the export process.
The only actual change Lightroom makes to your photo files is writing metadata to the files. And it really only does that when we tell it to. Don’t worry, Lightroom writes metadata to files losslessly, just like Photo Mechanic does. Here, we’re talking about both our kind of metadata – captions and copyright information and the like, and Lightroom’s kind of metadata – the recorded information about changes you make to your pictures, like toning, color and whatever. Working in Lightroom is conceptually very different from working with Photoshop and PhotoMechanic, or Bridge, or XnView. In those programs, we work directly on our files.
Let’s add metadata to some files in Lightroom, step by step.
Let’s get a preliminary out of the way. We’re going to need a boilerplate metadata template that we add to all our pictures.
Edit your template in the Edit Presets dialog. (Click to open a larger view.)
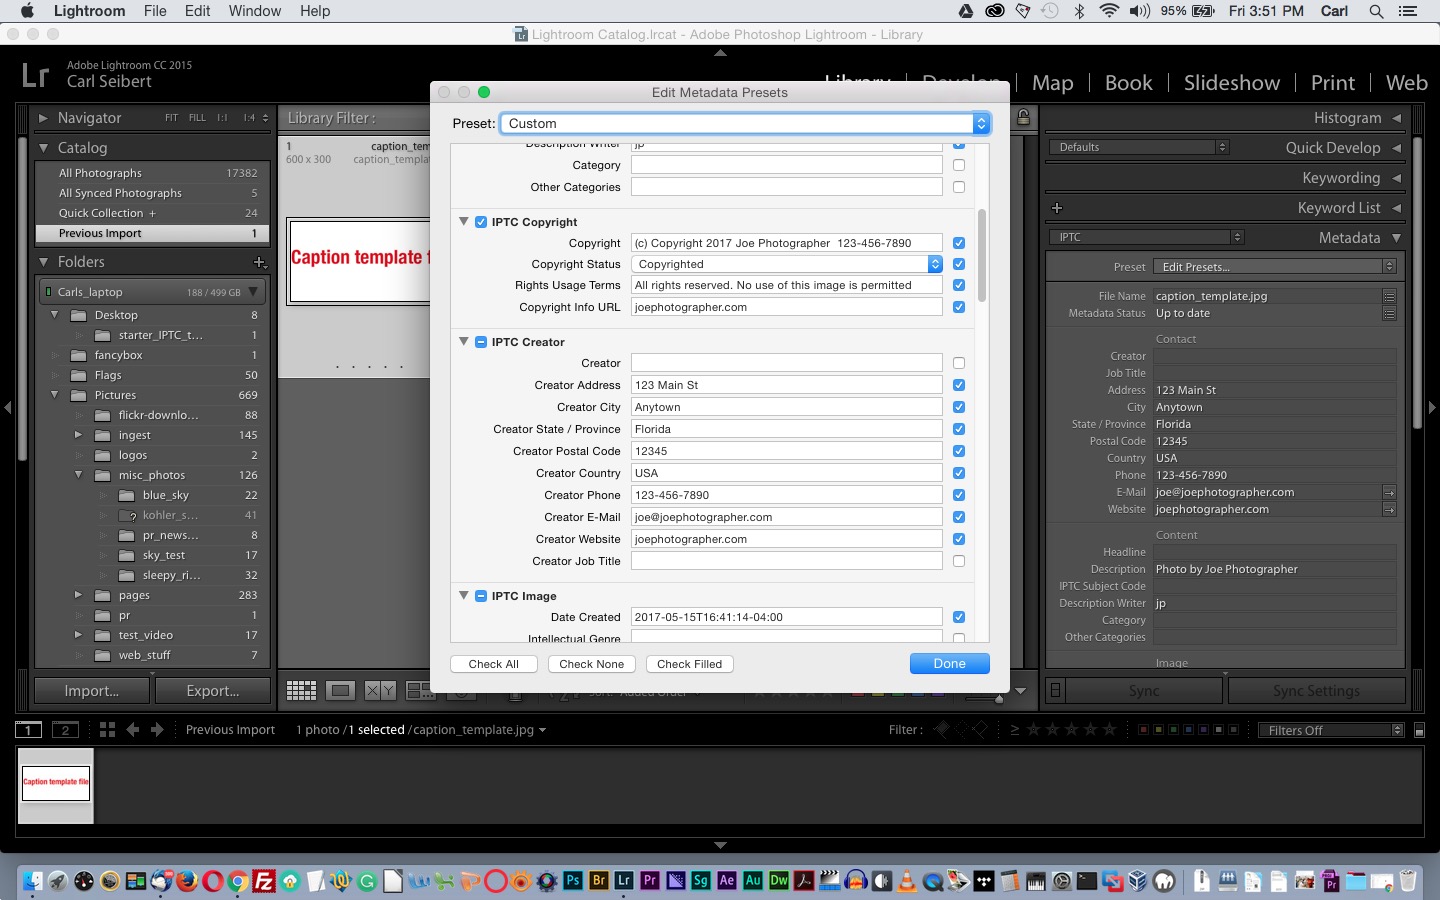
In Lightroom, in the Library module, with any photo selected, go to the right rail and expand the ‘Metadata’ section. Then, from the ‘Presets’ flyout, choose ‘Edit Presets’.
That will bring up a dialog where you can fill in all the fields you want to include in your template. If the picture you have selected already has metadata, fields in the dialog will already be filled in. If the metadata on that picture is similar to what you want your template to look like, that’s great. You’ll save some work.
One way or another, edit the template to be what you need.
You will notice that each field has a tickbox next to it. If the box is ticked, your template will
Save your new template in the Edit Presets dialog. (Click to open a larger view.)
overwrite whatever might already exist in that field on a photo with whatever is in that field on the template. If the box is unticked, that field is inactive in the template and nothing will be done to any data that might be there in the photo. If a field is blank and its box is ticked, whatever data might exist in the field on the photo will be cleared.
When importing photos into Lightroom, I can’t imagine wanting to lose any information, so you don’t want to tick boxes for empty fields. There are buttons at the bottom of the dialog that allows you to tick all the boxes, none of them, or just the ones where you have added data.
Once you have your template looking right, go to the ‘Preset’ flyout at the top of the dialog and choose ‘Save Current Settings as New Preset…’ from the bottom of the flyout. Name your preset and save it and you’re ready to go.
Now, when you import a batch of pictures into Lightroom, if you look at the right rail of the import dialog, you’ll see a panel called ‘Apply During Import’. In it, you’ll see a flyout for metadata. From that flyout, you simply
Apply a metadata template to all the photos in a batch on Import. Just choose the template from the flyout under ‘Apply During Import’. (Click to open a larger view.)
choose a preset. Click ‘Import’, and shazam! Your photos will be imported, and your template metadata will be applied in Lightroom’s database to your photos, with basically no work expended on your part.
Two important points to remember here:
1. Lightroom, at this point, has applied metadata to your pictures in its database. It hasn’t done anything to your files yet. We’ll circle back to this later.
2. The ‘Apply During Import’ setting is sticky. Next time you import photos, it will still be set to apply your template. You may NOT want to apply a template for some reason, perhaps on photos that already have metadata. So LOOK BEFORE YOU LEAP. Double check! You have been warned.
Caption your photos
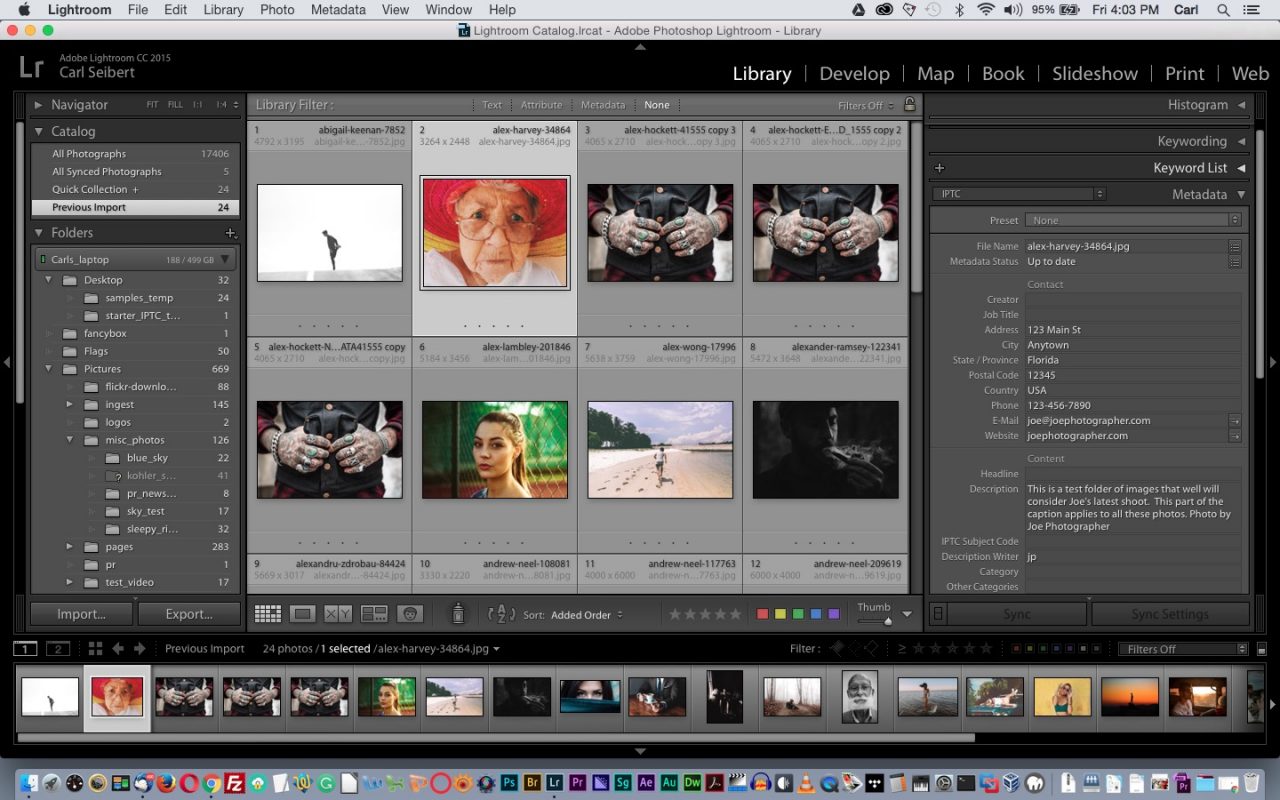
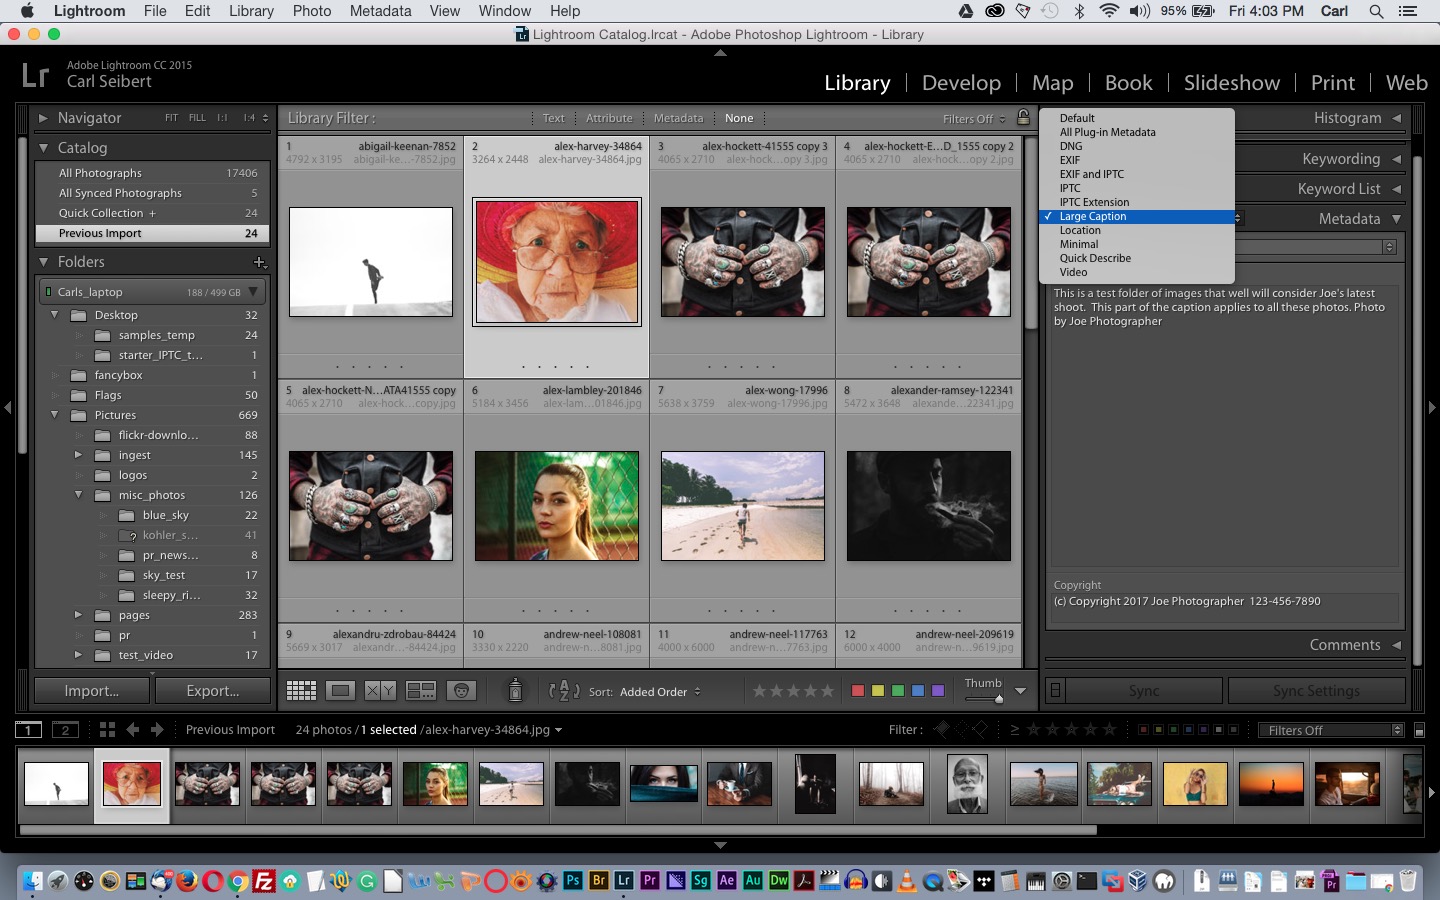
Now we want to apply metadata that applies specifically to the photos in the batch we’re working on. In Lightrooms right rail, look at the Metadata panel. At the top, there is a flyout for views. (There isn’t enough room in the panel to show all the fields, so this is necessary.) ‘IPTC’ gives a good overview of metadata on the photo.
In Lightrooms right rail, look at the Metadata panel. At the top, there is a flyout for views. (There isn’t enough room in the panel to show all the fields, so this is necessary.) ‘IPTC’ gives a good overview of metadata on the photo and is my personal default.
Choose ‘Large Caption’ from the View flyout to have enough space to comfortably write your caption. (Click to open a larger view.)
Change the view to ‘Large Caption’. That will give us a form field big enough to see what we’re doing in the caption. Simply select a picture and type in your caption information. There is no ‘Save’ or ‘Apply’ function. You’re typing straight into the database.
To copy the information you just entered to all the photos in your batch, you can do one of several things:
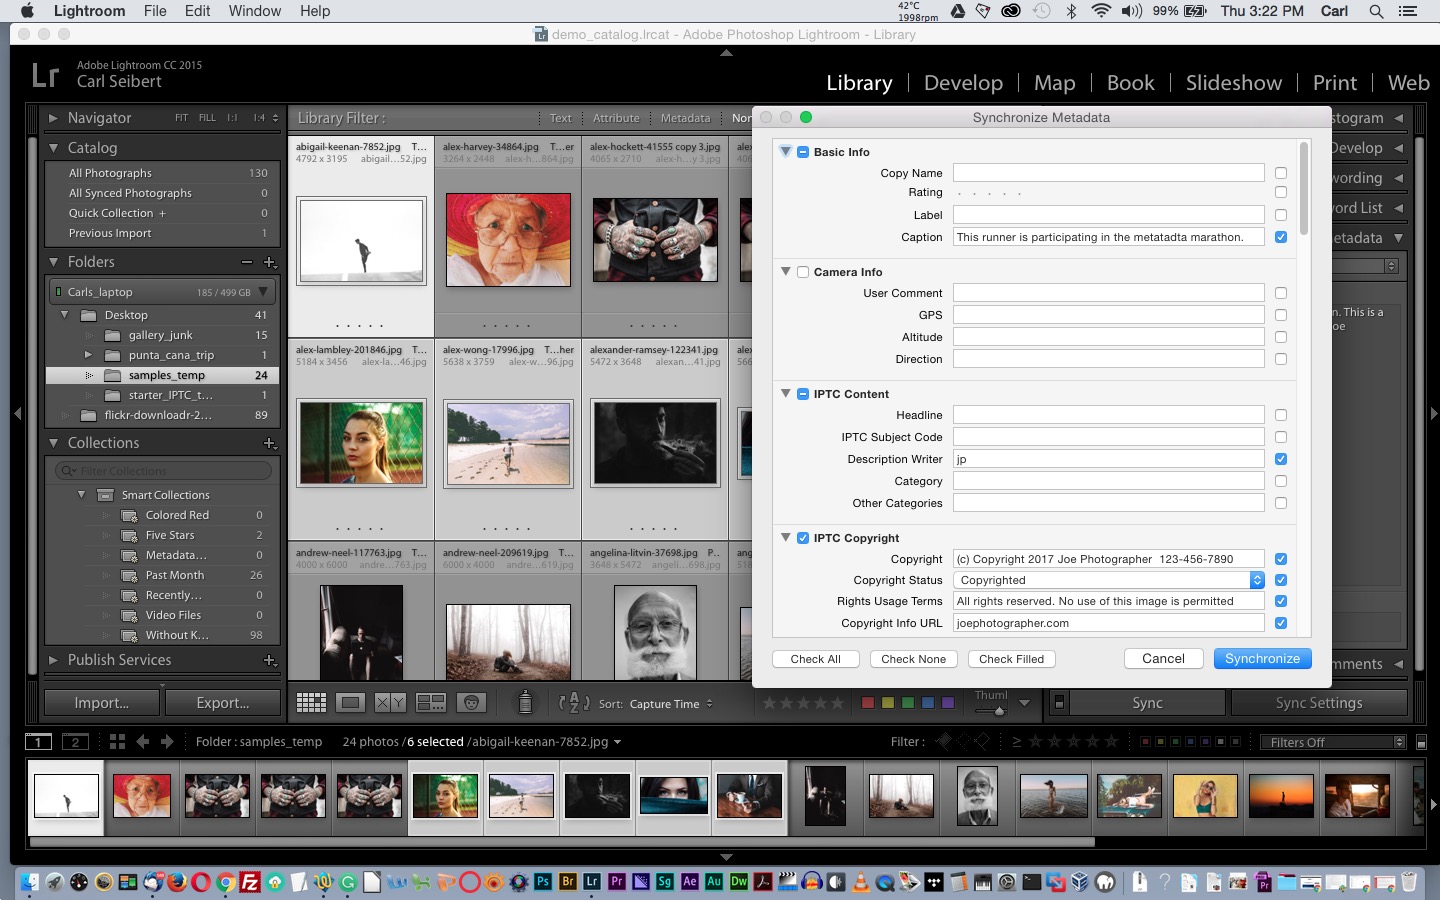
Option 1
Select the photo that has the new caption information. Go to the ‘Metadata’ pulldown in Lightroom’s main menu and choose ‘Copy Metadata’. This will bring up a dialog similar to the one we used when we made our template. Make sure that the Caption field is the only one ticked. Bear in mind here that we can’t append or prepend information to fields in Adobe Lightroom. Whatever is in the caption field in the dialog will overwrite whatever is in the field on the target photos. Make sure that the whole caption and your byline is still there. When everything looks right, click ‘Copy’.
You can copy and paste metadata using the commands under the ‘Metadata’ pulldown in the main menu. (Click to open a larger view.)
Now select all the photos to which you want to add the new information. Go back to the ‘Metadata’ pulldown on the main menu and choose ‘Paste Metadata’. You’ll see a progress bar and your new caption will be applied.
Option 2
Select the photo that has the information you want to copy. Now, using Command/Control-Click, or Shift-Click, add the photos to which you want to add the information to the selection. You’ll notice that the source (Or ‘Active’ in Lightroom-speak) photo will be highlighted a bit more brightly than the target photos.
Click the ‘Sync’ button at the bottom of the right rail.
Using the Sync function to copy metadata. Notice that the source image is highlighted a little brighter than the target images. (Click to open a larger view.)
The same dialog from above will appear. Make sure that only the Caption tickbox is ticked and that the information looks right. Click ‘Synchronize’. You’ll see a progress bar and your new information will be applied to your pictures.
Option 3.
You can use the Paint Tool (spray can) to spray metadata. The Paint Tool can only spray templates, so you’ll have to make a new preset (template) to squirt onto pictures.
With the Paint Tool selected, choose ‘Metadata’ from the flyout that appears to the tool’s right, and to the right of that, choose the template you want to spray. This technique is good if you have different sets of data you want to apply to arbitrary pictures in your batch.
Now go back through your photos and edit the captions to add information specific to individual photos.
You can use the Copy-Paste or Sync functions to copy captions between photos that can use the same caption information.
Embed the new metadata in your photos
At this point, we have added IPTC metadata to our photos in the Lightroom database. We haven’t written any new data to the files on disk. Should a photo be copied or moved to another folder, or if anything happens to the Lightroom database, we’ll lose our metadata. not just our metadata that we just entered, but any information that Lightroom has stored about color changes or other edits you have made. That would be bad.
There are three ways to handle this new challenge:
Set a global preference, per catalog
One way is to set a global preference in Lightroom’s Catalog Settings that tells Lightroom to automatically write any metadata changes to the files, as you go along. This is great if you have a fast computer. (I don’t.) Every time you do anything to a picture, Lightroom will write new metadata to its file in the background. (We’re talking about both so-called ‘develop’ data and metadata we add to pictures here.) There’s a performance penalty to be paid if we do that.
If you want to go this way, go to Lightroom’s Catalog Settings dialog (In the same pulldown with Preferences), choose the Metadata tab and tick the tickbox at ‘Automatically Write Changes to XMP’.
One further note about this method: The Catalog Settings preference is global for that oneparticular catalog. If you go this way, you’ll need to check the settings for each catalog you use.
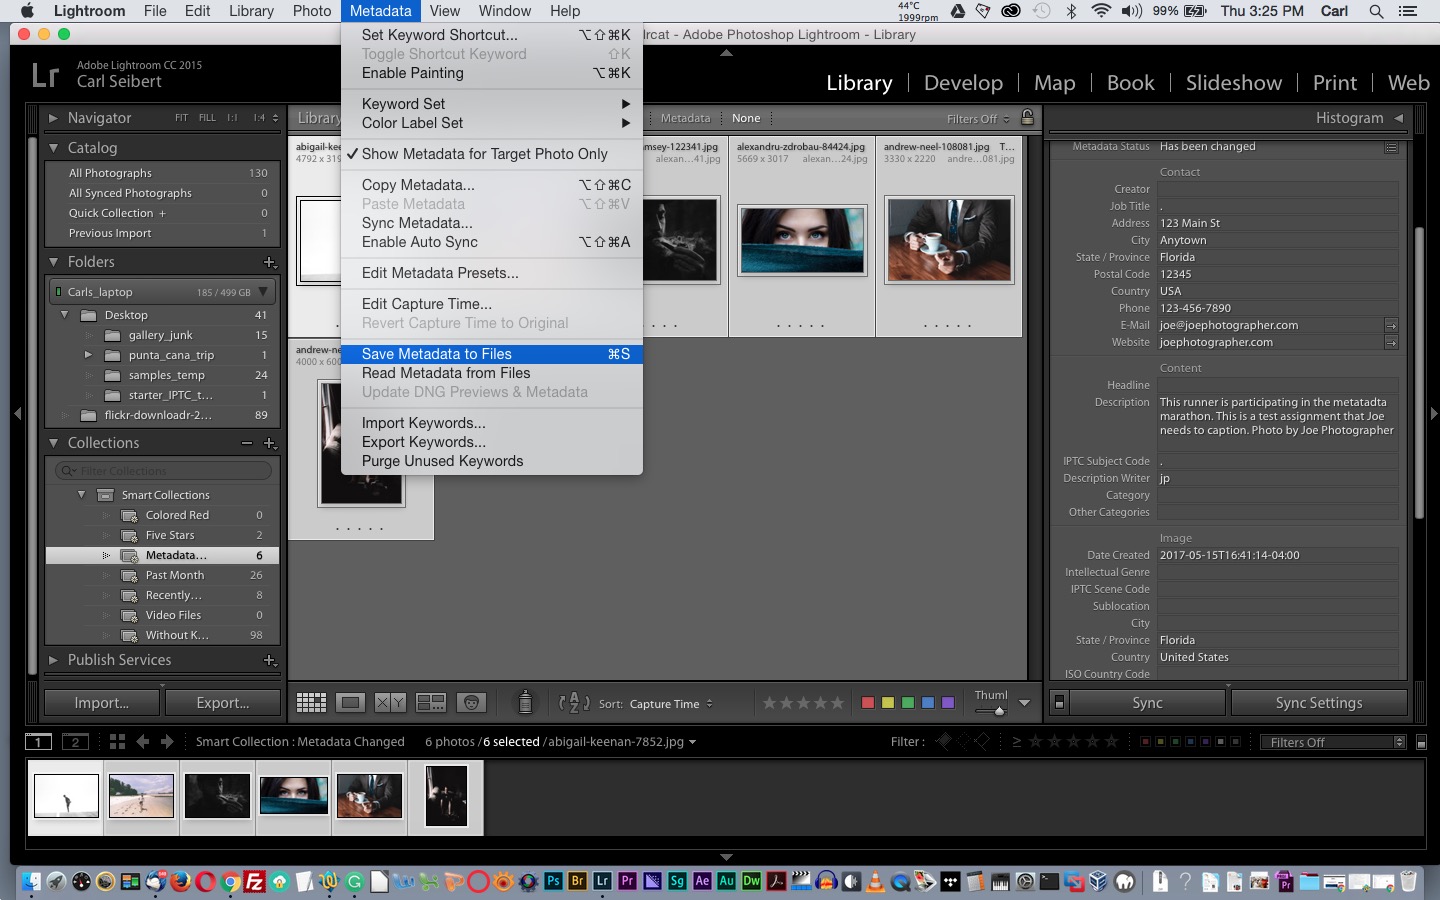
Update files manually
Another way to deal with writing our metadata to the files is to wait and update manually. To do this, all we have to do is select the files we want to write to, go to the ‘Metadata’ pulldown in the main menu, and choose ‘Save Metadata to File’.
‘Save Metadata to Files’ from the Metadata pulldown in the main menu will update the embedded metadata on your pictures. (Click to open a larger view.)
This way is great in that we control when we have our machine at full speed and when we bog it down with metadata writing. But the drawback is that we can lose track of which files need to be written. Then, in an abundance of caution, we simply select all the files in our batch and update. That’s totally fine, except that of we have hundreds of files, it’s going to take a while.
Make updating easier with a Smart Collection
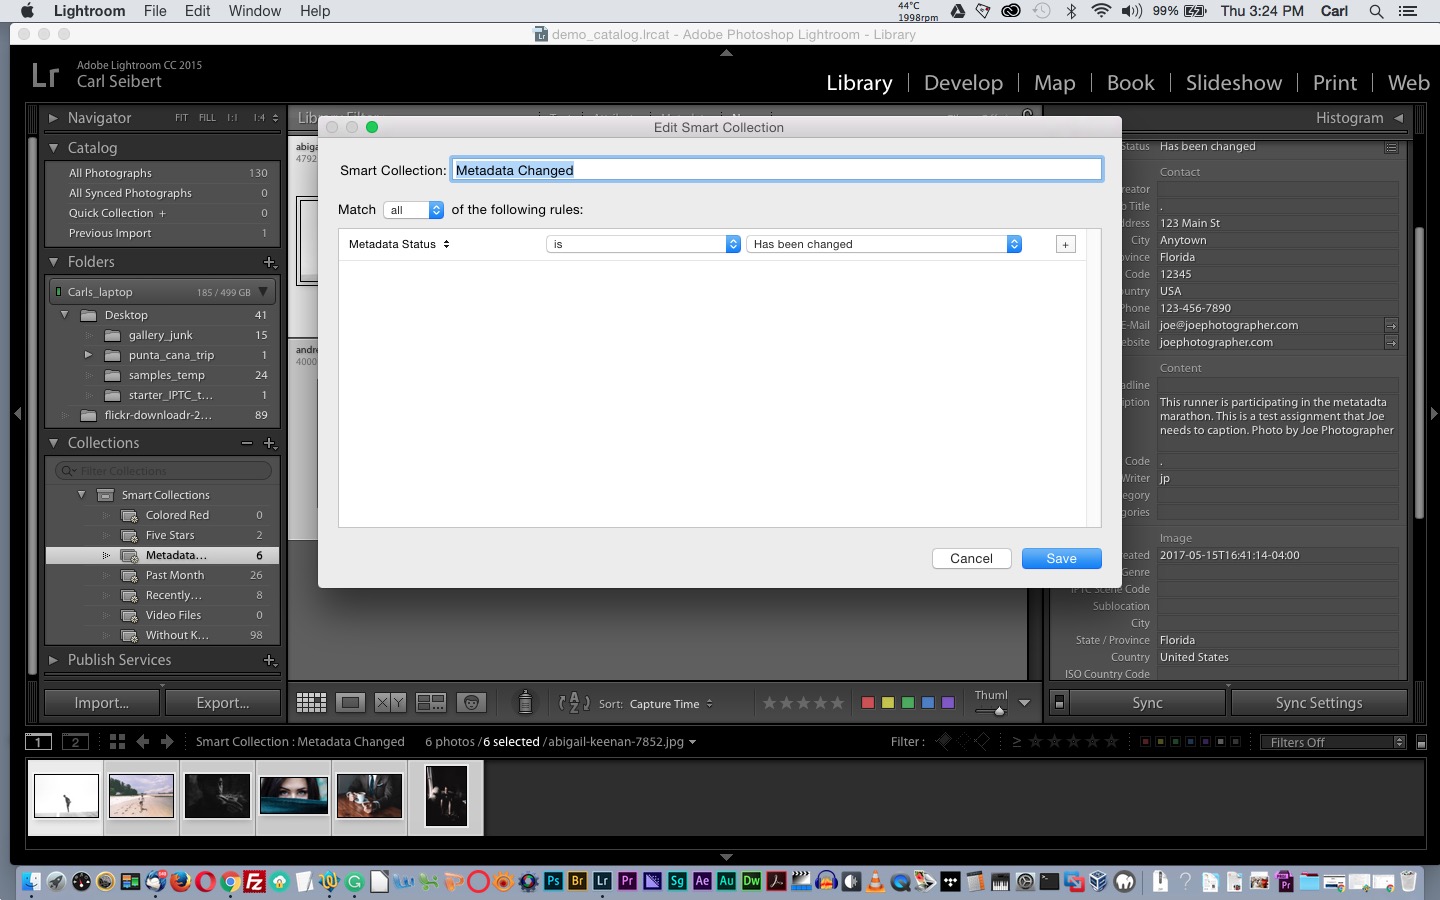
There’s a third path. We can use Lightroom’s Smart Collections feature to show us exactly which files need to be updated and just update those.
Smart Collections are found in Lightroom’s left rail (by default; you can move this stuff around).
Click on the ‘+’ at the top of the Collections panel and choose ‘Create Smart Collection…’. Lightroom opens a dialog to edit the Smart Collection.
This Smart Collection rule will create a Smart Collection that will collect all your files that need metadata written to disk. (Click to open a larger view.)
Leave ‘Match’ at ‘All’.
From the leftmost flyout (by default, it will show ‘Rating’) choose ‘Other Metadata> Metadata Status’.
The middle flyout will automatically change to ‘is’.
From the rightmost flyout, choose ‘Has been changed’.
That’s it. Name your new Smart Collection and save it.
Now, whenever you have images that need to have their metadata updated on disk, those images (virtual links to them, actually) will appear as if by magic in your Smart Collection. Select them all, choose ‘Save Metadata to File’ from the Metadata pulldown in the main menu, and watch pictures disappear from the Smart Collection as they are updated and no longer fit the criteria for inclusion in the Smart Collection. I’ve got to say, this is pretty slick!
Export photos from Lightroom
In order to actually use a photo from Adobe Lightroom, we have to export it. Remember that Lightroom doesn’t make any changes as we go along; it just makes a list of things we want to do with the image. When we export, it actually does all those things.
To export photos, select them and click the ‘Export’ button at the bottom of Lightroom’s left rail.
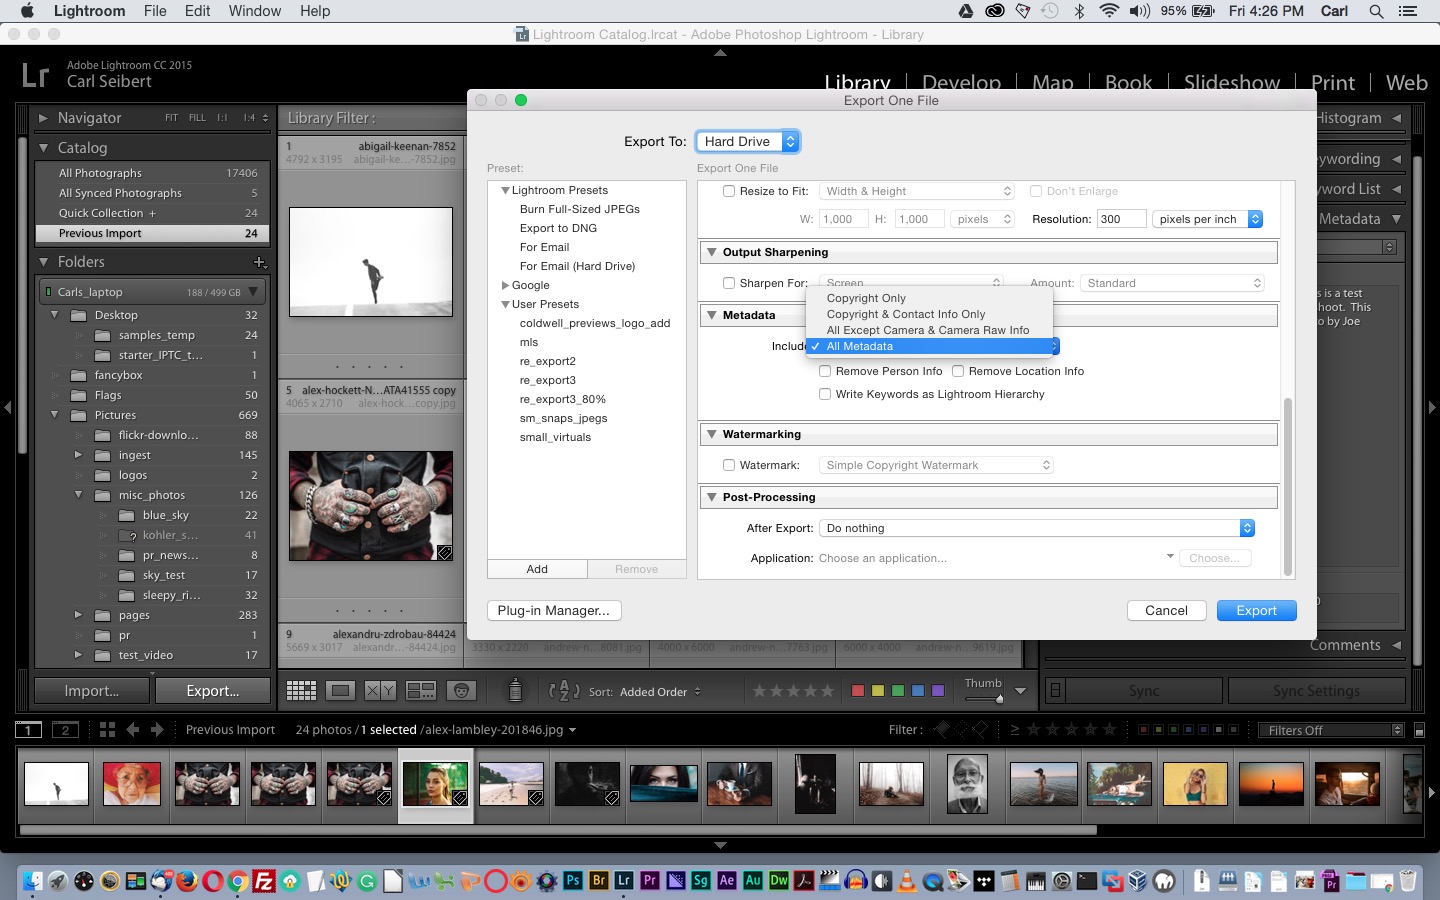
Now you will see the export dialog. In this dialog, we choose parameters for Lightroom to use when it writes our exported files to disk. Here, we can choose things like the pixel dimensions of our new files, their compression, file names and formats and more, including how we want Lightroom to handle metadata.
There are options to control what metadata is including on exported images, in the Export dialog. (Click to open a larger view.)
There’s a section in the Export dialog for metadata.
In it, you’ll find a flyout that allows you to choose what metadata will be included on export. You can choose ‘All Metadata’ or various subsets, down to only copyright data. (Why on earth anybody would want to blank out copyright data is beyond me. If you really need to, that can be done in Lightroom, but not here.)
Choose an option from the flyout.
Below the flyout, you’ll see tick boxes for ‘Remove Person Info’ and ‘Remove Location Info’.
‘Person Info’ refers to specialized keywords that Lightroom will put into the Keywords field if you use Lightroom’s facial recognition feature. If you don’t use facial recognition, this is meaningless. If you do, you get to choose whether or not those keywords are left on your pictures.
‘Location Info’ is all information in any location field in your metadata and GPS coordinates. That includes any information you entered in fields like City and State, and any information that Lightroom automatically entered in those fields. (If you turn on the feature, Lightroom can resolve GPS coordinates to physical addresses, right down to the house number.) If you want to zap that info from your exported photos, this is where you do it.
When you are satisfied with your export settings, click ‘Export’ and sit back while your output files are made for you.
What if you want to export a version of a photo with different metadata?
Here’s a pro tip: Lightroom has the ability to make ‘virtual copies’ of photos. (Right-click on a photo and choose ‘Create Virtual Copy’.) There’s no physical copy of the photo made on disk; Lightroom just makes another set of metadata in the database to describe an alternate edit of the picture.
This function is normally used for black and white versions of a photo, or versions targeted for a specific printer, or the like. Virtual copies inherit the IPTC metadata of their parents, but you can then edit it so that the virtual copy has its own IPTC info. This is tremendously useful in cases where you want to export a version of a picture with custom metadata. Let’s say you want to send a version to a client with custom Rights/Usage information for just that client. This is where you do that. If you do, for some reason, need to output a picture with no copyright information, this is the place where you would do that, too.
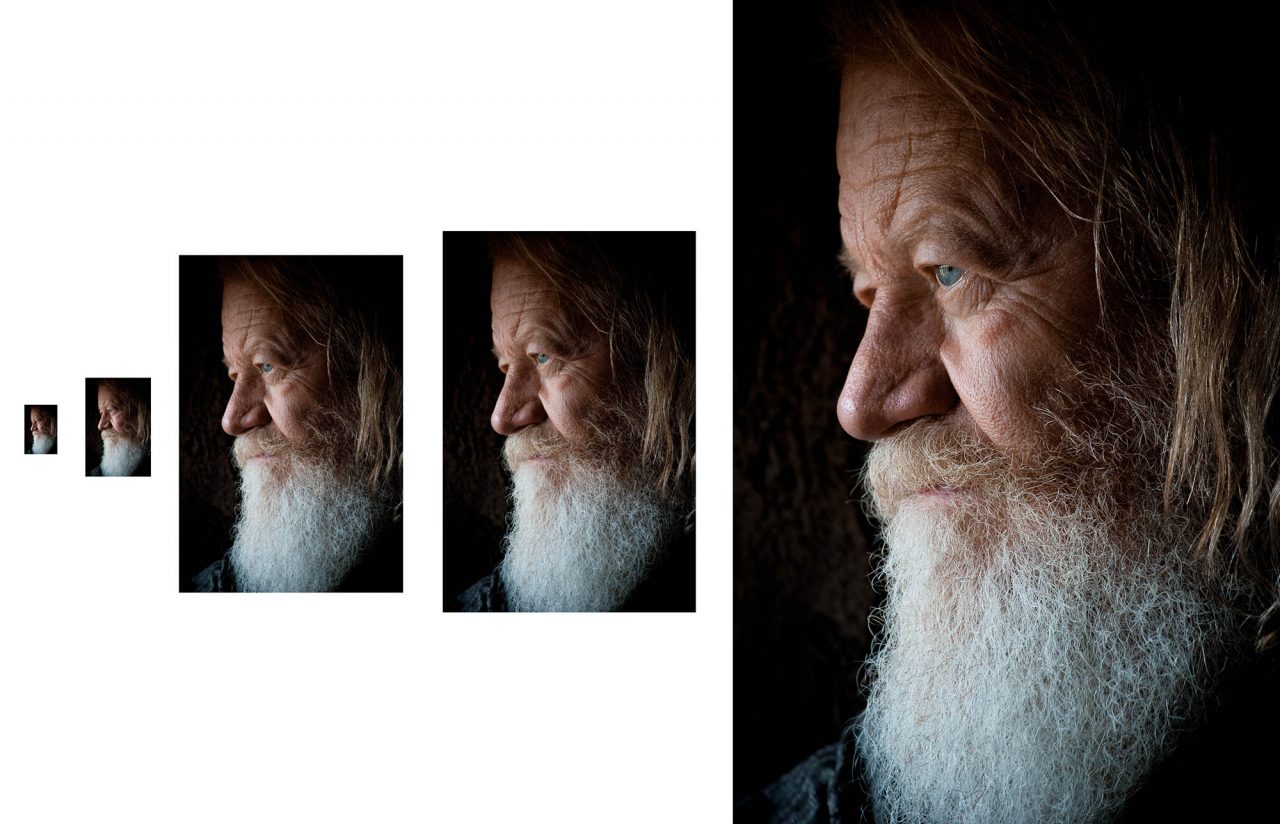
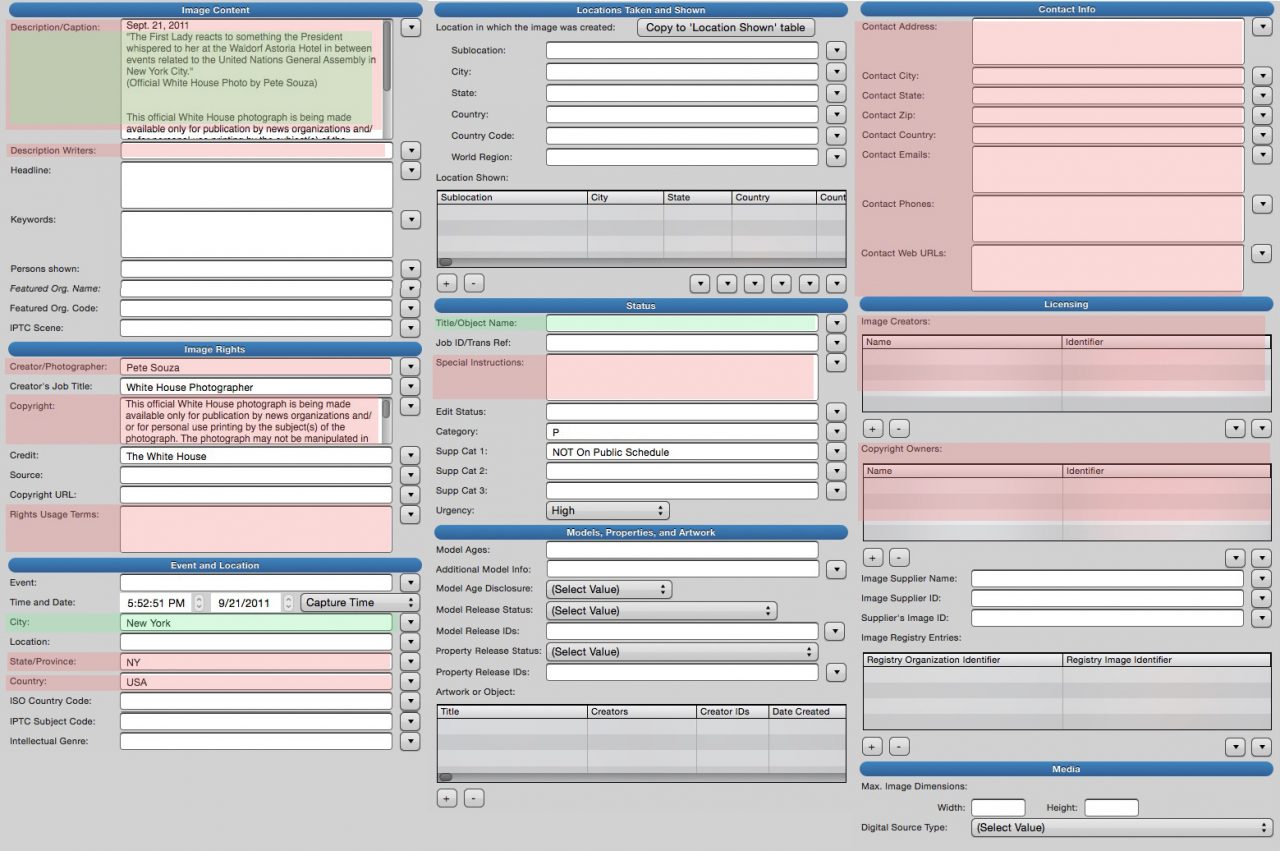
Which IPTC fields are we really concerned about? And what do the fields mean? If you peruse the photo at the top of this page, you’ll see that some of the field labels are pretty opaque. We’ll see which ones we will need to fuss with picture-by-picture, which ones we fill in our template just once, and which we can safely ignore.
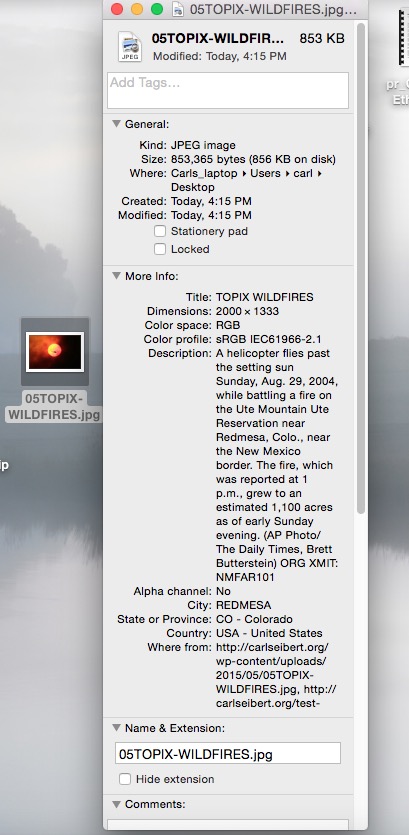
IPTC metadata is shown displayed in Photo Mechanic. It’s easy to see metadata. Many image editing programs can work with it. Your operating system itself displays captions in its file manager.
Webmasters — metadata is your friend. Respect it.
We should be able to look at a photo, or another digital asset, and see for sure who owns the copyright, how to credit the photographer, and what the heck is going on in the picture. It’s one thing that the client signed a contract that promises they’ll give you only material that’s properly licensed. Knowing for sure would be another, better, thing.
If you buy a jar of queso dip, it’s got labels, right? You can see what you can use it for, how to contact the manufacturer, and that “best by date”. It seems reasonable that in this day and age digital assets should have labels, too, right?
Turns out they do have. Make that “can have”, If the creator of the asset chooses to write the information in his or her his file’s metadata. And if we look. Sadly, few people even know that we can look at that information. That makes creators less likely to put it there. Which makes it less likely that anybody looks, which……….. It’s one of those vicious circle thingies.
“What we have here is a failure to communicate” – (The Captain, From Cool Hand Luke)
Good news: it’s not hard to see metadata. Your operating system (Windows, Mac, and Linux) displays captions in its file manager. Image editing software, from fancy and expensive to simple and free, can edit IPTC metadata. Command line utilities can manipulate it on the server.
But there’s bad news. Let’s say if a conscientious photographer does write his or her copyright and contact information and a good caption on a photo, will everything be OK? Ah, maybe. The chances are good that the first website that gets its hands on the poor photo will strip all that information off.
Back in the day, stripping off an image’s metadata actually made sense. That was when the rule of thumb was that landing pages had to be less than 40 kilobytes, back before they were even called landing pages.
That was then. Now it’s different. The internet is flooded with works that have come asunder from their copyright notices and captions. They would be useful if we knew what they are, but we don’t, so they aren’t. There’s a feeding frenzy of copyright infringement and plagiarism and ethical people are concerned, very concerned.
It would be great if critical information was embedded in every photo that was sent out into the internet world; if that information stayed with that asset forever, and we knew just what we were dealing with every time we picked up a photo. Let’s make that (start to) happen.
Ensure that documentation is not destroyed, so it can travel with the work wherever it goes.
As soon as we publish them, digital photos begin traveling the web at the speed of a right mouse button.
As web developers, designers, and site owners our part is to make sure that neither we, nor our CMSes, ever unnecessarily strip metadata off works.
But wait! “Unnecessarily” suggests that there’s nuance, and nuance suggests that there is annoying underlying technical complication (and acronyms). Of course, there is! This being a full-disclosure kind of blog, we’ll unravel that. Well, some of it. I’ll spare you the low-level stuff. We’ll discuss that in depth later.
Back in the day, there were two reasons for stripping metadata: load time and privacy concerns.
Back then, 8KB one way or the other materially affected load time. Today, that’s like five one-thousands of a second for a user with seriously mediocre internet service. Not a big worry.
I said eight kilobytes because That’s about how much metadata we really need on a photo. That’s the stuff that could be useful for saving the world. There is, however, more.
Really important metadata and less important metadata
Basically, there are a couple of flavors of metadata written into photos.
There’s IPTC metadata. That’s the world saving stuff – caption, creator, and copyright information. IPTC metadata appears in a file twice (usually), once in its old-timey
…the takeaway here is that we should avoid tampering with IPTC data, but we may want to delete Exif data…
proprietary format and once in the new-fangled XML-based XMP format. But it’s tiny.
(There’s also the possibility of other, non-IPTC, data written in XMP format. It’s not very big, either. We’ll just skip that, since in the context of publishing a picture on the web I can’t think of a reason why we would care one way or the other.)
Then there’s Exif metadata. Exif data is written by the camera when a digital picture is made. It’s mostly boring logging data. It records the camera model, serial number and the settings used to make the photo. EXIF also can include GPS data showing where the photo was made. That could identify the user. We’ll come back to that in a bit.
JPEG files can also have an embedded JPEG thumbnail. We’ll leave musing about what the heck for to another day. Said thumbnail, if present, can take up twenty or thirty-ish kilobytes.
The good news here is that the useless and potentially enormous thumbnail resides in
…it appears to be pretty seriously illegal to remove or alter “copyright management information”.
the EXIF metadata. The rest of the Exif metadata is of little interest to the greater good. There may be an argument for keeping it – travel pictures might be better off if not sundered from their GPS data, photography or sports sites might need the logging information – but on the whole, EXIF data is pretty expendable. We can decide to zap all or part of it without much remorse.
In a future post, I’ll talk about exactly how, and software we can use.
Consider before you strip
Exif or otherwise, in our strip-or-don’t-strip deliberations we should pause to consider some more stuff: legality and privacy.
Here’s where I say that I’m not a lawyer. I don’t play a lawyer on TV, not even YouTube. When in doubt, talk to your own lawyer! You know the drill.
Under the Digital Millenium Copyright Act, it appears to be pretty seriously illegal to remove or alter “copyright management information”. Statutory damages are set at between $2,500 and $25,000 per occurrence.
No person shall, without the authority of the copyright owner or the law—
(1) intentionally remove or alter any copyright management information,
(2) distribute or import for distribution copyright management information knowing that the copyright management information has been removed or altered without authority of the copyright owner or the law, or
(3) distribute, import for distribution, or publicly perform works, copies of works, or phonorecords, knowing that copyright management information has been removed or altered without authority of the copyright owner or the law, knowing, or, with respect to civil remedies under section 1203, having reasonable grounds to know, that it will induce, enable, facilitate, or conceal an infringement of any right under this title.
(c) Definition.—As used in this section, the term “copyright management information” means any of the following information conveyed in connection with copies or phonorecords of a work or performances or displays of a work, including in digital form, except that such term does not include any personally identifying information about a user of a work or of a copy, phonorecord, performance, or display of a work:
(1) The title and other information identifying the work, including the information set forth on a notice of copyright.
(2) The name of, and other identifying information about, the author of a work.
(3) The name of, and other identifying information about, the copyright owner of the work, including the information set forth in a notice of copyright.
…[skipping a couple items that don’t apply to pictures]…
(6) Terms and conditions for use of the work.
(7) Identifying numbers or symbols referring to such information or links to such information.
That’s pretty blunt stuff for something that politicians wrote.
The stuff they define as being “copyright management information” would be found in the IPTC fields for Caption, Title, Author, Copyright, Rights Usage Information, and various contact information and PLUS licensing fields. Possibly in Special Instructions, as well. That’s enough of the IPTC fields that we can pretty safely assume that the path of least regret here is to be very cautious about messing with any IPTC data.
You can do whatever you want with the copyright management information on works to which you own the copyright, of course. Or, if the copyright owner gives you permission, you may strip away. Some sites, like Facebook, include language in their Terms of Service that grants them permission to alter CMI on photos. But it’s worth noting that Facebook does leave the copyright notice and the creator’s byline on pictures. They strip out everything else but leave those two fields alone. That says something.
Privacy can be a consideration
Then we have privacy. Everybody nowadays has their undies in a bunch about privacy. Some concerns are legit. Some are silly. But still, we need to think about this.
In the EXIF, there’s that potentially identifying GPS information. Geotagging information can be useful. You could, say, automatically display a map with travel photos. (Or leave the possibility open for the next person who uses that picture.) On the other hand, if you’re not going to mention where a picture was made in a caption that’s visible to visitors, it might be nice to delete the GPS info. I can imagine cases where that would be justified, like maybe a picture of a fisherman at his favorite top secret fishing spot, for example. How convenient it is that GPS info lives in the rather expendable EXIF and not near the DMCA-protected copyright data in the IPTC!
And what about identifying information in the IPTC metadata?
When we consider information in the IPTC data, the first point to consider is that the photographer deliberately put it there. Do you trust that he or she did their job properly? The very fact that the information is there says something positive about the photographer’s professionalism.
Identifying is exactly what the caption is there to do. Specificity builds your authority. Barring pretty unusual circumstances, you want to tell your visitors exactly who is shown in a photo, what they’re doing, and in what context.
Now, you may decide for some privacy-based reason or another not to publish
IPTC metadata is shown displayed in Mac OS Yosemite.
information that is in the metadata with a photo. Then you might want to edit that same information out of the metadata, too. You might be concerned about doxing, for instance.
It’s a case-by-case thing. But honestly, it’s not something that comes up often. In my career as a newspaper photo editor, I published dozens of photos a day. I’d kill a photo or write around somebody’s identity a handful of times a year.
What I’m saying here is always look before you leap and use good judgment for each image you publish. There’s software that makes it easy. I’ll post more on what’s out there and how to use it later.
(General purpose ethical note: If serious privacy concerns are making you even think about whether to withhold all or part of someone’s identity, the ethical path of least regret is usually not to run that picture at all. It’s serious business. One day, I’ll devote a post to this, too.)
So, the big takeaway here is that we should avoid tampering with IPTC data, but we may want to delete EXIF data (and its potentially huge thumbnail).
Systems issues. Or automation might not be your friend.
Content management systems tend to strip off metadata by default. It’s an extremely rare case when that’s a good thing. We really need to make them stop.
Sadly, many websites, including all the big news sites and social media sites, delete metadata. I know why this is. I was there when it happened. All the photos used on professional grade news sites have metadata embedded. Many of those sites create their own images. In the metadata of those images, there may be proprietary or identifying information that might not be at all suitable for publication. (And, yes, of course, there was once a grand mistake, followed by a grand legal mess of the sort that gets publishers’ attention.) That’s when everybody in that business decided to strip out metadata programmatically, rather than simply being careful with each image. The assumption then was that those sites were altering works to which they owned the copyright, so no blood no foul. But who employs full-time staff photographers anymore?
If your content management system is automatically stripping metadata, you should consider making it stop. Compare the cost of paying a developer to fix your server to the cost of paying a lawyer to make a copyright suit go away.
Then there are the CMSes that the rest of us use. WordPress, for example, is the world’s most popular CMS. Over a quarter of all the world’s websites run on WordPress. WordPress only partially honors photo metadata.
When a photo that has a caption is placed on a page or post in WordPress, the caption is automatically formatted and placed on the page with the picture. So, good on the making-it-easy-see-metadata front. (And the making life easier for people who build pages front, too!)
But when a photo is uploaded to WordPress, by default, four versions of the file are put on the server. The files are made at various sizes, to accommodate devices with screens of varying resolution. Only one of the five files has metadata on it! Ouch. Granted, the file with metadata is the biggest one, which is generally served when a user clicks on a picture for a larger view. That is the version most likely to be grabbed by someone who wants to – legitimately or otherwise – reuse the picture. But still, ouch. We have work to do.
Note: WordPress, by default, actually prefers to use the ImageMagick image processing library, which does honor metadata for all of the sizes of images. But ImageMagick is not necessarily installed on your host’s server, and if it is, you have to enable it. Like I said, work to do…
There is a workaround. But workarounds require extra work and can only be performed by people who are well informed and technically savvy. (The readers of this blog, let’s say.) That’s good news for “us”, and a tiny first baby step toward saving the world. I’ll post a how-to shortly.
Insist that your server not do anything you might regret later.
Look carefully at every picture before you publish it. Distrust the ones that don’t have good metadata. Heed what the metadata says in those that do.
Yes, we can do our bit to turn the tide to protect content creators’ rights, keep ourselves out of copyright trouble, preserve history, and save ourselves some time and legal exposure. But there’s work ahead of us. Let’s do it!
I’ll pass on how-to information in future posts. We’ll look at software, legal issues, and best practices. If you make pictures, you can take a look at my companion rant exhorting photographers to put proper metadata on their pictures. It’s already accompanied by some how-to information and a video showing just how quick and easy it is to do the (copy)right thing.
I’d love to hear from you. Please post in the comments, or click the “contact” button!