Solutions for content marketers and PR practitioners
Author: Carl Seibert
The principal of Carl Seibert Solutions and the owner of this site, Carl Seibert has become a metadata crusader. From clients who need to bring order to their assets collections, to website owners, to Creative Commons activists, the digital world needs to take advantage of better metadata. Carl has made it a mission to spread the [meta]word.
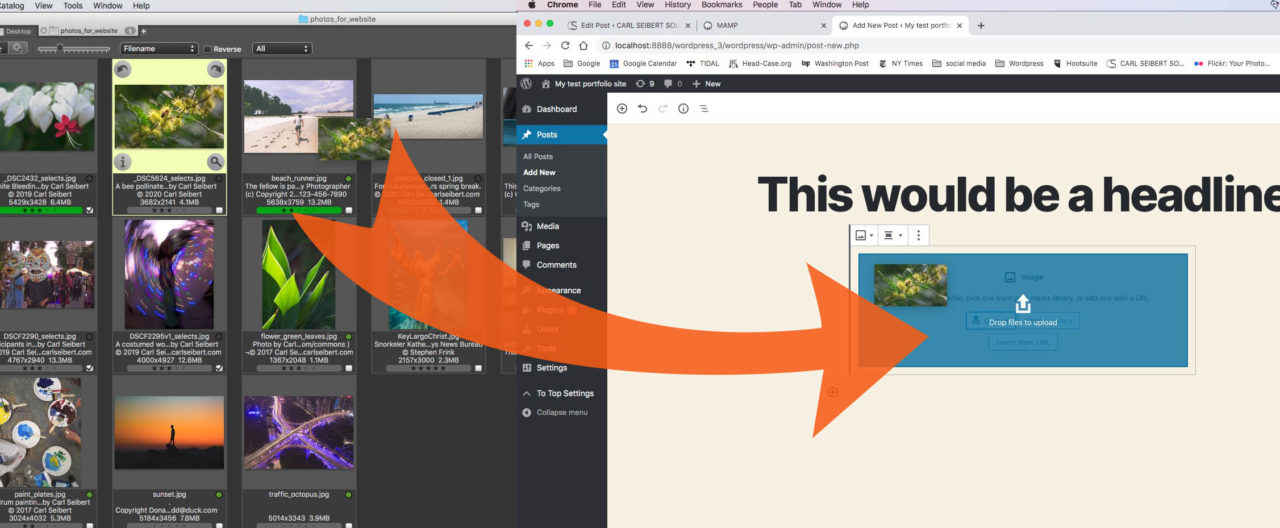
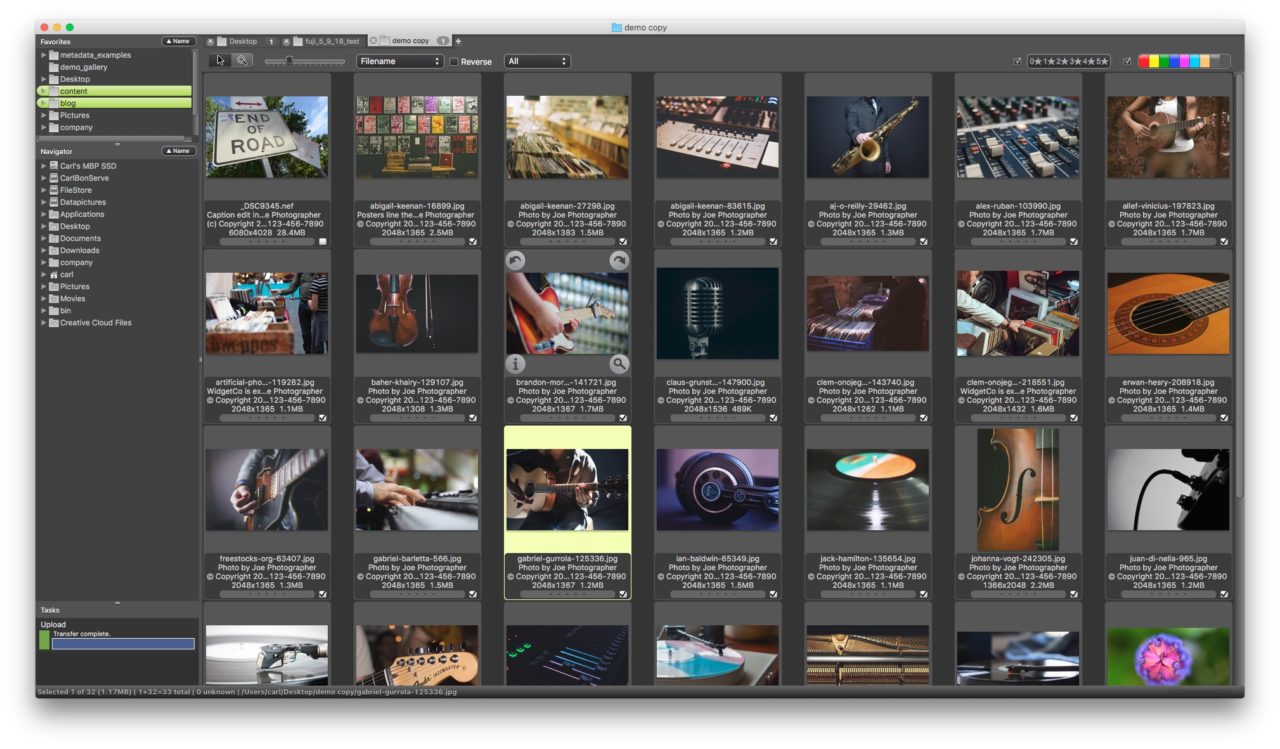
Let’s optimize some images for uploading to WordPress, step by step. In this How-to, we’ll use Photo Mechanic. Photo Mechanic is known as a hard-core tool for professional photographers. It’s not usually thought of as a program that web designers would turn to.
But, as it turns out, Photo Mechanic is a great tool for this particular job. It’s powerful, comprehensive, fast, and straightforward to use. Maybe it’s time to commend it to the attention of the web design community.
It’s what I use in real life for this kind of thing, if that means anything to you.
The ImageMagick wizard. Courtesy of ImageMagick/Creative Commons
We should use ImageMagick on our sites; here’s how
Everybody who has a WordPress website should enable ImageMagick (at least for the time being) to protect artists’ rights metadata. Why? Because we’re ethical, socially concerned folks, that’s why. How? Read on. It’s real easy.
A bit of background. WordPress uses an imaging library to (among other things) create the images that will be served by your website. We have a choice of imaging libraries. Right now, circa 2020, of the two at hand, only ImageMagick protects the important metadata that this site is all about.
This post is all about the process WordPress uses to optimize images.
This one covers stuff we can do to get our images ready for WordPress efficiently.
Virtually all good hosting providers offer ImageMagick. We could go so far as to say that doing so is part of the definition of a “good” hosting provider.
If ImageMagick is enabled on a server, WordPress, by default, will use it. Many hosting providers – and their number is growing as we speak- enable ImageMagick by default. In that case, we’re golden. We don’t have to do a thing.
Look before you leap
So, first, let’s see if ImageMagick is already working on your site.
Upload an image that you know contains IPTC metadata. The image should be big enough that your imaging library makes sized renditions of it. If you don’t have such an image handy, you can grab a purpose-made one here.
Put your sample image on a page or post. It should be small enough on the page that WordPress serves a re-sized rendition, rather than the original image that you uploaded. (The original image is just that. It’s exactly what you upload. It’s the renditions that we’re concerned about.)
Publish or preview the post or page with your test image. Previewing will do fine.
Right-click on your image and download it to your computer. When you see the save-as dialog from your browser, you’ll see the filename of the image, as served by your site.
Take a quick look to make sure the filename includes some dimensions, like this one: DSC4334_wp_test-300×200.jpg. When WordPress makes images, it adds dimensions to the filename. If you see them, that’s good. We’re dealing with a file made by the imaging library. If the filename is exactly what you uploaded, you were served your original file. Either your picture was too small or you made it too big on the page.
Now, take a look at your “round-tripped” file in any application that reads industry-standard metadata. You should see some meta-information. (If you downloaded the test file from a few paragraphs ago, you’ll see one of the metadata starter templates I give away all the time in How-To posts.)
Read metadata
Applications that will read metadata for us include any of those that I cover in this blog: Photoshop, Photo Mechanic, Lightroom Classic, XnView, ON1 Photo RAW, Adobe Bridge, and a bunch that I don’t cover, including the File Info dialog of the Mac operating system, the File Properties dialog in Windows, and a slew of photo editors and image browsers. Or you can use the IPTC’s own free online metadata viewer. A link is in the footer of every page on this website.
If you see that your site is indeed preserving metadata, congratulate yourself with a glass of fine wine, good coffee, or whatever floats your boat.
If not, you’ll need to enable ImageMagick on your server, which won’t take but a few minutes.
How to enable ImageMagick
Being the considerate people that we are, we should Google the name of our hosting provider and “ImageMagick” to see if they’ve provided an easy way to DIY this. If they have, then do what your provider’s documentation says.
If they haven’t, just ask their Customer Support team to take care of it for you. Usually, hosts provide chat with Customer Support. Or maybe you have to use an actual telephone. Most hosts have great support. They’ll take care of your request in a jiffy and you can be on to that congratulatory beverage.
You should re-do the check procedure, just to make sure all is well.
A bit more background
In order to enable ImageMagick on a WordPress server, we have to enable a PHP extension called Imagick. Imagick is all ready and waiting. It ships with PHP. The line to turn it on is already in your php.ini file. It’s commented out with a semicolon. All we need to do is delete that semicolon. One keystroke. That’s if we have access to the main php.ini. But we don’t.
Each server administrator chooses how he or she will handle this PHP extension thing. There are all kinds of ways to configure a server to allow ordinary users like you and me to do the deed. Or maybe the admin just wants their own employees to handle it. Thus, it’s a host-by-host thing and we usually let Customer Care take care of it for us.
I have a post explaining how to enable ImageMagick on a mini server on your local machine, like MAMP, here. In that case, you have total access to the server. So, that post shows the under the hood gitty-gritty, if you’re interested.
Is your site on Drupal? This post talks about enabling ImageMagick on Drupal. If anything, it’s even easier.
All of this assumes that ImageMagick itself is installed on your server. As I said, on good hosts, it almost always is.
If it isn’t, or if it’s not enabled via Imagick, WordPress falls back to an imaging library called GD.
GD what?
GD ships with PHP, so it’s always available. By necessity, GDis a more stripped-down, lightweight sort of affair. One of the things it doesn’t have is the ability to preserve metadata. Which is the whole reason for my mania about enabling ImageMagick. I’ll circle back here in a minute.
Is there an efficiency advantage to one library or the other?
Short answer: No.
If you’re a normal person, running a website that isn’t Facebook or eBay, you won’t see any real difference. ImageMagick uses a bit more server resources during the two or three seconds while your image uploads. Unless you upload a zillion images a day, like eBay, you won’t notice.
GD runs in PHP’s memory space. ImageMagick doesn’t. Depending on a bunch of factors that we, as normal website owners, don’t even have a way of knowing about, that could tilt an advantage in server speed, so small that nobody would ever notice – during those few seconds when images are uploading – one way or the other, depending on which library is in use. Not that we could even know, much less care.
Load time?
Will the imaging library make a difference in how an image is processed that will affect page load times?
Again, no.
ImageMagick’s fans claim that it provides better image quality at a given compression ratio. In theory that means that if you use ImageMagick, you could have WordPress compress your images a tiny bit more and see faster load times, or better quality at the same load times. But in all honesty, I can’t tell the difference. We’ve got more important stuff to worry about.
ImageMagick is a much bigger, fancier, more comprehensive program than GD. If we had a WordPress plugin that would allow us to take full advantage of all the cool things it can do, that might be really cool and we might be able to eke out a load time advantage. But we don’t have such a plugin. Volunteers?
GD, for its part, has a new maintainer, Wilson Chen, who is very interested in adding metadata support to the program. He has added it as a milestone in a future release. When GD gains metadata support, those of us who are so inclined can nerd out on the fine points and choose whichever imaging library we like.
But until then, social responsibility wins out and ImageMagick remains our library of choice.
Feel better about how your site treats the people who create your content – a group that may include you – by enabling ImageMagick to preserve artists’ right metadata. Just do it. Congratulate your self in the comments.
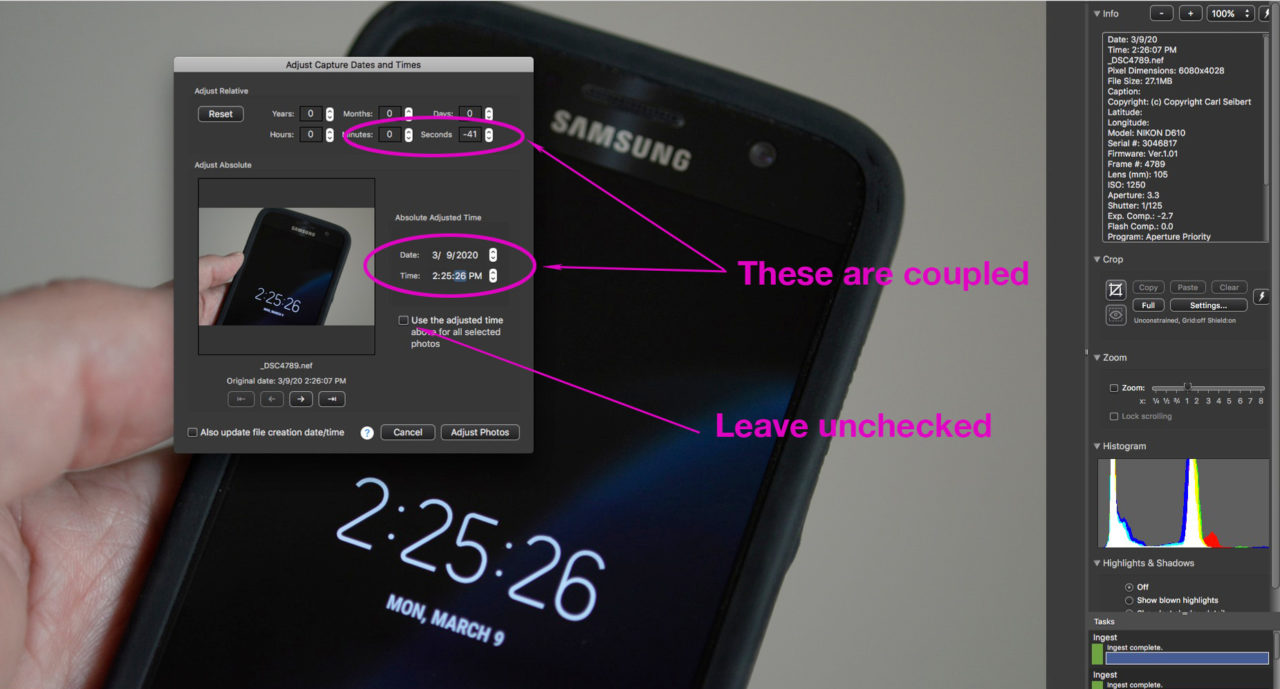
In most of the US, we have just sprung forward for Daylight Saving Time.
While we are busily setting the clocks in all our cameras, some of us might wonder if we can synchronize these things so that we can sort images by time. For real. Like frame by frame. Or play by play in a ballgame.
Well, no. The crappy clocks in cameras just don’t run well enough for that to really work. But we can use Photo Mechanic’s time manipulation feature to sync up multiple cameras after the shoot.
We may be seeing a long longed-for trend toward WordPress hosting providers enabling the ImageMagick imaging library by default. That causes their customers’ sites to respect embedded metadata on images. Preserving metadata means preserving rights information, powering rights-driven features like Google Images’ “Image Credit” and “Licensable”. Which makes life better for honest people all over the web. When hosts turn on ImageMagick for all of their customers, millions of sites at a time will switch to honoring metadata. If indeed we're seeing a trend, this is really good news.
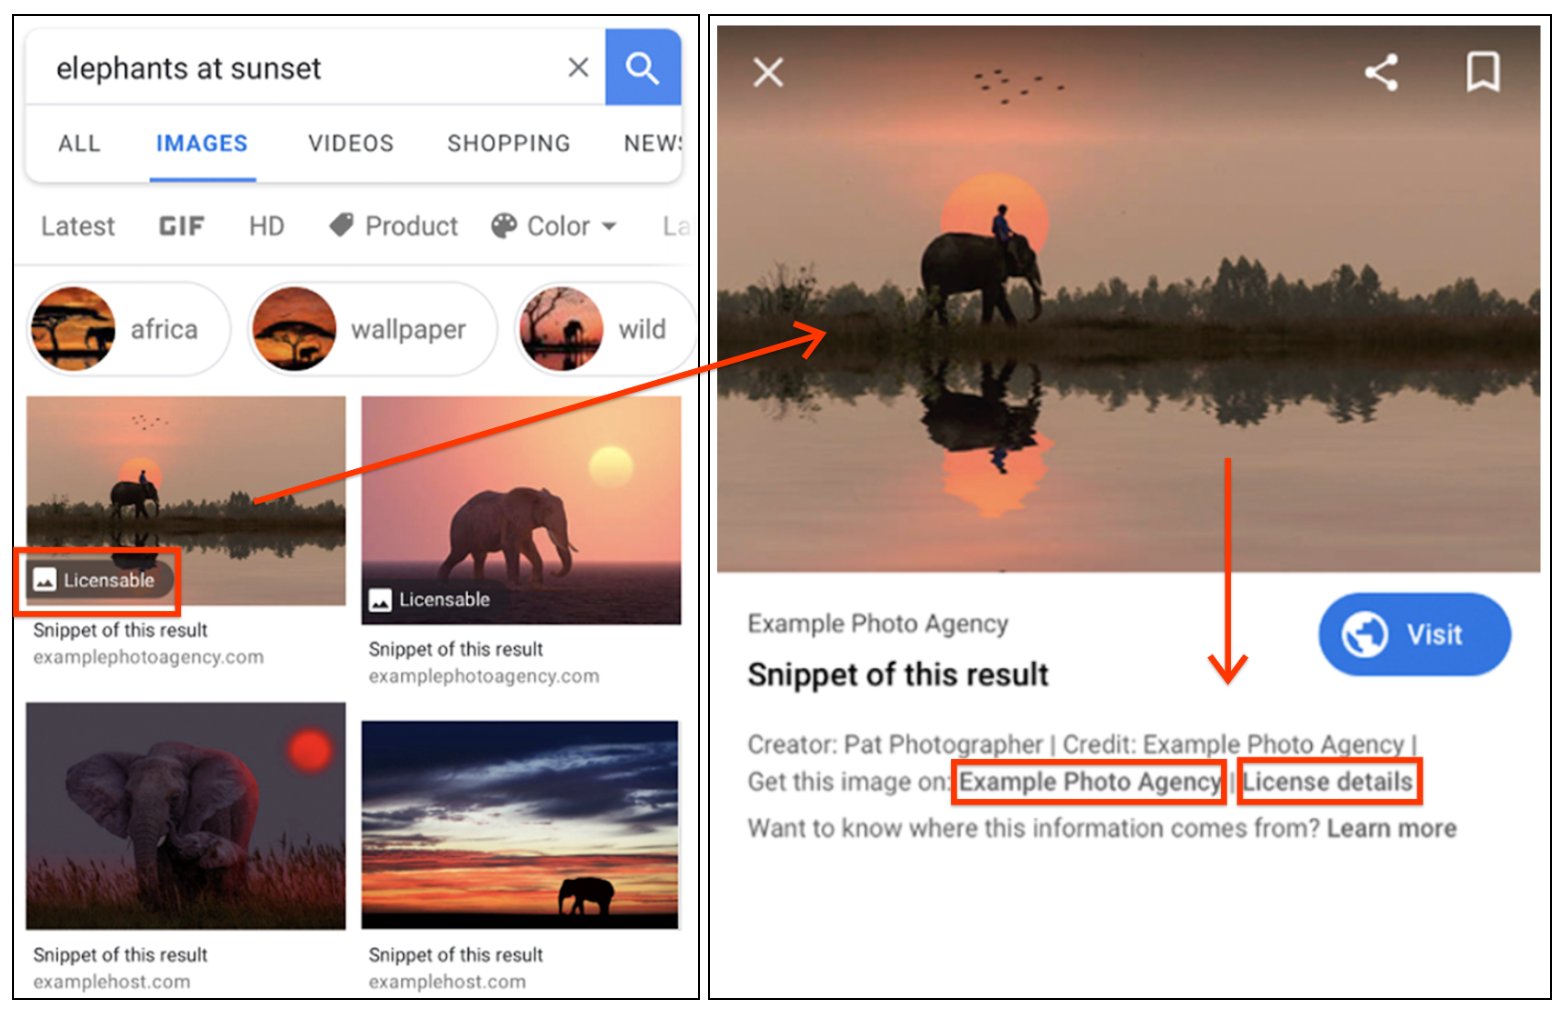
Google distributed this mockup of how “Licensable” might look when it is released. Photo courtesy of Google
IPTC fields will drive new “Licensable” feature
Google is beta testing a new feature that will help honest people obtain licenses to use pictures found on Google Images. “Licensable” will help identify images whose owners can be readily found. Cash can be exchanged and a license issued in the speed of a click. Or an email or phone call.
(Many copyright owners I have dealt with have been so blown away by somebody approaching them for a legit license that they have just given me the license. Honesty pays. I kid you not.)
How it works
Three IPTC fields new to Google Images will drive the new feature. This is in addition to the three fields that Google has supported since late 2018.
The Web Statement of Rights field, which is known in most software as “Copyright URL” will drive a “Licensable” badge on an image in Google Image search results (see illustration above) and, if the field contains a valid URL, a link for “License Details” will appear on the image’s preview. (“Valid” here means the whole URL, beginning with the protocol, like this: https://www.carlseibert.com/licenses ) This is the most important of the new-to-Google fields.
Google is now telling website operators that stripping metadata from images is not a good thing. Look at the bottom of this help page where Google tells webmasters – ever so gently – to leave copyright metadata alone! Woo! Hoo!
Google describes the URL in Copyright URL as “A URL to a page that describes the license governing an image’s use.” For most non-Creative Commons images, there is no license yet for whatever use a Google Images user might have in mind. That’s the idea – to arrange for such a license. So, Google’s description can’t be taken too literally. I’ll come back to this.
Missing from the mockup Google released is the image’s copyright notice. The contents of the Creator and Credit fields appear more prominently than before. But where’s the copyright notice? Maybe clicking on the photographer’s name brings up the copyright notice? If the contents of the Copyright field aren’t revealed, that could be a big issue. Hopefully, this will be sorted out in the beta process.
PLUS fields
Licensor and Licensor URL, relatively unknown fields in the PLUS portion of the IPTC’s Extension Schema Standard, will drive additional links for the name of an agency/licensor and “Get this photo on:”. This part of the feature is clearly aimed at photo agencies. The URL could point straight to a purchase page for that particular photo.
There’s no harm in just putting your company name and link to whatever page on your site is best for dealing with folks who want to license a photo here. Or, on the other hand, honestly, I don’t see any harm in individual photographers just skipping this field. Which is a relief, since most of us won’t immediately have access to the Licensor fields in our software anyway.
For what it’s worth, I think the way Google has laid out these links in its current beta (see the main picture above) is backwards. I think that they should start with a link for “Licensing Details” (which will be driven by the most likely populated field), followed by “Get this photo on:” which can really only help out in those cases where a license may be purchased online. We’ll see what happens as Google proceeds with the beta.
What does this mean to you and me?
Google is trying to clean up the copyright thieves bazaar that the internet and that their product, in particular, has become. It is in our interest as content creators and publishers to help out in any way we can. It’s our stuff that’s being stolen and our web pages where the stolen stuff ends up.
Moreover, it’s dead easy to be on the right side of this.
For photographers
What do we have to do?
Photographers need to make sure that they embed proper metadata in every image they send out into the world. Readers of this blog already know this.
To review, Google Images already exposes the contents of the IPTC Creator, Copyright, and Credit fields. Double-check to make sure your template fills these fields properly.
The Creator field just needs your name.
The Copyright field holds your copyright notice. There is no legally required format. Just tell everybody you own the copyright. Adding some minimal contact information, like your business phone number, really helps.
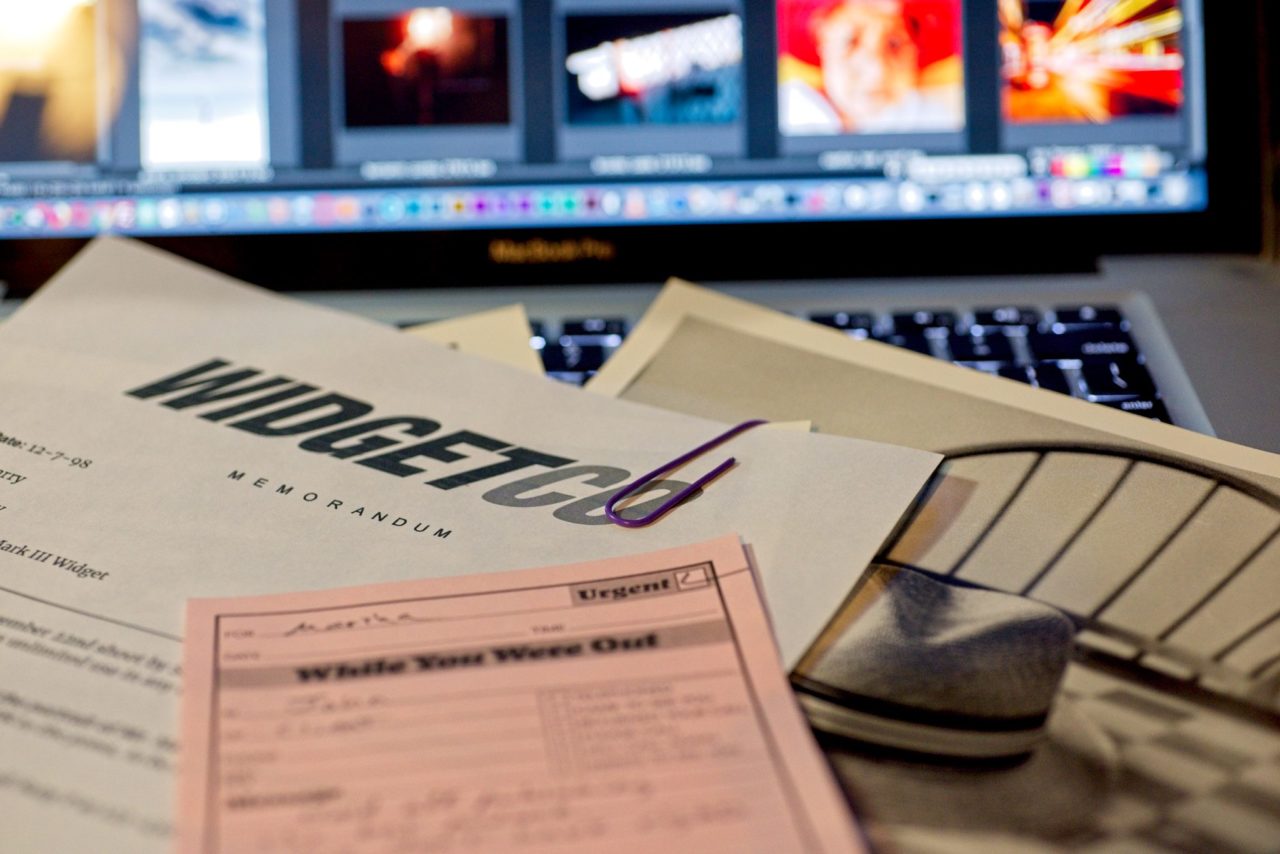
The Credit (or “Creditline”) field is trickier. Traditionally, this field holds the name of whomever the photographer is working for. For a published credit that reads “Suzie Photographer/The Widget Times”, ”The Widget Times” goes in the Credit field. Nowadays, some people are putting the entire credit string in this field. Which freaks out automated publishing systems, yielding something along the lines of “Suzie Photographer/Suzie Photographer/The Widget Times”. Sigh. Your choice. Or don’t use the field at all if you don’t need it. Neither Google nor I will judge you.
I have written about the Copyright and Credit fields before. Visit this post. The search feature on this site will return some more posts that talk about Copyright.
Add – or refine – content to the new fields
Check to make sure you have a valid URL, complete with the leading https// or http//, in the Copyright URL field of your template.
Copyright URL/Web Statement of Rights needs valid content for you to benefit from the new Google goodness. Make sure the value in your template is complete, including that beginning “https//” or “http//”.
But where should the URL point? Mine used to just point to the front page of my site. I figured that anybody who wants to reach me will be able to click “Contact” and all will be good. But I didn’t have “https//” in the URL, so by Google’s lights, it would have been for naught.
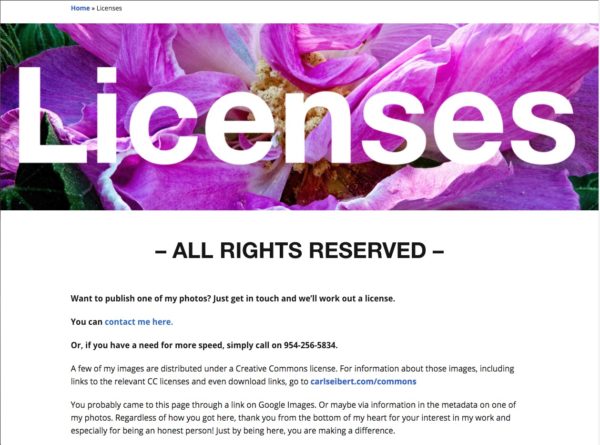
What I recommend here is for you to make a simple landing page for people who might want a license. “Hey, thanks for your interest in my work. Talk to me and we’ll hook you up.” is all you basically need to say.
I made this very simple license details landing page for my website.
I made such a page for this site in a matter of a few minutes. It doesn’t appear anywhere on the site’s navigation menus. The only visitors who will see it will be coming from a link in my metadata, so it doesn’t have to be fancy at all.
If you have a page on a photographer’s portfolio site like Photo Shelter or Zenfolio or SmugMug, from which users can buy licenses, you could link there. Or you could make a landing page on any of those sites, too.
Or… I imagine that just linking to your home page or contact page would still be OK.
What about Licensor and Licensor URL?
If you’ve got ‘em, smoke em. It’s basically no work on your part to fill them in on your template and then you’re good to go. If you don’t have access to those fields in your metadata editing software of choice, I wouldn’t sweat it. By properly filling Copyright URL, you’ve got the “Licensable” tag and 90% of the benefit of the feature. Anybody who wants to buy a photo from you has the information they need to do so.
Of course, remember to add a good caption! Google doesn’t read embedded captions (yet). But identifying what’s depicted in am image is the main point of metadata.
Once a lot of images are tagged, the Google Images environment will be a better place – a little more honest-people-friendly and a little less thief-friendly.
Editing software support for these fields
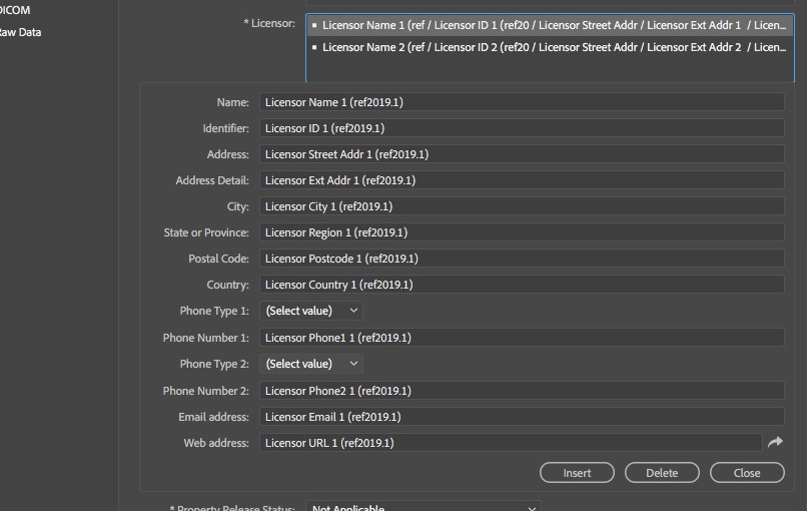
The Licensor subfields appear in a pop-up dialog in Adobe Photoshop
I scanned through the software I cover to see which programs support these newly important fields and which didn’t.
Photo Mechanic – Supports Copyright URL, but doesn’t yet support Licensor and Licensor URL. Photo Mechanic’s lead developer Kirk Baker told me that his team is aware of the issue and is discussing potential solutions. Support is forthcoming.
Update Late April 2020: Photo Mechanic 6 now supports the entire Licensors structure, including Licensor Name and Licensor URL. See this post for more.
ON1 Photo RAW – Supports the Copyright URL field, but not the Licensor fields.
Photoshop – Supports both Copyright URL and the Licensor fields.
Adobe Bridge – Supports the Licensor fields, but not Copyright URL. Copyright URL is part of the Core Schema. What. The. Heck? I looked carefully. If I made a mistake, please let us know in the comments.
Adobe Lightroom Classic – Supports both Copyright URL and the Licensor fields.
Capture One – Does not support Copyright URL or the Licensor fields.
XnView – Does not support Copyright URL or the Licensor fields.
In sum, this is a zero-work thing. (Unless you’re using software that doesn’t support Copyright URL) Check your templates and you’re good to go. Depending on your software, “Get this photo on:” will either work now or be available to you later.
For website owners
What do those of us who operate “normal-size” websites have to do to make our web pages work with this new Google feature?
Not much.
Just make sure your website does not destroy metadata. Then Bob’s your uncle. Or substitute whatever cliche for things being hunky-dory you prefer. Regular readers of this blog probably already have their sites whipped into shape.
To make sure, just grab a photo that you know has IPTC metadata. Put it on one of your pages. Visit the page in a browser. Right-click and download the picture. Go to the IPTC’s online metadata viewer here, or from the link at the bottom of this page. Or use any metadata-capable program.
If the metadata is there, it’s all good. You don’t have to do a darn thing and you and your contributing photographers can rest easy.
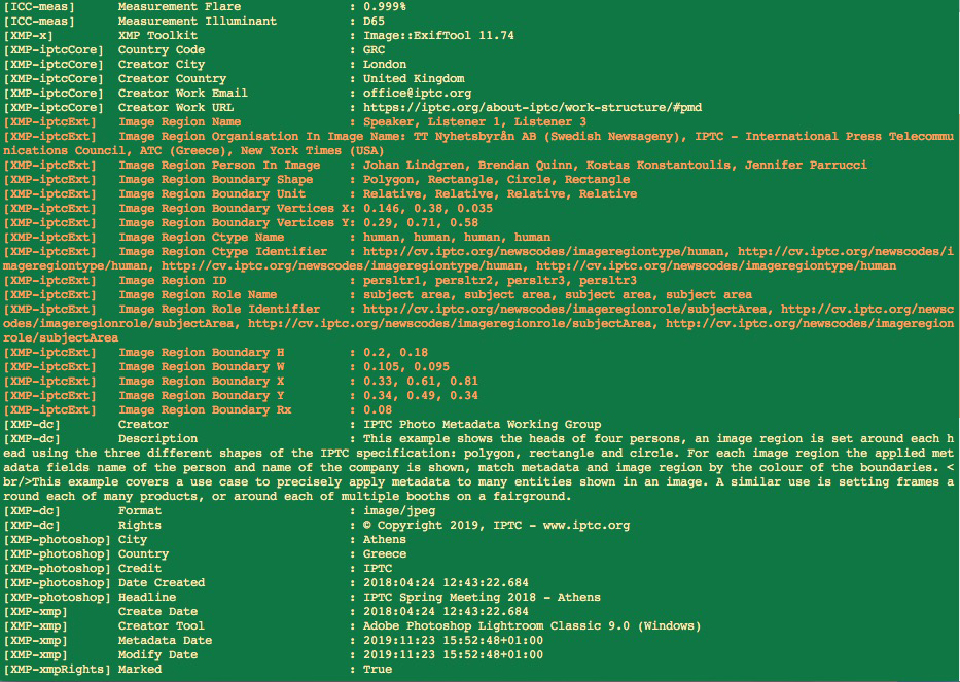
If you don’t have a marked-up photo handy, you can download the IPTC’s standard test image here. It has LOTS of metadata. I wouldn’t put it on a visitor-facing page, but that’s just me.
If your website fails the metadata round-trip test, the chances are it can be fixed in a jiffy.
Fixing websites that strip metadata
A plurality of all websites (some 35% of the entire web) run on WordPress. WordPress will use the imaging library ImageMagick if it’s available and has been enabled in PHP. Most WordPress hosting services offer ImageMagick. By default, ImageMagick supports metadata.
Turning it on is incredibly easy, but the exact method you’ll need to use depends on your host. Some hosts have easy-to-follow instructions in their documentation. For others – most of them, really – you just contact customer support via chat or phone and they’ll either tell you what to do, or more likely, just take care of it for you. Problem solved.
More and more WordPress hosts are enabling ImageMagick by default. If your host has already hooked you up with ImageMagick, we don’t need to be having this conversation. But props to your host!
The “other choice” for WordPress sites is an imaging library called GD. GD ships with PHP and is used if ImageMagick isn’t there. GD strips metadata. Currently, GD is at version 2.25. Support for metadata is on the roadmap for GD v2.4. When that day comes, it will be good news for content creators everywhere. But it might be a while.
Big sites
Many big websites use the Drupal CMS. Drupal users need only install a couple modules and they will be able to choose their imaging library in Drupal’s GUI. That will take a good healthy three or four minutes. The hardest and most tedious part by far is reading my How-To post on the subject.
Super-fancy, custom-built websites, like the big news sites, may use any imaging library, but the chances are pretty good that a given site uses ImageMagick. And ImageMagick has likely been told to strip metadata. If that’s the case, it’s as simple as telling it not to by deleting an argument. Obviously, that’s a developer thing. And nobody is going to change a live server absent a pretty good argument for doing so. But when it comes down to it, it’s not a big deal.
If your website is static and your images are processed externally from your site and you have metadata stripping going on, just tell whoever or whatever is doing the stripping to stop doing that!
Another way to trigger “Licensable”
You can also enable the Licensable feature on your page itself, with schema.org structured data. This is a page-by-page and image-by-image thing, and you have to do it, as opposed to just letting Google parse the embedded metadata from your images. That’s a lot more work. Structured data is able to override embedded metadata, so that might be a reason to go that way.
Photographers and website operators alike – when should we make ourselves ready?
Well, right now would be good.
Seriously, we’re only being asked to do stuff we should already be doing anyway. All we really need to do is check and make sure our metadata templates are in good shape if we’re photographers and make sure our website is behaving as it should if we are website operators. We should check this stuff periodically anyhow.
Google says that Licensable should be up and running by late April, 2020. The more compatible content we have up before then, the better.
Will I zoom to the top of the SERP?
Google is saying that participation in Licensable will not be a ranking factor. That makes total sense. Right now there just isn’t enough properly marked-up content out there for Google to use as a basis for judgment. That said, in the long term, doing stuff that Google asks us to do is usually works out to our benefit.
Google has once again moved a step closer to a better world, where images are more likely to retain the information that makes them relevant to society. It took a bit of a lawsuit nudge to get Google’s heart in the right place, but no matter. Their momentum is in the right direction. Will it all help? Let us know your thoughts in the comments!
The IPTC has released the IPTC Photo Metadata Standard 2019.1 This new version of the fundamental standard for descriptive embedded metadata features Image Regions, which users, particularly including application developers, can use to define an area within an image.
Let’s say you want to tag faces with names that your AI recognition software assigns to them. To do that, you’ve got to carve out a shape in the photo and tell your program - and the rest of the world, ultimately - just what is depicted within that area of the picture.
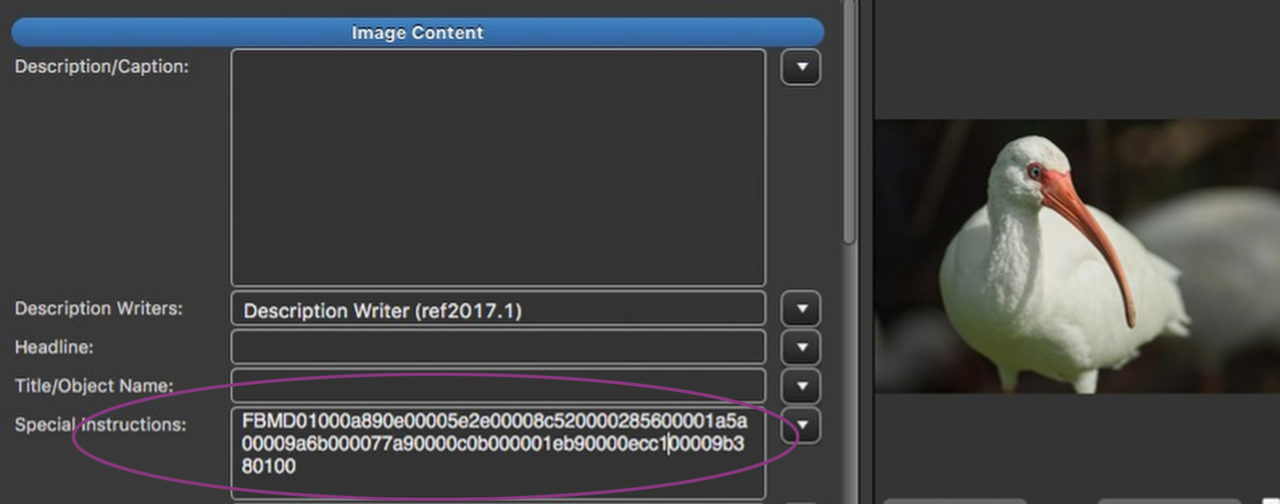
A nefarious metadata plot has been unearthed and news of it is streaking around the interwebs. An Australian law student named Edin Jusupovic was casually looking at photos downloaded from Facebook in a hex editor and tweeted about what he saw.
And from there, as they say, the rest was history. When last I looked, Jusupovic’s tweet had been retweeted 16,637 times, there were nearly 2,000 mostly clueless replies to his thread, and no less a journalistic standard-bearer than Forbes had weighed in: “Facebook Embeds 'Hidden Codes' To Track Who Sees And Shares Your Photos”, cried their headline.
How do you deal with photos that come to you with no metadata? If you watched my videos on preparing images for the web, you may have noticed that I said that "I tried to make the demo images look halfway professional.” Most of them had embedded metadata, in other words. You may have cried foul. “None of my [insert adjective] clients ever send me pictures that are labeled in any way!”
We can deal with that. We can slap on some metadata. To our optimizing for the web process, we’ll just add a step to apply the metadata that should have already been there. But we’ll only add seconds to the amount of time it takes. We’ll invest some think/plan/learn time now (again) and the physical process will go by in a blink.
Camera Bits has released version 6 of Photo Mechanic. Version 5 was released way back in 2012. According to Camera Bits’ Director of Marketing Nick Orlowski (sp?), there have been 43 updates to Photo Mechanic 5 during its six-year run. Many of those updates introduced new or refined functionality. Clearly, Camera Bits isn’t pestering their users for upgrade fees every time we turn around
Camera Bits has lowered the price of a full Photo Mechanic license by $11, to (USD) $123. The upgrade fee drops by a buck, to (USD) $89.
So, what’s new in this long-awaited new version of Photo Mechanic? I’ll go over some of the high points here.
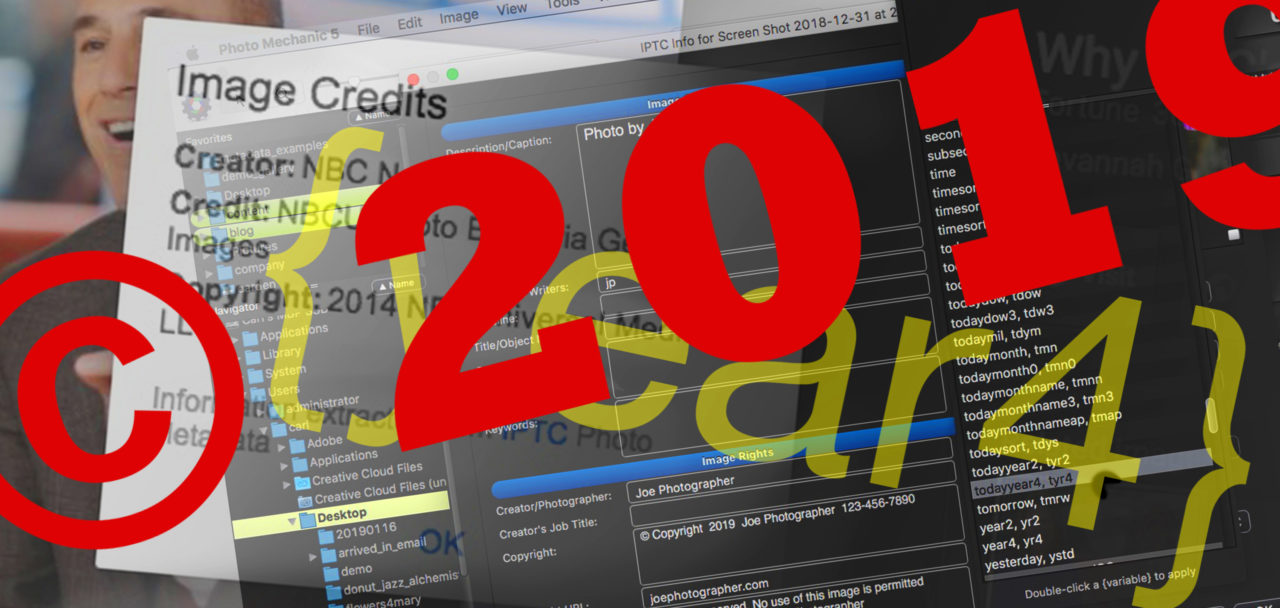
Have you advanced the year in your copyright notice? As I write this, the new year is a couple of weeks old. That’s about when most photographers start to feel a slight gnawing feeling that maybe there might be something they’ve forgotten.
So, go increment your copyright year while it’s still early enough to pretend that you did it in time for your first assignment of the new year.
Users of Photo Mechanic don’t have to go through this copyright year nonsense. In Photo Mechanic, you can just put a variable in the copyright field in your template. The variable will fill in the copyright year when you apply your template. And you don’t have to worry about it anymore. Ever. Again.